No spark? From 1989 to 2004 Suzuki Sidekicks, Trackers and Vitara’s
See the no start page for a fast spark audit.
Index:
- G16A, SOHC valve spark. Early 1989/90
- G16B early (per 1996)
- G16B, SOHC 16v OBD2 (added CKP sensor ) 1996 and newer.
- All COP engines. V6 shown. also same for 2.0L I4’s and the 1.8L I4:
- All 1.8L and up, CMP and CKP sensor facts. J18/20 1996 to 2004
- See my simple bench test video of one type of CMP hall sensors.(can be done on car, unplugged & cranking the engine.)
- See the CKP scope signals? and rules here? lots and lots of rules.
You tested for spark first here using the tried and true way.
USA centric, other counties the ignition can be different!
1989 to 1998 1.6L and up to 2005 on all 1.8L to 2.7L C.O.P coil based engine. Coil Over Plugs.
I try here, to cover all generations in the year range stated!.
The Ignition parts slide show.
STOP and do the ECU Diagnostic first, Please!
This page attempts to cover 5 generations in 15 years span.
If spark is bad, all ECU’s Cut Fuel injection!
Spare design evolution is complex, over 5 generations of radical changes.
Hints (top errors, to not make)
Do not do or forget:
To check all fuses!
Fail to check spark at each spark-plug and at the coil. (this combined information can save you lots of time)
Fail to discover the timing is way off and 100% proof the cam belt slipped. “a timing light is only $20”
Read the Haynes books, the data on distributor rotations is wrong.
Forget you can check for spark with the timing light cranking, and see the cam has in fact slipped.
Pull the distributor, unless you learn how to re-time it from scratch.
Fail to see if the Cam is actually spinning! LOOK!
Fail to look for shorted spark plugs all 4 or 6 of them. for Fouled but they should look GOOD.
Fail to look at the factory dash tachometer, and see that it moves to 400 rpm (or tad less) cranking, No? then Igniter is dead.
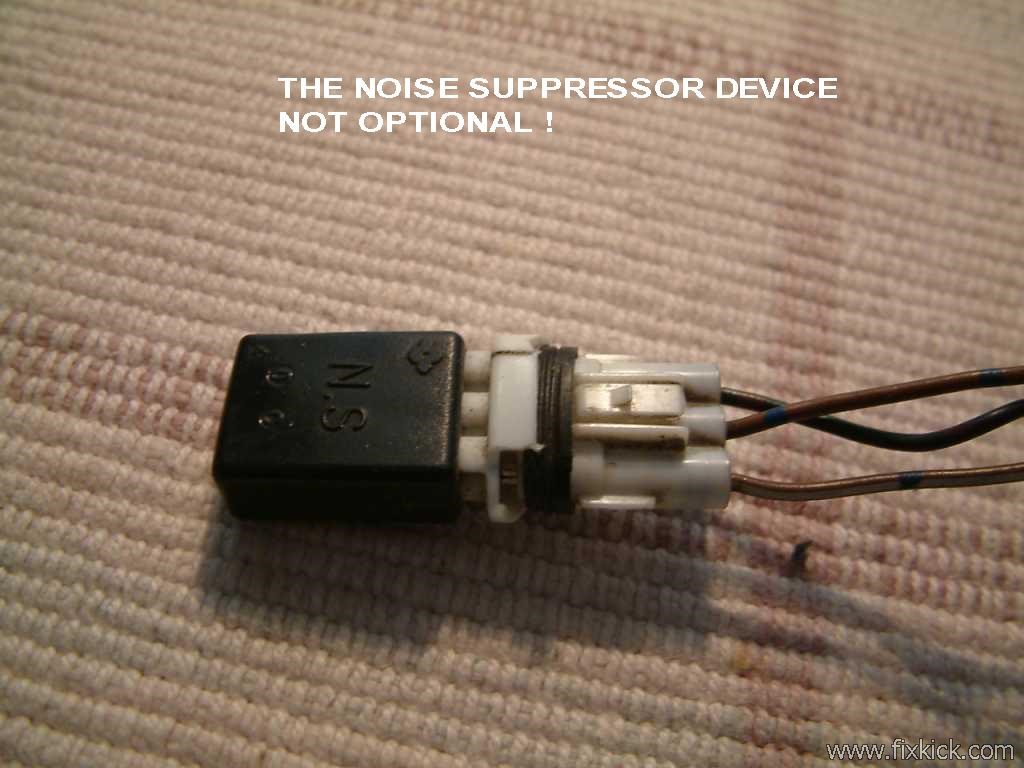
Fail to make sure you didn’t loose the Ignition suppressor module, no Tachometer cranking, and loss of injections as a result.
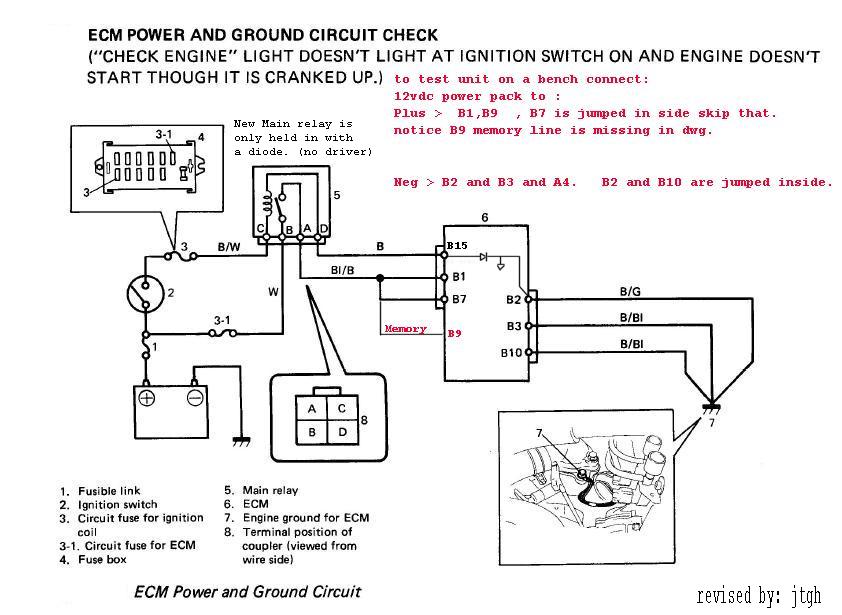
Fail to have ECU power, and grounds to ECU and distributor. per this ground check page.
Tools: a Timing light, if no timing light? your efforts are wasted, IMO!
Top fails /issues are:
- Fuses must all be good, there are 3 fuses for ECU and COIL.(see fuse maps here) IG-coil, Dome, “FI”
- Timing belt slipped or snapped ( is cam spinning cranking? ) look down oil fill hole. See cam spin? no? If not, you have discovered your problem.
- Gross neglect of Distributor cap-rotor-wires-plugs ( called a tune up ).
- Top diagnostic error?, not checking Ignition timing for near TDC firing and missing the fact, that the cam timing belt has slipped!!!
- Rotor installed in the wrong position of 3, USA rotors can not be done this way, unless you buy fleabay China knockoff noname JUNK.
- Dead battery below 12.6vdc. ECU dies below 10v. (try to stay above 11v at all times, at the ECU)
- Not checking all 4 spark plugs for spark and if all 4 spark plugs are bad, checked directly at the coil. Possible on all years!
- Not checking the firing order of the spark wires ( “THE HAYNES RAG”, has this WRONG!) use mine.
- Not realizing the 8v and 16v Distributor rotors, spin in opposite directions.! (the Haynes shows this wrong.)
- Not doing the ECU LIVE DIAGNOSTIC CHECK below!
- Ignoring the DEAD CEL lamp and not checking the ECU for code 12, cranking. 12= OK.
- Not checking for DTC code 41 or 42 cranking for 10 seconds. or code P0340 on OBD2 cars (96+)
- Do not forget you can move the COP coils, to see if the misfire follows the COIL.
- Why are you working on any 1996+ or newer car with no full scan tool, huh? $78, and it is yours.
Check for spark all 5 places, (4 on Sports) each spark plug and at the COIL directly ( keep hands off ignition parts while cranking or get HIT hard)
You are certain that you have no spark at the COIL? now, but are you sure your Distributor rotor, is spinning?
In 1996+ the coil was moved inside the Distributor and is tad harder to test.
96+ So. use spare spark wires to test it. Use clip on the end. and new spark plug on the other, gapped to.028″
Do not gap this generation car, spark plugs over 0.028″ ever. Do not read gaps on spark plug boxes, ever!
Jargon used on this page.
CKP = crank position sensor. (antique name CPS, crank position sensor, I will not use the name CPS) The CKP on our cars is the VR coil type.
CMP = Cam position sensor HALL (on some cars it can be called CAS, cam angle sensor as found on 96+ 1.8L and larger engines.)
CAS = Cam Angle sensor (I will use this term only on 1.8L here)
VR = variable reluctance sender used with integrated igniter (89-90 only in USA and old Samurai)
Igniter, is a transistor module that turns on and charges the Induction COIL, and then releases it for the induced high voltage spark.
Suzuki moved the ignitor 6 times. But most Suzuk’s the ignitor ended up inside the COP’s.
COP = Coil over plug, one spark coil per spark plug.
Hall sensor, is a sensor that has coil and an amplifer all in one device, that is super reliable and needs no tuning (timing maybe up to 2001 or so) and has perfect 4v square waves outputted.
Coax= a shielded cable that allows the very tiny VR sensors signals to make it from the engine bay all the way to the ECU and still be viable signal, for sure cranking.
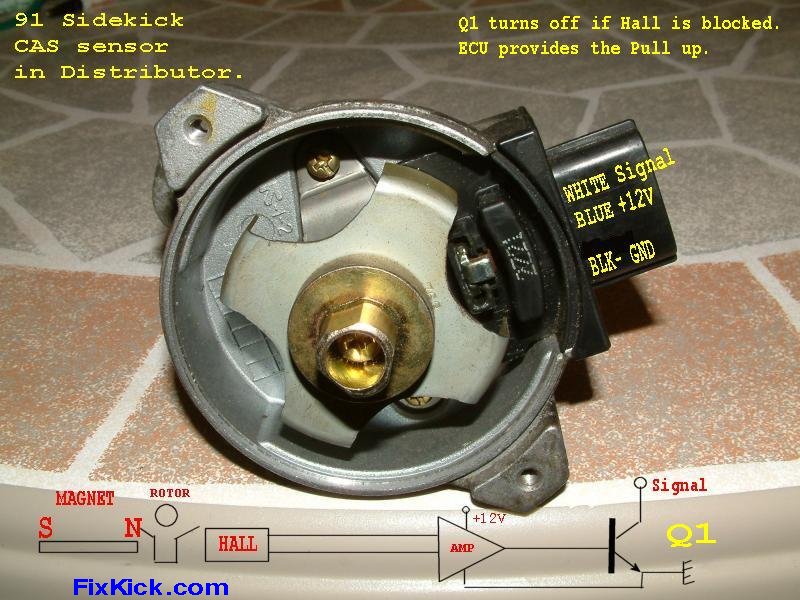
1989/90 Distributor issues:
First off, this Distributor (advance) works just like a 50,60,70s Chevy, it is 100% pure mechanical, the ECU does NOT MAKE SPARK! <read that 2 times…
However the ECU does monitor (watch) the Tachometer line (brown wire for loss of primary spark signals and cuts fuel like they all do all years, when the brown wire goes dead.)
The ECU can not see, the loss of high voltage spark, not at all.
If you have an 1989/90 SideKick/Tracker.
89/90 :! No ECU needed for 89/90 Sidekicks to make spark! see end of page!
You can unplug the ECU and crank the engine over, and get spark all day. (but sure, no fueling happens)
It has a Vacuum advance, that can jam.
It has a mechanical advance, that can jam.(rust happens, just like in 1950, in the same exact ways) Same with its Vacuum Servo mech. advance.
It has a VR (variable reluctance) sender that needs to be gapped.
This is a pick up coil, or just a simple magnetic coil that senses a very weak signal and then sends that signal to the Igniter module, near by, #7. (you need a scope to see it.)
A high fail rate Igniter and VR sender. (likes to fail hot or random cut outs)
However 89/90 ECU does monitor spark! DTC 41. (diagnostic trouble codes)
The 89 has no DTC 42 codes, CMP started in 1991 and remains until today. (and in 1996 became P3xx DTC error codes)
Crank engine with Diagnostic jumper(fuse) in place for 5 seconds, see if code 41 throws.
If yes? Loss of spark, or a bad Suppressor module, bad coil, no power to coil, bad gap, bad VR, bad Distributor.
If you don’t have a scope, you will be hard pressed to fix this Distributor.
Click to zoom 89/90 Distributor (slang for distributor) drawings, below.
That crappy 89/90 distributor.
- Loves to die, due to VR bad, or the electronics module next to it or the Igniter next to them. VR gap must be.008 to.016 inches.
- Love to heat soak fail! (many newer cars with a CAS (cam sender up top) for same reason, heat soak on 1.8Liter and bigger motors)
- The Advance plate, can stick wide open, making person and motor quite crazy. Use the Strobe timing light to check static and advanced timing.
- The ECU monitors the spark and will show code 41, cranking, after 10 seconds of cranking ( diag jumper inserted) Don’t fail to use this powerful tool
- Has Vacuum advance that can fail and diaphragm that can rupture and leak.
- This Kick motor will MAKE SPARK, with no ECU in the car (removed) The Distributor is Stand alone. (but you must keep spraying test fuel to keep motor going, with no ECU)
- Grab the top shaft there, inside the Distributor and wiggle it hard, does the VR gap change, yes? Well, time for a new rebuilt Distributor or new bearings.
- If I had this Distributor, I’d dismantle it and clean and lube the advance weights day 1, and put on a new fresh Vacuum advance. or buy the CARDONE. (link above)
- If spark keeps going bye-bye, at odd times, buy a new Distributor, or rebuild it totally but the CARDONE is cheaper that any DIY rebuild, the tiny parts are very expensive.
Main Induction SPARK Coil primary is 1.5 ohms, secondary about 12,000. spark wires,will measure 6.5k ohms per foot max. (OMG put in NGK blue mag wires, and don’t mess about)
VR = variable reluctance sender.
Tools:
Harbor fright (pun) sells a Strobe light for a lousy $20, how can that be cheaper.? Mine cost me $400 in 2014 price adjusted dollars. back in 1980. (I have a modern, dial back tool too)
CHECKS! TO DO:
Cam not spinning? look down oil fill hole. Ignition timing way off (strobe light?), then the Timing belt stripped.
A snapped /stripped out timing belt.
This first section applies to 1.6L engines, see comments for 1.8L Sports that have COIL ON PLUG, “COP”.
 Wide gap tester only works on 1.8L and 99 and newer cars. Use a real spark plug on 1.6L (89-98)
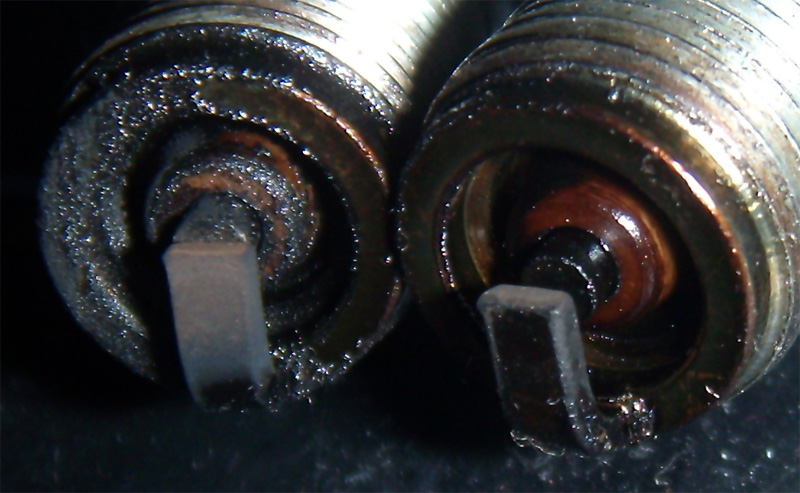
Always use a fresh new spark plug to test for spark, any heat range is OK, but it must be never ran in an engine and must be gapped
to.028″ (AKA: “28 Thou”,we call that), Never use post 99 large gap plugs or other 4J type plugs on 89-98 Kicks. It WILL MISFIRE.
I call this the rubber meets the road test, no fancy, hard to interpret, glow plug testers to confuse you.
Always check each spark plug wire tip for spark, then directly at the coil if any Plugs are dead/weak. 89 -95.?
96-98 1.6L has a hidden in “Distributor” Induction coil and is tad harder to test it, so just check each of the 4 HV wires for spark.
96+ 1.6L ( all 4 spark plugs dead)
If you are patient, you could take a old spark wire/with spark plug boot, attach an alligator clip at the other end and attach this
clip to the coil top tower post, inside distributor, (cap and rotor removed) and test spark plug at the end.
Then cranking and looking for hot fat blue/white spark. Charged battery to 12.6v.
BTW: If the rotor is put on wrong or the dust cover ( it’s not really a dust cover) is missing or cracked the spark will cross fire or misfire.
If you run this distributor set up in this way you risked destruction of the CMP, Igniter, or ECU. $$$$
This condition will be seen as spark missing on some spark wires. (new wires and sparks (tuned up)
Never allow the low voltage parts come into contact with the High Voltage parts. Do all you can do avoid that.
Clean it too. Clean the parts well all the insulating parts. Dirt conducts, at 50,000. Volts. Sure does.
Do not run the Distributor with the dust cover missing. Do not.
1.8L Sports / 2.0L and newer DOHC motors?,just pull the COP and insert a test spark plug, with the shell grounded to the valve cover.
COP is also called DIS, for Distributor LESS ignition systems found on 96 and newer 1.8L SPORTS and all 99 and newer USA cars.
TEST #1 ( never touch these parts when running or cranking, the voltage is very painful and risky your heart.)
The Spark tests ( best is to do each spark plug and coil if you can?)
Just pull #1 spark wire at the spark plug and connect a known good plug to the end of said wire, with the shell of the spark plug, touching the valve cover.
Have someone crank the engine and check for a fat blue/whit spark. (works on COP’s too)
IF COP car (no, not police) repeat the above on all 4 spark plugs plug units.
If this first plug fails, immediately remove the test park and spark wire and move it directly to the Coil main High Voltage (HV) terminal.
Yes, remove Distributor cap center wire to COIL. ( On 96’+ with coil in “Distributor” base) make up a test connection to the hidden coil.)
Pre 96 configuration:
Coil on firewall, HV spark cable to Dist. CAP and Distributor cap wires to each spark plug. HV= High Voltage.
Remove #1 spark wire from top of spark plug (twist the BOOT first, gently, then pull the boot, or you may wreck the wires)
Insert a new spark plug into the spark boot of this HV spark cable end. Any new spark plug will work “J” plugs that can be gapped at 0.028″
On the early 89 to 95 Sidekicks only a few things must be good, to get spark.
Keep in mind 89/90 have an integrated Distributor with CMP and Igniter inside and has old fashioned, mechanical or vacuum advance inside.
Starting 91 the ECU now does all spark generation, the advance, and the Igniter was moved to the outside of the Distributor near the coil.
In 96 the igniter is moved back in to the inside of the 16v Distributor body. (USA rules) [ not 1.8L COP SPORTS]
Components are the same but there locations vary by year. ( the 89/90 as a magnetic VR (variable reluctance) device that generates spark directly)
Coil, Igniter, CMP (later called CAS), ECU. CAS/CMP is the CAM angle sensor in the base of the Distributor.
Starting in 91 the Cam turns, the CMP pulses, the ECU sees this pulse and generates a spark signal and sends this signal to the Igniter and then the Igniter powerfully pulses the induction coil and spark happens.
ECU LIVE DIAGNOSTIC TRICK!: 89-95′
The ECU has 2 secret test tricks to discover a bad CMP and or a bad Igniter. Special DTC 41 and 42 (91-95)
If you have no spark, you can install the DLC diagnostic jumper and crank the engine over for 5-10 seconds. DO NOT KEY OFF. crank for 10 seconds to be sure.
Release the key to ignition on position and look for CEL flashes.? DO NO KEY OFF! yet.
(if the CEL flashes are not 12,41,42, then pull the dome fuse for 1-2 minutes, put back and repeat this test) Dome fuse pull kills all ECU DTC memory storage.
The ECU looks at both the Ignition signal and the CMP signal, during this 3 second test. I do the test for 10 seconds to be sure. Never move.
If you receive any of the 2 codes below, then you have discovered the failure.
Code 12, OK, no fails.
Code 42 says the CMP signal is faulty. 91-95 P0340 fails on all 1996 and newer cars. (no diagnostic jump needed on 96+ but a scan tools is needed)
Code 41 says the Ignition failure.91-95 ( bad Coil or bad Igniter bad suppressor but on 89/90 bad distributor electronics.) (P030x, in 1996+ cars)
The ECU tries everything it can do, to make spark 91-98. Almost all sensors can be dead and the spark will happen (except the CMP).
You don’t even need a starter motor or start position or ST signal to start the car, you can push start, the car and spark will happen, due to CMP spinning.
If CMP happens, the ECU generates spark during cranking.
On 89/90 years, the distributor is stand alone and makes its own spark (with external coil) the 80/90 needs no ECU to make any spark.
How ever, the 89/90 can report spark fail 41.
Keep in mind, if the ECU throws a code, and the failure has been corrected, you need to clear the code by removing the DOME fuse above your left (USA) knee.
The Dome fuse is the memory power to the ECU.
Pulling this fuse, erases all DTC fails from memory. see fuse panels at the end of this page.
Pulling the battery will mess up radio (audio), alarm, and other fancy electronic options added to car the last 15 years. Don’t do that.
Rarely does the COIL or Igniter fail on old 91-98 Kicks. very rare but on 1.8L the CAS loves to fail and fail hot. ( hot soak no starts, are classic this car 96-98)
If spark is good and DTC 41s throw (flash), the Ignition suppressor module is bad or loose or just fell off (not good the latter).
For COP type engines (1.8L). just move the coils around to see if the problem of now spark follows the suspected coil. Swap coils.
On all 96 and newer cars the ECU will log a pending or full DTC failure of P030x for bad spark or compression or bad injection. So called Misfire. “A scan tool is a must”
89/90 the Distributor VR sensor and Igniter love to fail. ( no spark at all or flaky)
96-98 Sport 1.8L love to have bad CAS,CAM CMP sender. (and heat soak issues) Mark it before removing it.
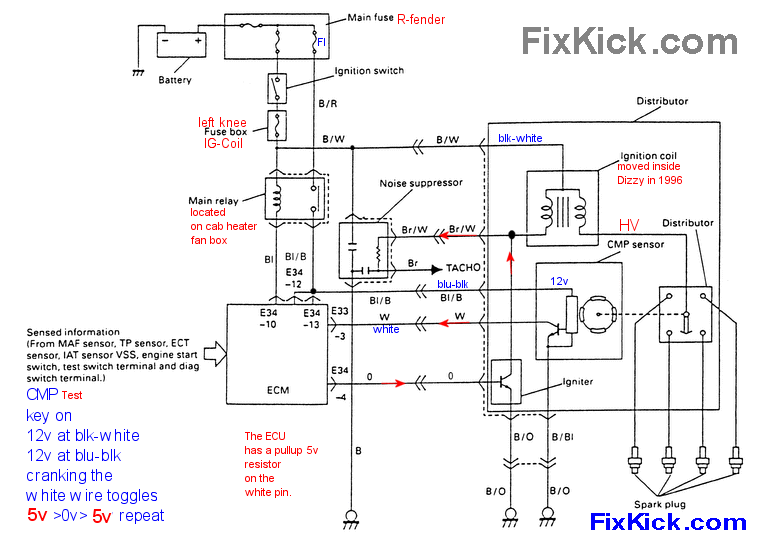
CMP tests! (in the base of the “Distributor”, DTC code 42 fails) 1991-1998 (89/90 has no CMP, but has VR integrated Igniter)
DMM = Digital Multimeter. DSO = Digital Storage Oscilloscope or just Scope it.
Do not delay with tools, set your DMM to 20 volt range connect the minus lead to the metal of the engine. (or use DSO)
Connect the Red test lead of the DMM to the distributor white wire side connector (91-98,8v or 16v) (do not remove the connector,just back probe it)
Key on, and crank the motor, the DMM needle will swing from 0v to 5v and back to 0volts for each fining of each cylinder.
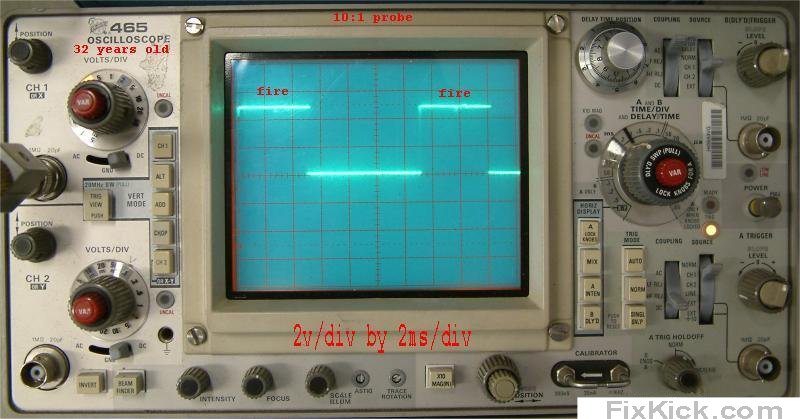
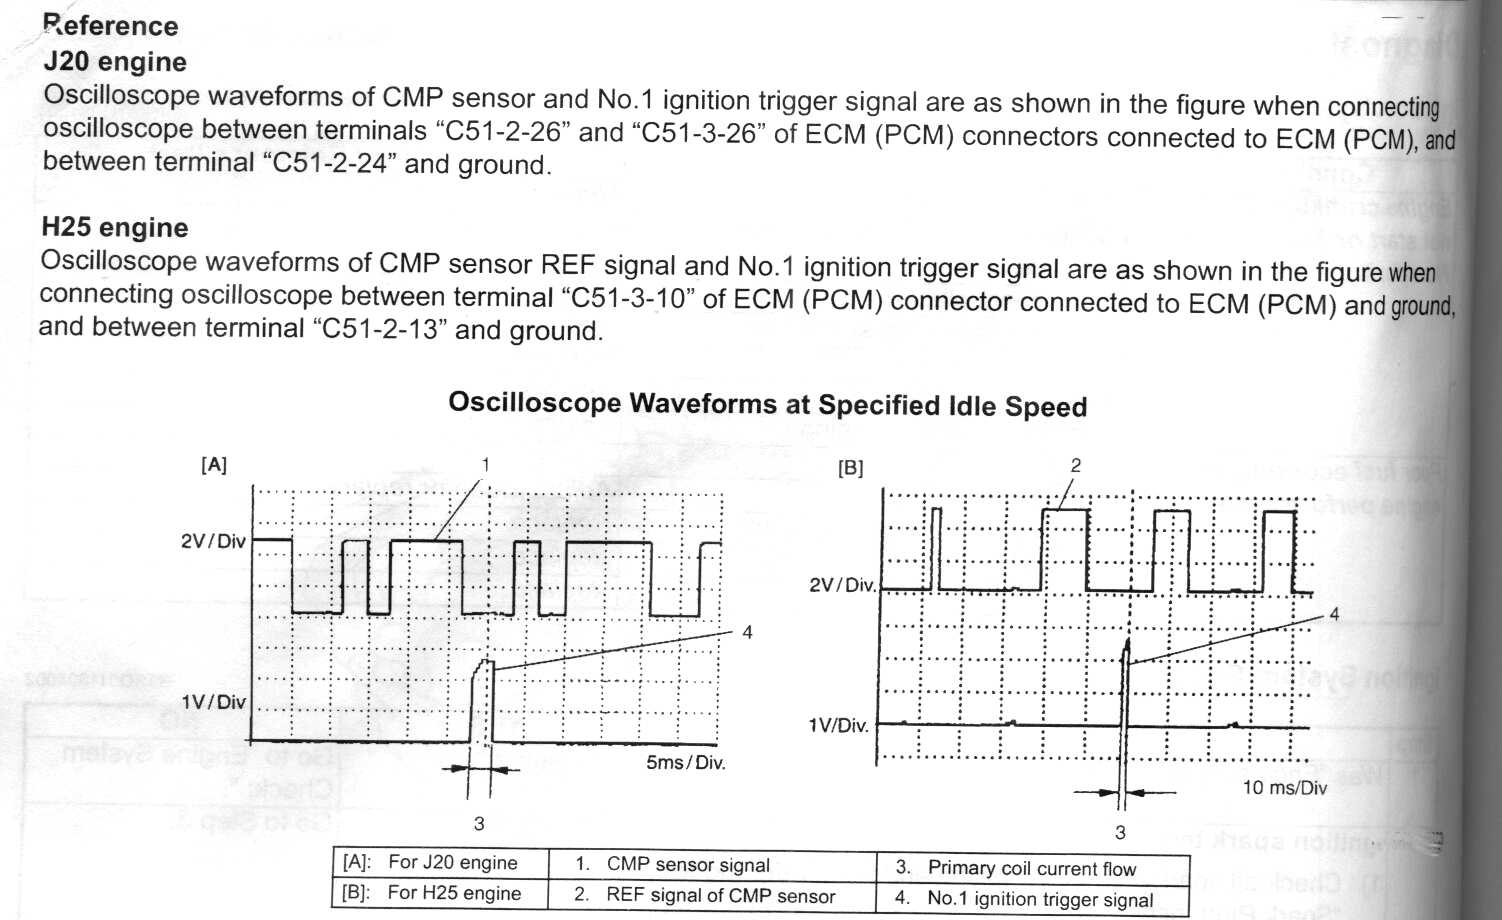
The CMP generates a nice 5vdc square wave as seen on a DSO, see photo of DSO below.
If you want to back probe the ECU these are the pins:
8 valve ECU pin A13 is the 16v CMP input pin.
16 Valve engine, this pin becomes the B3 pin.
If your car is a 1.6L 1996-98, the crank sensor will not kill spark but will throw codes if it does fail.
The CMP Acts just like a switch, open and closing. The ECU pulls the voltage to 5v (via ECU internal resistor ) and the CMP only switches this signal to ground.
There will be no spark or fuel injection, when the CMP goes dead for any reasons.
It must be grounded at the connector, it must have 12vdc at the connector.
Supporting documents.
Schematics
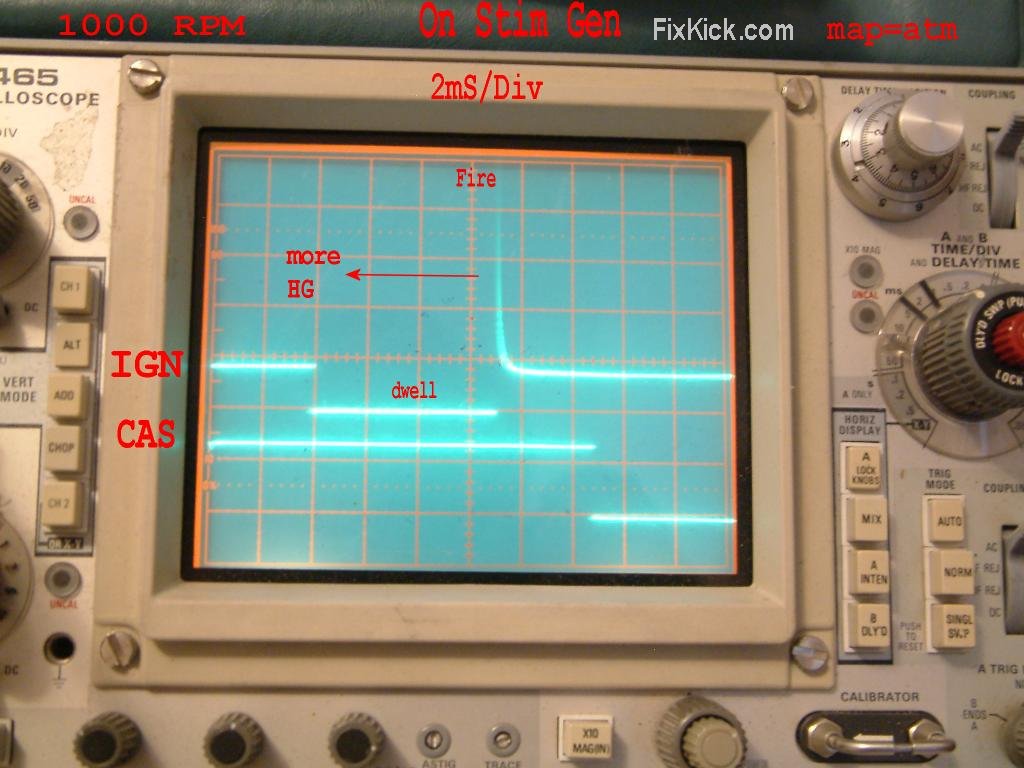
Click to zoom DSO photo below. (same wave form for 8v and 16v distributors, 91-98 only)
Below is actual 1991 8v G16 engine. This is input to ECU. If this dies (rare) spark ends.
We now cured the code DTC 42 failure, and if you still have spark failure, continue to the next frame below.
TESTING THE Igniter AND THE COIL SIDE, for spark loss.
The Igniter on all cars moved to many places in time, first the Distributor, then the Fire wall, then to the ECU internal. In all cases, it’s just a power transistor.
Some engines have COPS, and the Igniter is inside each COP. (coil over plug)
Suzuki spells this as “Igniter” I’ll try to follow their lead.
Next I will show you how to test the Igniter / Coil and actually make and see spark.
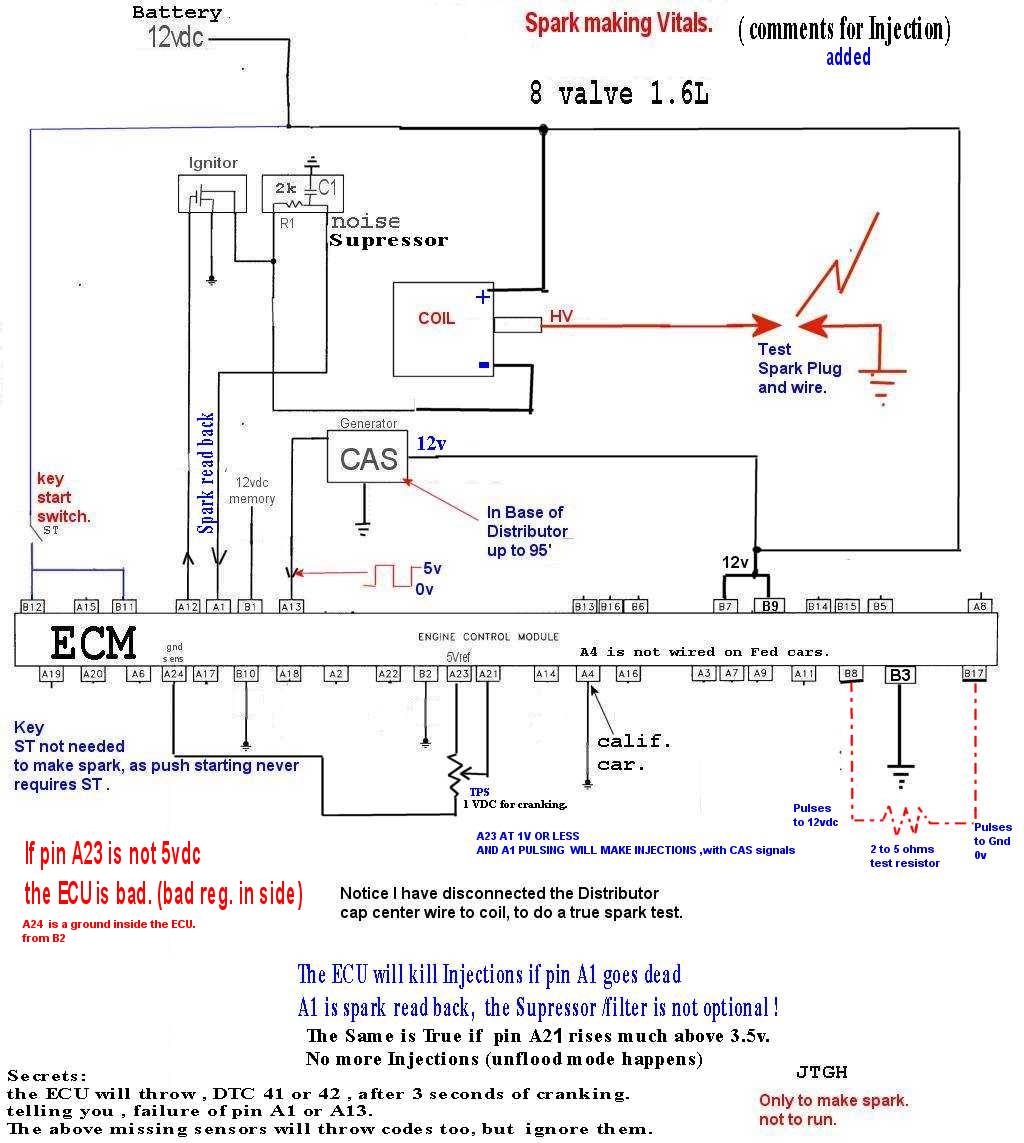
First the 91-95′ 8v uses pin A12 as its Igniter driver pin at the ECU.
The 92-95′,16 V Igniter uses pin is A4 at the ECU.
The secret here, is that the Igniter input gate is a low impedance (resistance) pull down device and takes stronger currents to fire the Igniter.
I disconnect the ECU “A” (white for 8v) connector and then, I then take my 150 ohm test resistor and connect 1 side to 12vdc (cigarette light plug will work) and
the other side of this resistor, I touch to the A4 or A12 (as appropriate to 8v/16v valve type) pin of the ECU harness connector.
If your car is a 1.6L 1996-98, the CMP pin is E34 Pin 4, orange. (integrated Distributor coil/cap, Igniter and CMP)
This act, turns on the Igniter and the coil starts charging up.
I touch this pin and release it, on each release there will be full power spark out the HV tower plug on the COIL.
When you jumper this resistor ( pull up resistor) to the Igniter gate the Igniter turns ON.
Do not charge the coil for more than 1 second in 30 seconds as to not over heat your coil.
The ignition must be turned on at the key, but no cranking.
I place a spark plug and spark plug directly to the coil for this test. (I put my test spark plug, where i can see it from cab, grounded shell,of course)
If this test fails, the Igniter or coil are bad. (check coil resistances per FSM spec) the coil primary is like 10 ohms and the secondary is like 20,000 ohms.
The below photo is of the actual ECU Igniter driver signal on the pin, 0 to 3.5v is the signal.
The Igniter is just a simple transistor that has a resistor to the input gate.
I need to use a 150 OHM, pull up resistor to achieve the 3 volt drive signal.
The pin marked gate is what the A4 or A12 pin on the ECU drives.
I avoid connecting 12vdc directly to the gate, as this might damage it. (it’s expensive $ )
150 ohms has a color code of “brown, Green, brown” = 1, 5, 1 1 and 5 and 1 zero.
The below is the actual Igniter that I reverse engineered (hacked).
The signal is from a scope on a running motor. (my simple graphic) the The transistor below IS the Igniter (91-95) 8V
Note the pull down resistor at the gate! the resistor keeps the transistor off, this pull down protects your coil from burning up. if you accidentally unplugged the ECU with the key on.
The coil can not survive infinite dwell (charging) on most cars.! For sure all these cars.
Drawing of Igniter mounted to Fire wall ignition coil.
The signal below is the Igniter module gate signal. 1991-98. (1991 actual, (I have 3 lab scopes)
The Igniter, is just a simple TRANSISTOR with a default pull down resistor, so it can not, by accident turn on and burn up a nice ignition coil. (the coil must never be on full time )
The Igniter charges the coil, then release it and INDUCTION happens (read Mr. Tesla’s works)
 , maximum.
My test resistor (166 ohms is max) I use a 150 ohm test resistor will flow 1/8 watt or more is ok.
A 1/8 watt 150 ohm resistor is all that is needed costing 3 cents (wholesale). Radio Shack has then for 50 cents.
One can use this 150 ohm resistor to test the Igniter on the car.!
If you have spark now, using the above test and the last frame (chapter) test for the CMP passed and you still don’t have spark the ECU is bad.
If you have spark and you get code 41s, your suppressor is bad or missing. Engine my start and immediately die in the fail mode. and throw 41s.
Code 41’s like All injections FAST, by ECU programming.
Photo 2:
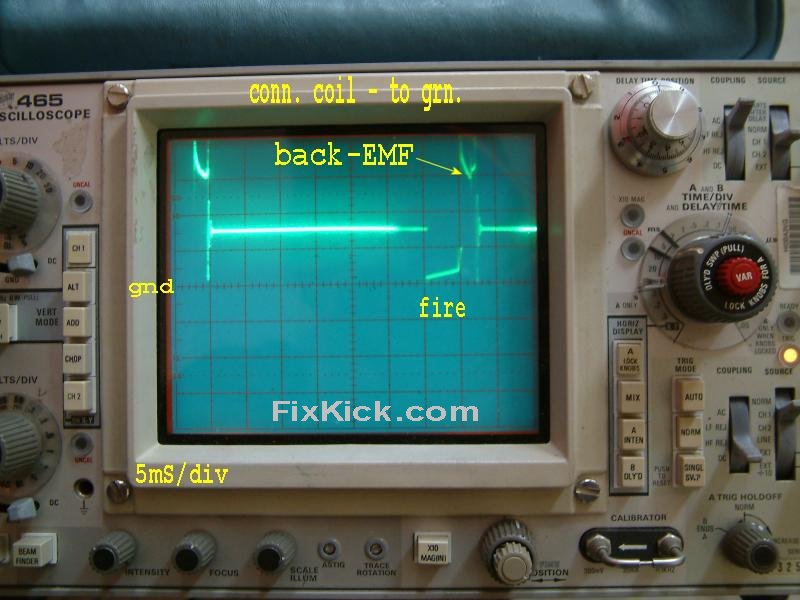
The output of the Igniter below is on the top waveform, coil MINUS. see that kick, the Tachometer runs off that KICK.
The bottom wave form is the CAS/CMP signal. (bench testing ) 1991 8v.
Here is one more photo of the Coil primary (minus lug).
ODD things. or the rotor is indexed wrong. (China clone rotors do that, never BOSCH or SUZUKI Mitsubishi parts)
If someone timed the Distributor, so that the rotor is firing between cap posts, and not aligned PERFECTLY with #1 TDC, then spark at the plugs will be weak or dead.
If the coil checks out with a fat blue/white spark (never yellow or orange or weak looking) then the Ignition is working. The car battery must be fully charged to 12.6v.
Look for bad cap, rotor, wires, plugs or grossly bad timing of the distributor.
Careful don’t get shocked, it hurts REAL BAD.
Test with hands in pockets, or be sorry. Electric shock is not only painful but dangerous, to your heart and can make you jump and get CUT REAL BAD!
Below are drawings of the most common Sidekick ignitions.
If all else fails to make spark, then the ECU is bad. but make sure all power pins on the ECU are at 12vdc, Key On. and all grounds are good.
8v only Power and Ground:
Drawing #1: 8v 91-95 only
OK Success you now have spark from the Ignition coil. So You do have spark, but maybe not at the spark plugs.
Now check spark at each plug.
if you do not have spark at the plugs, then there is only 2 possibilities.:
1: You need a new cap, rotor,wires and plugs ( this is called a tune up and these parts don’t last long, 50k miles is a good rating on wires, cap and rotor)
2: The Distributor is mis-Timed grossly.
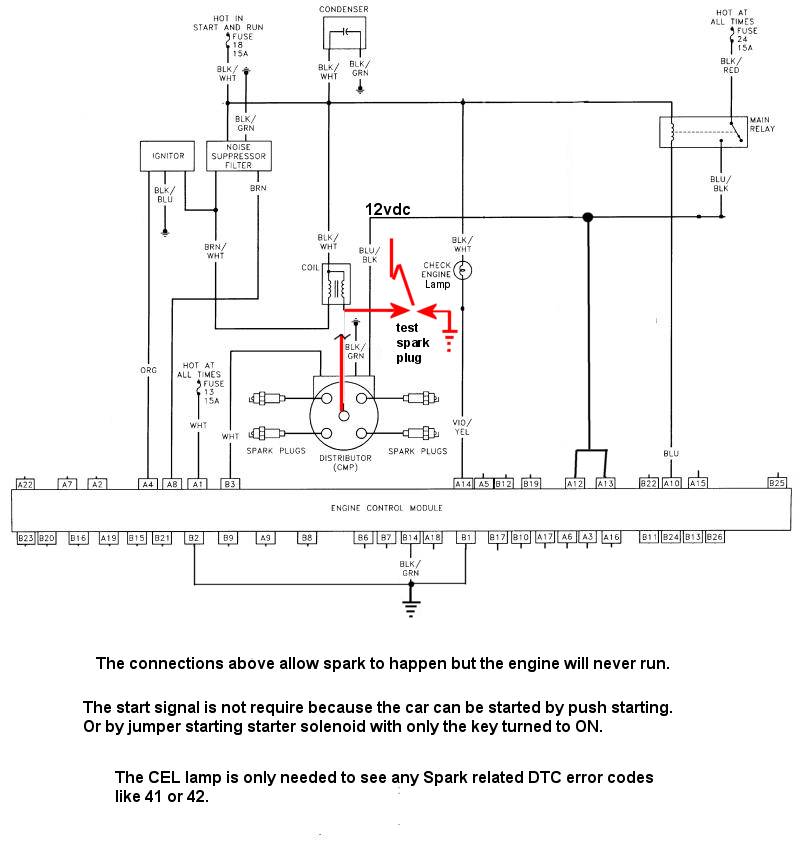
The below drawings demonstrates the minimum circuits needed to make spark, I may not show the fuses, but it does show battery. You do have power.
Always check spark under load, under the load of spark plug! or dangerous spark flash over can happen, shocking you or damaging the near by electronics parts.
My 8 valve Suzuki Side kick 1991-95, will spark all day long, with only these wires connected: This is called ECU Bench testing.
Drawing 2:
Next trick?
This is called ECU Bench testing.
if your car makes spark and then engine dies, after starting,then the spark filter suppressor is bad. (very rare). its just a 1000-2000 ohm resistor inside.
This device feeds back the spark signals to the ECU ( a monitor watches it) and if missing, kills injection of all fuel, or crash and fire safety.
16 Valve engine (92-95′): Drawing 3:
Note Spark plug connected directly to coil for a true spark test. If this test passes then reconnect distributor center lead and test each of the 4 cylinder plugs for spark.
The 92-98 SOHC 1.6L A new designed Distributor USA: G16 engine.
Note: Hidden COIL (induction)
One can do ECU Bench testing, if you create signals on the white wire the ECU will fire the Igniter transistor and the coil will charge and fire spark.
All you need is power to ECU (& ground) then your white wire pulses and you will see the Orange wire plus (O) called igniter drive.
With this simple diagram one can see how to do the testing, in the light of the above. (a scope at E33 White and E34 Orange will tell all you need)
All they did was move the Igniter to the inside of Distributor along with the COIL. ( the COIL is hidden in the bottle of the Distributor, not the cap)
Note the CMP sensor, does not drive the coil directly and only the ECU can make spark.
Keep in mind, each year 96-98 the ECU is vastly different [software wise ] (thanks to the EPA).
Note that the coil output can not be tested directly, easily, as the older cars could be done. but a test lead can be made up from an old spark wire.
An Alligator clip soldered to spark wire clip, then High voltage spark wire, to its spark boot then boot to tests spark plug. (3 parts) now you can test the coil output)
The Same OBD1, code 41 and code 42 tests work here too from 1992 to 1995 in USA.
On this ECU, I only need to make up a CMP HALL type (0-4v pulse) signal generator to pin 3 above. (white) and the bench tested ECU makes park (power wires with power to ECU sure)
The ECU cuts fuel if the brown wire goes dead. (spark read back pin) marked TACHO above. brown wire.
Photo 1: The 1996-98′ CKP sensor. CRANK sensor:
(oddly, it will not prevent starting, but will fail with a DTC code every time. and is used only to make spark more accurate! and for OBD2 misfire monitor, laws)
The EPA mandated this sensor, to the 1996 car and the 8valve TBI engine became illegal here (gone)
It is not a nice HALL sensor, it’s just Va R coil sensor, with 2 wire.
Warning: there is no pan gasket, here, starting in 1996, only a RTV glued on pan, if you put a gasket here (as seen in 1995 kits), the CKP goes DEAD (or misfires {far worse that})
The Crank position sensor. USA 1996 and newer. ( the tone wheel is behind the cam cog on crank, it’s now part of the cog in 1996)
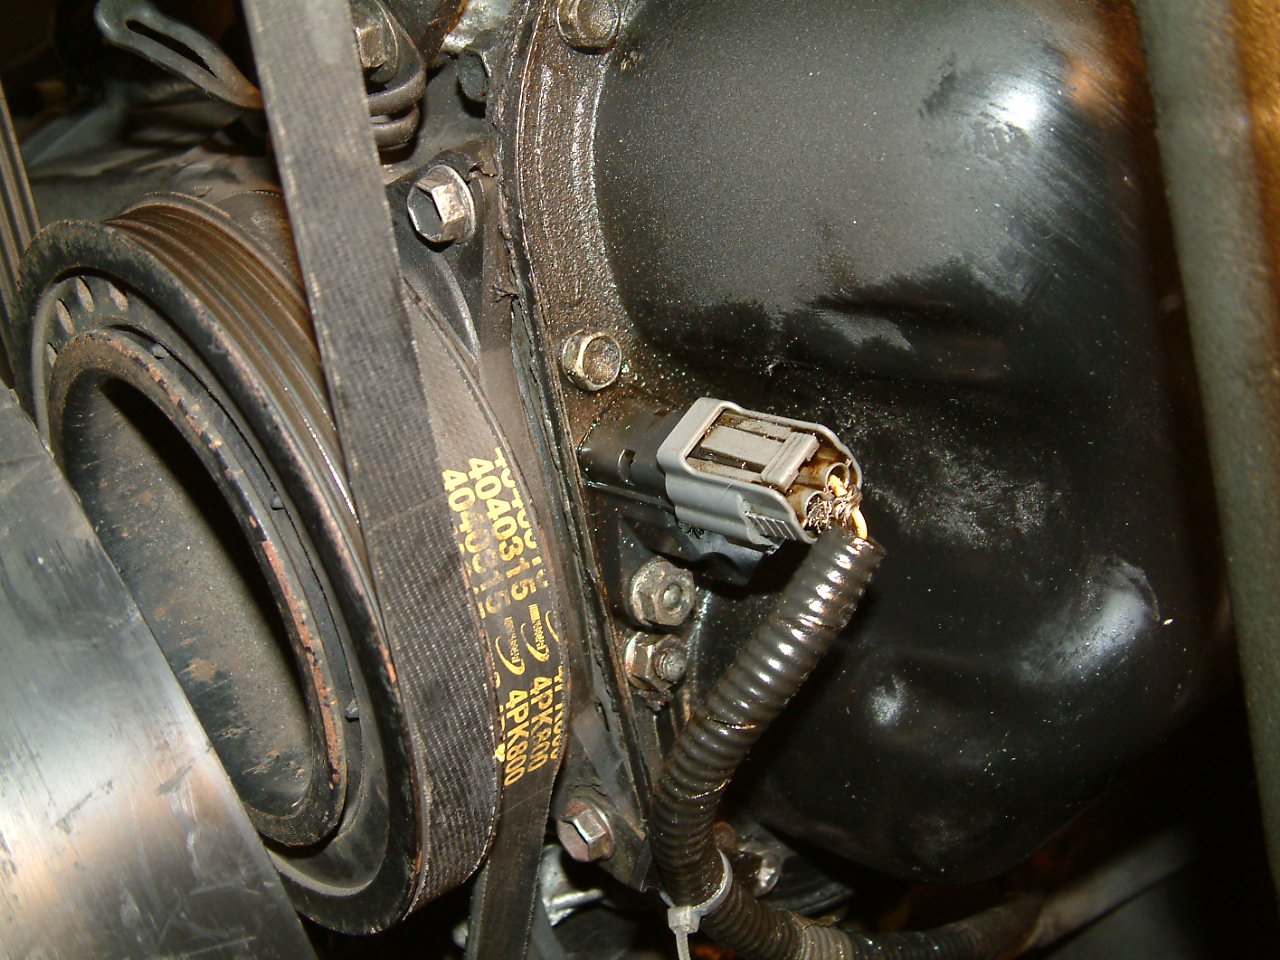 Click to zoom 96 CKP sensor. Crank position sensor
As you can see the 96+ cars have a Crank Position Sensor CKP (SAE name). ( if it fails, you will get DTC codes for this sensor, and the results my be limphome.) You will fail smog with the CEL glowing for sure.
This device is for the more accurate timing, necessary for the NEW EPA mandated Misfire P030x monitors,of OBD2.
Car will start up, and run, with this device unplugged, but timing will be jittery. (timing belt jitter is real! as all 1995 did.. 92-95)
The 96 car does use a CMP (inside the distributor) to make spark, but the CKP above, makes the spark dead accurate, they work together to make perfectly timed spark.
Keep in mind, a loose timing belt will make Misfire DTC’s throw and may make this sensor, CKP may show up as bad, when NOT. (think about the cam bouncing madly and the CMP?)
On this OBD2 engine we crank the engine for 5 seconds. With the scan tool attached, and see RPM rise to 300 RPM(about) if not CKP is dead and look for DTC P0340 or P0355 or near.
If the CMP CAM sensor is shown as dead by the ECU scans, the engine will never start.
A dead CKP, the engine will will start, but many OBD2 features, will be inoperative. misfire detection will be dead. (P0300,301, to 304 will be logically DISABLED)
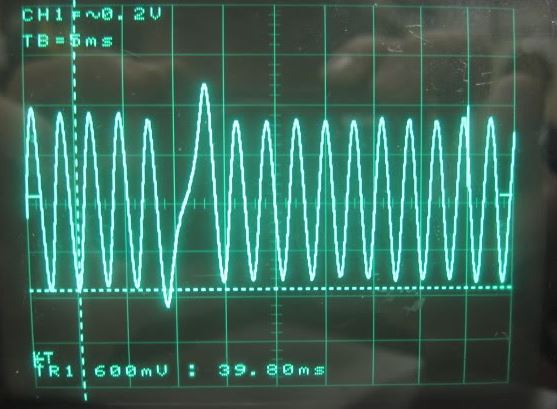
The below CKP is not a Suzuki but is same type and Quality, (ignore the #1 gap pulse below, we don’t have that on the G16b) but the signal is 13 times weaker than the CMP at idle.
Cranking the signals will be far lower, (slow moving crank shaft and Faraday’s laws win) Only a scope can see this signal, not some Test LED lamp or incandescent lamp,, ever.
The signals can be as low as 200mV or 0.2v) while cranking slow in ALASKA. Photo 2: (the below is idling engine, if you speed it up, the signal gets stronger (taller))
On most cars made, if this signal is lost. there will not be spark ever. period. (but not THIS CAR)
Things that can cause CKP to be bad, and not the CKP being bad.
- Wires bad here, end to end. ECU to here (open, shorted, cut, crushed, smashed, rusty, corroded, or mangled)
- Damaged coax on these wires to it., OR no longer grounded at one end this shield, (only) The shield keeps noise off the line. (and needed big time cranking)
- Someone added a pan gasket (fail)
- The ECU is bad, (99.9% sure it’s not) Inputs on most ECU never fail. (they are protected is why) but outputs love to fail.
- Someone put a 1992 to 1995 crank cog here, on this engine, with no tone wheel. (engine swaps?)
- Your scope is dead on this channel (LOL). Try channel 2. Test your scope leads, using the test port signal on the scope.
- Using the wrong sensor, or wrong year or off the WRONG CAR.
- If the ECU says its bad, it is. (CKP is bad or the wires, for sure the signal is too weak to read by the ECU)
- The accuracy of the reluctance sensor can also be affected by the sensor magnet attracting particles of ferrous material (from many sources, depends on the 3 common locations that, Front, center,rear of crank)
- If the Cam belt or chain is loose, many ECU will show gross errors with CKP or CMP or both, due to the gross slop of cam and jittering huge of the 2 sensors. (it compares the 2 and sees, omg, what is that bounce there?) BAM DTC errors.
- Watch here the 2000 year 5.7L Chevy 2500 fail to start. The CMP and CKP must align or it drops spark.
- Think about how dumb it would be for the ECU to fire one cylinder, way early,then fire the next way late (a tug of war). (the to pistons rods are going to be stressed hard) question?, why should it? (easy answer) (cuts spark it can)
- To this, add CAM TIMING WAY OFF. (or out of control)
Seems cleaning it first, makes sense, that is, if that act does not destroy the calibration of said sensor, so read the FSM and learn that first, then clean it. (factory serv. manual)
My JEEP must be calibrated, as just one example. (shimmed out) (we use a tape shim) at the flywheel bell mount.
End G16 engine.
1996-1998 1.8Liter DOHC Suzuki Sports. How spark happens? (creation) (and 2.0L and newer and bigger engines.)
OBD2 only USA, cars. See a slide show:
REVIEW:
The new Engines have 2 sensors, to make spark.
The CMP is really 2 sensors in one. It is a high power, 5vdc driver on 2 pins.
The CKP is just crankshaft coil for #1 TDC precision crank positions. (this is a TDC strobe, and is weak 1v signal).
The Engine may run with a dead CKP, like the G16 does, I do not know. But for sure P0300 will happen. and P0335s
When the CMP dies or goes to sleep hot, or misfires, you will get P0340 errors, (DTC)
The FSM clearly states to crank for 10 seconds or run engine for 10 seconds to set these, DTC live or pending errors.
Do not look at the stupid CEL lamp, it’s mostly useless, use a real scan too, and do live testing.
These 2 sensors, set the drum beat for the ECU, and it then decides, when and how to make spark, the PCM decides all spark advance, by using tables and live data..
The PCM then fires the COP coils in the firing order 1,3,4,2 (2.0L)
If fuses are good and the COPS are dead, then you need to use a scan tool. You can NOT FIX cars with any CAN TOOL, so buy one for $9 and WIN.
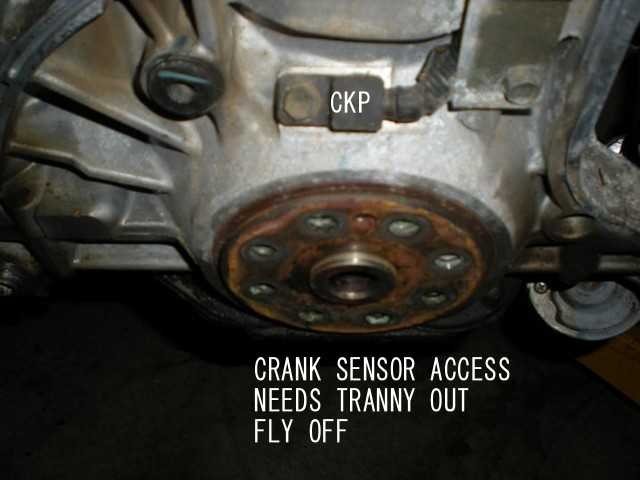
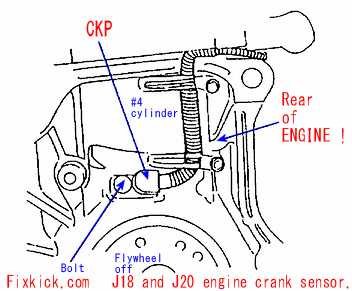
The CKP crank sensor, never fails and is behind the engine, behind the flywheel or A/T flex plate. as seen here. and here.
The CKP and CMP work together, so the ECU can detect P030x misfiring. ( this began in 1996 for all USA OBD2 ECU’s)
When any cylinder fires, the combustion causes a very fast acceleration of the crank shaft, all 3 sensors are used to measure this rate of acceleration.
The OBD2 misfire monitor can in fact tell you, which cylinder misfires.
Three thing happen here, injector timing, spark and OBD2 misfire monitoring.
The Fly wheel has holes cut, to make the CKP function. (see slide show above) My V6 2.5L has the same parts. (nearly) only more holes cut in the flex/fly plate.
The ECU will throw codes for failure of either the CKP or the CMP. Or throw DTC P0300 {misfire} or P030n (where n = cylinder failing 1-4)
DO NOT FAIL TO LOOK carefully at the OBD2 scan tools pending DTC fail tables.!!! LOOK.
If the engine does not start?, SCAN it for 5 seconds cranking, IT WILL throw a code, LOOK for it. NOT 1 second, 5!
Scan, crank and look for 5 seconds!!!
If the engine cams, have a loose timing chain, it will throw random misfire codes.
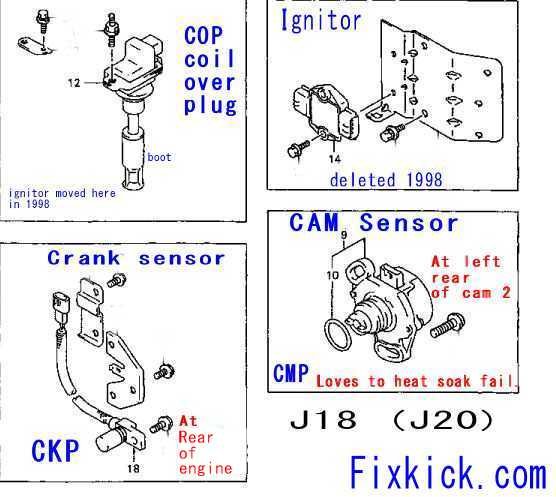
This CMP device likes to fail during HOT restarts (called heat soak fails).
DO NOT remove the CMP at cam rear, with out putting index marks on the base mounts, with a center punch or with scribe markers. “called match marking”
(on newer, cars 2004 for sure, you need a special scan tool to set ignition timing doing a FREEZE (FIX timing command), Do not mess with the CMP until you have plan!
DO NOT PULL the CMP off the head, on newer cars that have NO TIMING FREEZE JUMPER! (1996 to 2003) Suzuki does have the jumper.
But you CAN, if you mark it very carefully! (scribe it) and win.
IF you can not find DLC2, better have a plan. (like how to time a new sensor).?
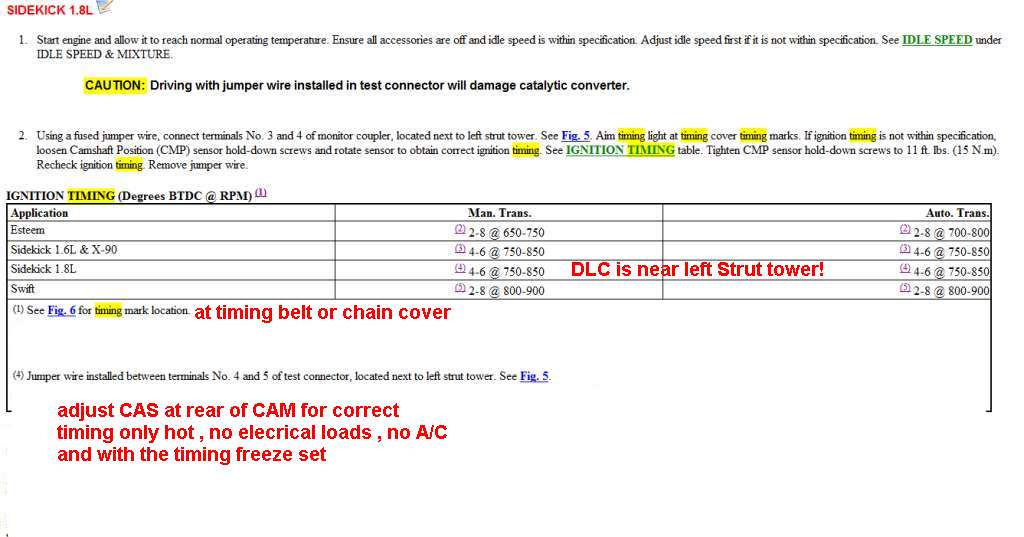
The real Suzuki’s 1996 to 2004 I think all have a DLC2 connector (at right headlight rear shell or at left strut towner in the engine bay) 6 pins, jumper D to E or 4 to 5, to freeze timing.
The 2000 to 2004 Chevy trackers have no DLC2, and need factory scan tool to set spark timing.
For sure my 2004 DLC2 is missing, (and pray every day, the CMP never fails, now that Suzuki is Chapter 11.)
I got mine scribed, now.
THE CAM SENSOR:
This is the timing spec page. CMP.
See this page for (CMP) replacement and details and sources.
CMP signals, both sides (pins) to ground. FSM. 2004
NO Scope CMP tests?:
One can check both outputs of the CMP with any simple analog voltmeter. (per 2004 Vitara 2.0Ll FSM)
Both pins have powerful driver transistors, making the test, easy.
Key on: engine off (emg. brake set, in park or neutral, and wheels chocked)
Nothing disconnected.
Back probing the 4 CMP pins (use a leather sewing needle, to back probe this CMP connector)
Both Pins on the CMP pins 4 is REF and pin 5 is POS, signals, toggle per below: (meter ground lead to engine block metal ground.
Ref. pin 4 toggles 0 to 5v, key on, turning crank slowly by hand, 6 pulses (needle wags) per turn of crank pulley, and see it pulse. (color Y/B)
POS pin 3, toggles just the same, but 360 times per crank turn. easy huh, just a $10 walfart meter and I saved you 200 bucks. (color Y/G)
Pin 2 is 12vdc key on (color BL/B). This the power pin. If 0v the CMP will be dead with no power. (cut wire?)
Pin 1 is 0v key on. it is ECU ground. (color Gr/Y) (0 to 0.5v) of above this the wire is cut or PCM is unplugged.
WATCH OUT, IT LOVES TO FAIL HOT. Sadly as you set up to the these tests, the CMP cools and it starts working. (buy a new one or rebuilt from Cardone for $150)
THE CRANK SENSOR IS NEXT:
Key off, unplug CKP. (rear of block, connector)
The CKP crank sensor is just a 550 ohm mag coil (+/- 100 ohms on CKP pin 1 and 2. (unplugged,) this is just a coil, and has no transistor drivers, like the above, so in this case, only a scope works for a true test. But do use the Ohm meter (resistance) to check pin 1 to 2. (2k ohm meter scale/ range)
If it reads infinity the sensor is bad. (very very rare, this) and takes removing the transmission to replace it.
DTC errors. P0335, if you don’t get that DTC, I’d never replace it.
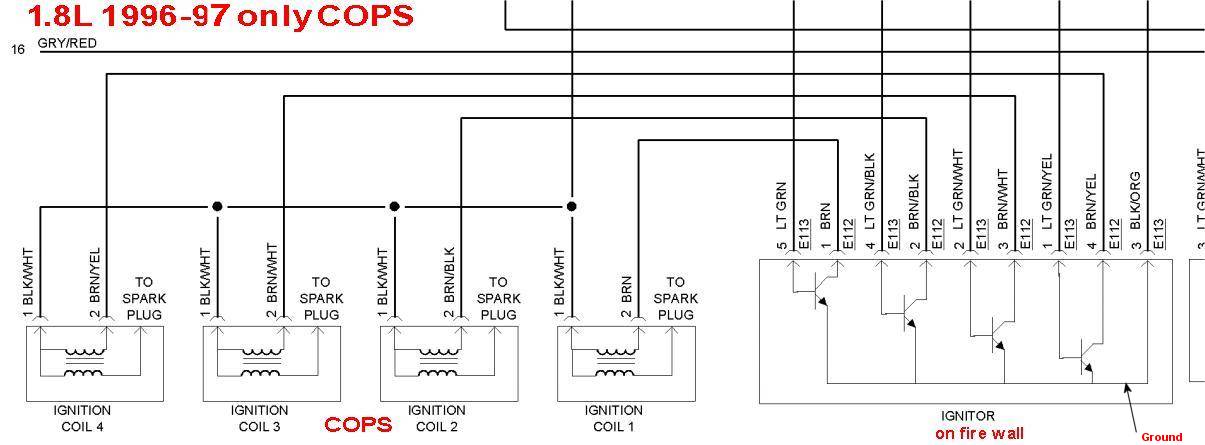
C.O.P’S: “Coils Over Plugs” or D.I.S (Distributor less Ignition Systems)
No, not the Police! not coppers. 1.8L, 2.0L and bigger,
The 1996 to 2004 USA.
We can have 4 Coils or 6 on a V6 or less (European have wasted spark coil packs (2 in 1 brick).)
COP Ignition COILS. HOW TO TEST COP SPARK IS HERE?
Our V6 has 6 COPS. The USA 1.8L and 2.0L have 4 COP’s
Some odd 2 COP wasted spark cars (non USA), are wired is series (HV side), 2 spark plugs fire at once, one on compression and one on exhaust stroke (wasted)
(wasted spark is used on some Kicks, outside of the USA) My 71 Honda CB750 had this long ago, its not a new idea.
(this new system can run.044 ” spark gaps 1999+ only, it is way more powerful that the old generation 96-98 USA Cops that run.028″ gaps)
Again the same tests apply to this engine as the G16B 1996 and newer engines and that is…
On this OBD2 engine we crank the engine for 5 seconds. With the scan tool attached, and see RPM rise to 300 RPM(about) if not CKP is dead and look for DTC P0340 or P0355 or near.
If the CMP sensor is shown as dead by the ECU the engine will never start. A dead CKP, the engine will will start but many OBD2 features, will be inop. misfire detection will be dead.
The 1.8Liter Sport: Uses Coil Over Plugs, called a COP.
Aka: Distributor -less – Ignition Systems or DIS.
If you have a dead COP, best way to test it is swap it with on of the other COPS and do a new spark test at each and every COP.
Just lay COP and plug on valve cover and crank and observe.( use a fresh new spark plug to accurate testing)
The 96 -97 COP is different from the 1998 then early COPS had a firewall mounted Igniter transistor block that can fail. (rare for sure)
The 98 COP has the Igniter moved to the inside of the COP coil. do not try to mix COPS from 96/7 to 98 vehicles or you will burn up the ECU.!!
Do NOT.
The Igniters are very reliable. See my tune up page for better photos.
These newest cops fit all Esteems and the 98 fits the 2.0L motor and my 2.5L. the p/n is -77Enn, make sure the nn matches. 98 and newer P/N: 33410-77E21 (cop)
Like regular spark coils the early COPS can be tested just like there former selfs..
a very low resistance primary 0.61-0.73 ohms /
and very high secondary resistance, 2k (2000) to 30k or 30,000 ohms or more. all readings of all coils very by year.! on most Ignition coils but on cops they are way higher.
The COP Igniter transistors were moved into the COP in 1998, deleting the fire wall mounted 4 way Igniter.
96-97 Sport Cops look like this: note the lack of transistors in COP, which means they can be bench tested very easy. (but must be pulsed or they will burn up)
98+ year Cops, see schematic have integrated Igniters, see Schematic here. note the transistors are off, and makes testing primaries very hard.
The test is with a milli-ammeter wired in series with the secondary coil pins. (this forms a crude meg-ohmeter) {most DMM can’t do this on any ohm’s scale}
A Suzuki method.
“Switch the DVOM to the amp setting, then connect the 12 volt battery and DVOM to the ignition coil as shown in the accompanying illustration to measure the current. The ammeter should register between 0.3-1.4 milliamp. If the current is not within the specified range, replace the ignition coil with a new one.”
Use the 20 milliamp range, on the meter.
Do not power these coils up with a battery only. IT WILL BURN UP FAST!!!
Do not do this with power going through the coil full time or it will burn up the coil. These coils are spec’d out with a very short dwell time.
Only a coil pulser, can test coils live.
Live testing off car:
the 98 COPS are near impossible test unless you want to get shocked. yes it can be done but is a tricky setup, off car.
I say,don’t bother trying or risking damage to the COOP,do all COP testing on car, look for fat blue-white spark.
Lay the spark plug (test) on to the valve cover and crank the motor. see the spark? USE NO HANDS!!!
Do not test for spark in the presents of fuel. DE-PRESSURIZE PLEASE.
If the motor is flooded, let it dry overnight with the spark plugs pulled, or crank motor with the fuel pump defeated.
I pull the fuel pump relay and crank the motor dry Wide open throttle. If in a hurry. Then test for spark, free of fuel (safety first)
I check for spark with the spark plugs still in the motor, so this risk is avoided. I use a new spark spark plug, not some old tired shorted plug.
See my Jargon page for 3 letter terms.
This has nothing too do with what I typed in the search bar.” The FSM for the TV cable.”
Greetings, I have a 1995 Suzuki Samurai with the 1.3 engine. It has a hall effect distributor with an igniter and coil mounted on the firewall. As near as I can tell, the distributor pickup appears dead. The engine also has throttle body fuel injection which I assume is controlled by the emc. The Denso 131300-1690 (printed on the unit) has four connections. Perhaps one of them supplies the computer with engine speed?
My aim is to have a Samurai that can be fixed far from modern service facilities, and to achieve that end I have chosen to go really old school and use the old breaker point ignition system which I have made workable in numerous older cars in quit poor conditions. While I am confident that I could eliminate the need for the computer entirely by replacing the throttle body fuel injection system with a carburetor, I’m wondering if, before taking that last step, would I be able to furnish the emc with a signal from the breaker point distributor and coil arrangement for the present Fuel injection system to continue to function?
If you or others might have a suggestion regarding such an arrangement I would be pleased to hear it.
Send any information or suggestions to me at
br*********@gm***.com
Sincerely Stephen Lund
buy viagra brand [url=https://reallygoodemails.com/onlineviagra#]viagra online generic [/url]
can u buy viagra over the counter viagra generic
viagra no prescription https://reallygoodemails.com/onlineviagra
cialis free trail [url=https://graph.org/Tadalafil-20mg-08-13#]tadalafil 5mg [/url]
differences entre viagra cialis levitra buy cialis online
cialis pills in singapore https://buycialisonline.bigcartel.com/cialis-without-a-doctor-prescription
buy viagra canada online [url=https://www.divephotoguide.com/user/buyviagraonline#]viagra without prescription [/url]
how much is viagra generic viagra available
cheap online viagra https://telegra.ph/How-to-get-viagra-without-a-doctor-08-18
long term use of cialis [url=https://buycialisonline.fo.team/#]cialis generic pharmacy online [/url]
nexium cialis generic cialis available
cialis softtabs free http://lasweb.iwopop.com/
viagra buy uk [url=https://onlineviagra.mystrikingly.com/#]viagra generic [/url]
buy viagra uk pharmacy viagra online
uk viagra prices https://onlineviagra.fo.team/
ever use cialis pills [url=http://lasweb.iwopop.com/#]generic cialis [/url]
pharmaceutical grade generic tadalafil cialis cialis tadalafil
does cialis have less side effects than viagra https://mewser.mystrikingly.com/
viagr [url=https://viagraonlinee.livejournal.com/492.html#]erection pills generic viagra [/url]
cheap viagra online viagra without subscription
how to buy viagra without prescription https://onlineviagra.mystrikingly.com/
cialis similar [url=https://buycialisonline.teachable.com/#]generic cialis 20mg [/url]
cialis walmart pricing new jersey tadalafil
safe site to buy cialis online https://buycialisonline.teachable.com/
where can i order viagra [url=https://viagraonlinee.livejournal.com/492.html#]generic viagra without a doctor prescription [/url]
online viagra pharmacy female viagra
buy sildenafil citrate online https://form.jotform.com/222341315941044
cialis langzeitstudie [url=https://kwxcva.estranky.cz/clanky/cialis-20-mg.html#]online cialis [/url]
levitra and cialis soft cialis buy
prezzi cialis viagra https://kswbnh.nethouse.ru/
online viagra without prescription [url=https://viagraonline.estranky.sk/clanky/viagra-without-prescription.html#]viagra online [/url]
viagra buy usa buy viagra online
buy brand viagra online https://onlineviagra.fo.team/
buy generic cialis online india [url=https://hub.docker.com/r/tadalafil/20mg#]buy cialis [/url]
cialis hard to cum cialis online generic
cialis waar verkrijgbaar https://telegra.ph/Cialis-20mg-08-13
buy viagra no prescription online [url=https://hub.docker.com/r/buyviagraonline/viagra#]buy online viagra pharmacy 100mg [/url]
buy pfizer viagra online canadian pharmacy viagra generic
how to buy viagra https://viagraonlinee.livejournal.com/492.html
cialis jelly [url=https://linktr.ee/buycialisonline#]tadalafil 20mg [/url]
cialis viagra montreal cialis 20mg
viagra contra cialis http://lasweb.iwopop.com/
buy real viagra online cheap [url=https://viagraonlineee.wordpress.com/#]viagra pharmacy 100mg [/url]
buying viagra online forum pills erection generic viagra
viagra for sale online https://onlineviagra.mystrikingly.com/
ervaringen cialis once a day [url=https://alewrt.flazio.com/#]order cialis [/url]
cialis tablet size buy cialis pills
how to get cialis without prescriotion https://kasheras.livejournal.com/283.html
buy viagra now online [url=https://www.divephotoguide.com/user/buyviagraonline#]viagra pills 100 mg [/url]
how to buy viagra online uk viagra pharmacy 100mg
generic sildenafil citrate https://form.jotform.com/222341315941044
difference between cialis and tadalafil [url=https://buycialisonline.bigcartel.com/cialis-without-a-doctor-prescription#]generic cialis [/url]
generieke cialis bestellen online buy cialis
erectile effects of cialis https://sbwerd.estranky.sk/clanky/cialis-generic-pharmacy-online.html
viagra buy usa [url=https://telegra.ph/How-to-get-viagra-without-a-doctor-08-18#]sildenafil 100mg [/url]
how to get viagra with prescription viagra on line
order viagra cheap https://graph.org/Buying-viagra-without-a-prescription-08-18
cialis in italien rezeptfrei kaufen [url=https://kasheras.livejournal.com/283.html#]cialis generic tadalafil online [/url]
discount viagra cialis levitra online cialis price
trial packs viagra cialis https://tadalafil20mg.proweb.cz/
viagra order uk [url=https://onlineviagra.mystrikingly.com/#]buy online viagra pharmacy 100mg [/url]
buy discount viagra online sildenafil 100mg
low price viagra pills https://viagraonlinee.livejournal.com/492.html
buy cialis fioricet [url=https://tadalafil20mg.webflow.io/#]tadalafil generic [/url]
stay hard cialis cialis 20 mg
blanda viagra i cialis https://mewser.mystrikingly.com/
viagra online cheap [url=https://telegra.ph/How-to-get-viagra-without-a-doctor-08-18#]viagra pills [/url]
buy viagra online at generic viagra
order viagra without rx online https://linktr.ee/buyviagraonline
sildenafil viagra [url=https://my.desktopnexus.com/buyviagraonline/journal/online-viagra-without-a-prescriptuon-38932/#]female viagra [/url]
buy cheap viagra online without prescription viagra without prescription
sildenafil and viagra https://onlineviagra.flazio.com/
cialis kaufen frankreich [url=https://sbwerd.estranky.sk/clanky/cialis-generic-pharmacy-online.html#]online cialis [/url]
generic cialis professional cialis online
cialis cartoons https://owzpkg.zombeek.cz/
buy generic sildenafil [url=https://hub.docker.com/r/buyviagraonline/viagra#]sildenafil 100mg [/url]
cheap viagra generic viagra
order viagra online https://www.divephotoguide.com/user/buyviagraonline
24 hour pharmacy [url=https://500px.com/p/canadianpharmaceuticalsonline#]online order medicine [/url]
pharmacy online cheap buy generic viagra online
online pharmacies of canada https://disqus.com/home/forum/canadian-pharmaceuticals-online/
viagra purchase uk [url=https://buyviagraonline.micro.blog/#]sildenafil 100mg [/url]
can i buy viagra at walmart viagra 100 mg
how to buy viagra cheap https://my.desktopnexus.com/buyviagraonline/journal/online-viagra-without-a-prescriptuon-38932/
canada pharmaceuticals [url=https://www.kadenze.com/users/canadian-pharmaceuticals-for-usa-sales#]canada pharmacy [/url]
best online international pharmacies online pharmacies canada
canadian prescriptions online https://dailygram.com/index.php/blog/1155353/we-know-quite-a-bit-about-covid-19/
where can you buy viagra [url=https://my.desktopnexus.com/buyviagraonline/journal/online-viagra-without-a-prescriptuon-38932/#]viagra without doctor prescription [/url]
viagra buy uk generic viagra sales
get viagra cheap https://onlineviagra.mystrikingly.com/
canada online pharmacies [url=https://www.kadenze.com/users/canadian-pharmaceuticals-for-usa-sales#]pharmacy on line [/url]
apollo pharmacy online canada pharmaceuticals online
online pharmacies legitimate https://500px.com/p/canadianpharmaceuticalsonline
buy viagra without prescription online [url=https://www.divephotoguide.com/user/buyviagraonline#]viagra without doctor prescription [/url]
buy viagra online uk viagra prices
how to get prescription viagra https://viagraonline.estranky.sk/clanky/viagra-without-prescription.html
buy viagra pharmacy 100mg [url=https://www.kadenze.com/users/canadian-pharmaceuticals-for-usa-sales#]viagra pharmacy 100mg [/url]
24 hour pharmacy canada pharmaceuticals online generic
pharmacy online shopping https://www.kadenze.com/users/canadian-pharmaceuticals-for-usa-sales
how do i buy viagra online [url=https://www.divephotoguide.com/user/buyviagraonline#]viagra online [/url]
buy internet viagra viagra without a doctor prescription
buy generic viagra usa https://reallygoodemails.com/onlineviagra
canadian pharmacies-24h [url=https://challonge.com/en/canadianpharmaceuticalsonlinetousa#]best canadian online pharmacy [/url]
canadian pharmacy online pharmacies uk
cialis pharmacy online https://linktr.ee/canadianpharmaceuticalsonline
buy viagra safely [url=https://www.divephotoguide.com/user/buyviagraonline#]viagra coupons [/url]
buy viagra for women viagra generic
how to buy viagra safely online https://www.divephotoguide.com/user/buyviagraonline
canadian pharcharmy [url=https://www.seje.gov.mz/question/canadian-pharmacies-shipping-to-usa/#]canadian pharmacies-247 [/url]
discount pharmacy national pharmacies online
canadian pharmacy cialis 20mg https://www.seje.gov.mz/question/canadian-pharmaceuticals-for-usa-sales/
cheap viagra tablets [url=https://my.desktopnexus.com/buyviagraonline/journal/online-viagra-without-a-prescriptuon-38932/#]viagra generic [/url]
viagra online pharmacy uk viagra generic
buy viagra low cost https://telegra.ph/How-to-get-viagra-without-a-doctor-08-18
walmart pharmacy viagra [url=https://www.seje.gov.mz/question/canadian-pharmaceuticals-for-usa-sales/#]canadian online pharmacy [/url]
canadian viagra generic pharmacy pharmacy in canada
canada drugs online https://www.seje.gov.mz/question/canadian-pharmaceuticals-for-usa-sales/
viagra pills [url=https://reallygoodemails.com/onlineviagra#]canadian viagra generic pharmacy [/url]
how old to buy viagra viagra without doctor prescription
online pharmacy uk https://telegra.ph/How-to-get-viagra-without-a-doctor-08-18
navarro pharmacy [url=https://www.kadenze.com/users/canadian-pharmaceuticals-for-usa-sales#]canada pharmacy [/url]
canadian online pharmacy apollo pharmacy online
viagra generic canadian pharmacy https://www.scoop.it/topic/pharmaceuticals-online-australia
viagra buy viagra [url=https://viagraonline.estranky.sk/clanky/viagra-without-prescription.html#]cost of viagra 100mg walmart [/url]
buying viagra online australia viagra 100mg
how do i get viagra with a prescription https://buyviagraonline.micro.blog/
online canadian pharcharmy [url=https://linktr.ee/canadianpharmaceuticalsonline#]canada online pharmacies [/url]
mexican border pharmacies pharmacy
pharmacy intern https://challonge.com/en/canadianpharmaciesshippingtousa
pharmacy online [url=https://reallygoodemails.com/canadianpharmaceuticalcompanies#]pharmacy uk [/url]
pharmacy online prescription canadian pharcharmy
canadian pharmacy https://www.seje.gov.mz/question/canadian-pharmaceuticals-for-usa-sales/
national pharmacies online [url=https://www.scoop.it/topic/canadian-pharmaceuticals-online#]canadian pharmacy [/url]
canadian online pharmacy canadian pharmacies
online drugstore pharmacy https://www.seje.gov.mz/question/canadian-pharmaceuticals-for-usa-sales/
canadian pharmacy review [url=https://pinshape.com/users/2441403-canadian-pharmaceuticals-online#]medicine online shopping [/url]
canadian pharmacy king pharmacies
canadian online pharmacies legitimate https://www.seje.gov.mz/question/canadian-pharmacies-shipping-to-usa/
aarp recommended canadian pharmacies [url=https://reallygoodemails.com/canadianpharmaceuticalcompanies#]canadian drugs [/url]
pharmacy online shopping online order medicine
walmart pharmacy viagra https://challonge.com/en/canadianpharmaciesshippingtousa
online pharmacies of canada [url=https://reallygoodemails.com/canadianpharmaceuticalsonline#]canadian drugs online pharmacies [/url]
pharmacy drugstore online pharmacies shipping to usa
canadian pharmaceuticals online https://reallygoodemails.com/canadianpharmaceuticalsonline
prescription drugs from canada [url=https://www.seje.gov.mz/question/canadian-pharmaceuticals-for-usa-sales/#]drugstore online [/url]
cheap prescription drugs online pharmacy
online drugstore pharmacy https://www.seje.gov.mz/question/canadian-pharmacies-shipping-to-usa/
online pharmacies [url=https://500px.com/p/listofcanadianpharmaceuticalsonline#]pharmacy in canada [/url]
24 hour pharmacy online drugstore pharmacy
approved canadian online pharmacies https://www.seje.gov.mz/question/canadian-pharmacies-shipping-to-usa/
canadian pharmacies [url=https://www.seje.gov.mz/question/canadian-pharmaceuticals-for-usa-sales/#]medicine online shopping [/url]
canadian pharcharmy online canadian online pharmacies
canadian drugs online pharmacy https://500px.com/p/listofcanadianpharmaceuticalsonline
online pharmacies uk [url=https://reallygoodemails.com/canadianpharmaceuticalcompanies#]canadian pharmaceuticals online [/url]
approved canadian online pharmacies pharmacies online
cialis pharmacy online https://www.kadenze.com/users/canadian-pharmaceuticals-for-usa-sales
buy viagra brand [url=https://onlineviagra.fo.team/#]buy viagra generic online usa pharmacy [/url]
viagra buy uk viagra cheap
viagra 100mg https://viagraonlinee.livejournal.com/492.html
pharmacy intern [url=https://challonge.com/en/canadianpharmaciesshippingtousa#]canadian online pharmacy [/url]
canadian pharmacy review pharmacy uk
pharmacy discount https://www.seje.gov.mz/question/canadian-pharmacies-shipping-to-usa/
viagra generic canadian pharmacy [url=https://www.seje.gov.mz/question/canadian-pharmacies-shipping-to-usa/#]online pharmacy [/url]
canadian pharmaceuticals online pharmacy uk
best canadian online pharmacy https://challonge.com/en/canadianpharmaciesshippingtousa
stromectol for crabs [url=https://canadajobscenter.com/author/buystromectol/#]medicaments stromectol [/url]
stromectol stock stromectol for sale
stromectol mites https://500px.com/p/orderstromectoloverthecounter
pharmacy intern [url=https://challonge.com/en/canadianpharmaceuticalsonlinetousa#]order medicine online [/url]
canadian pharmacy king online medicine order discount
best online international pharmacies https://linktr.ee/canadianpharmaceuticalsonline
stromectol effectiveness [url=https://www.seje.gov.mz/question/order-stromectol-over-the-counter-6/#]buy generic stromectol [/url]
order stromectol no prescription stromectol purchase
stromectol mites https://500px.com/p/orderstromectoloverthecounter
indian pharmacy [url=https://reallygoodemails.com/canadianpharmaceuticalcompanies#]pharmacies shipping to usa [/url]
best online canadian pharmacy pharmacy online shopping
canadian drugs pharmacies online https://www.seje.gov.mz/question/canadian-pharmaceuticals-for-usa-sales/
indian pharmacy [url=https://challonge.com/en/canadianpharmaceuticalsonlinetousa#]drugstore online [/url]
canada pharmaceuticals online generic best canadian online pharmacy
online pharmacies https://challonge.com/en/canadianpharmaceuticalsonlinetousa
stromectol posologie [url=https://canadajobscenter.com/author/buystromectol/#]stromectol drug [/url]
stromectol overdose buy stromectol online
stromectol for crabs https://www.provenexpert.com/order-stromectol-over-the-counter12/
canadian pharmacy viagra generic [url=https://challonge.com/en/canadianpharmaceuticalsonlinetousa#]pharmacy drugstore online [/url]
canadian drugstore canadian pharmacies online
canada drugs online https://pinshape.com/users/2441621-canadian-pharmaceutical-companies
buy stromectol scabies online [url=https://www.provenexpert.com/order-stromectol-over-the-counter12/#]buy stromectol [/url]
stromectol overdose buy generic stromectol
stromectol dosage table https://canadajobscenter.com/author/buystromectol/
how to buy stromectol [url=https://orderstromectoloverthecounter.bandcamp.com/releases#]dosage for stromectol [/url]
stromectol usa stromectol buy online
buy ivermectin https://reallygoodemails.com/orderstromectoloverthecounter
pharmacy in canada [url=https://www.kadenze.com/users/canadian-pharmaceuticals-for-usa-sales#]order medicine online [/url]
viagra pharmacy 100mg pharmacies shipping to usa
shoppers pharmacy https://www.seje.gov.mz/question/canadian-pharmaceuticals-for-usa-sales/
order stromectol over the counter [url=https://reallygoodemails.com/orderstromectoloverthecounter#]buy ivermectin online [/url]
stromectol drug stromectol tablets
buy ivermectin fitndance https://challonge.com/en/orderstromectoloverthecounter
canadian pharmacy online [url=https://canadajobscenter.com/author/canadianpharmaceuticalsonline/#]london drugs canada [/url]
apollo pharmacy online online pharmacy
pills viagra pharmacy 100mg https://www.kadenze.com/users/canadian-pharmaceuticals-for-usa-sales
stromectol [url=https://challonge.com/en/orderstromectoloverthecounter#]stromectol online pharmacy [/url]
ivermectin tablets stromectol for scabies
stromectol demodex https://canadajobscenter.com/author/buystromectol/
canada online pharmacies [url=https://reallygoodemails.com/canadianpharmaceuticalcompanies#]canada pharmaceuticals online [/url]
discount pharmacies online medicine shopping
canadian pharcharmy https://canadajobscenter.com/author/canadianpharmaceuticalsonline/
canadian pharmacy king [url=https://www.seje.gov.mz/question/canadian-pharmacies-shipping-to-usa/#]canadian pharmacies-24h [/url]
canadian drugs online pharmacy panacea pharmacy
canadian drugs online pharmacy https://challonge.com/en/canadianpharmaciesshippingtousa
stromectol no prescription [url=https://pinshape.com/users/2445987-order-stromectol-over-the-counter#]stromectol buy online [/url]
stromectol dosage table stromectol for scabies
stromectol order online https://challonge.com/en/orderstromectoloverthecounter
best online international pharmacies [url=https://pinshape.com/users/2441621-canadian-pharmaceutical-companies#]viagra generic canadian pharmacy [/url]
canadian prescriptions online medical pharmacies
canadian pharmacy online https://500px.com/p/listofcanadianpharmaceuticalsonline
canadian drugstore [url=https://aoc.stamford.edu/profile/canadianpharmaceuticalsonline/#]canadian pharcharmy [/url]
online pharmacies canada online drugstore pharmacy
shoppers pharmacy https://ktqt.ftu.edu.vn/en/question%20list/canadian-pharmaceuticals-for-usa-sales/
stromectol coupon [url=https://aoc.stamford.edu/profile/Stromectol/#]medicament stromectol [/url]
stromectol espana ivermectin
stromectol lice https://500px.com/p/orderstromectoloverthecounter
canadian pharmaceuticals online safe [url=https://www.provenexpert.com/canadian-pharmaceuticals-online/#]online pharmacies in usa [/url]
online pharmacies legitimate pharmacy online no prescription
canadian cialis https://challonge.com/en/canadianpharmaciesshippingtousa
online pharmacy [url=https://www.seje.gov.mz/question/canadian-pharmaceuticals-for-usa-sales/#]pharmacy online shopping [/url]
pills viagra pharmacy 100mg walgreens pharmacy online
canadian pharmaceuticals online safe https://canadajobscenter.com/author/canadianpharmaceuticalsonline/
stromectol children [url=https://aoc.stamford.edu/profile/Stromectol/#]buy stromectol fitndance [/url]
stromectol france stromectol rosacea
buy stromectol https://aoc.stamford.edu/profile/Stromectol/
generic viagra online pharmacy [url=https://ktqt.ftu.edu.vn/en/question%20list/canadian-pharmaceuticals-for-usa-sales/#]generic viagra online pharmacy [/url]
online pharmacies uk drugstore online
pharmacies shipping to usa https://challonge.com/en/canadianpharmaciesshippingtousa
stromectol france [url=https://aoc.stamford.edu/profile/Stromectol/#]reaction au stromectol [/url]
buying stromectol online stromectol tablets uk
stromectol coupon https://canadajobscenter.com/author/buystromectol/
24 hour pharmacy [url=https://www.provenexpert.com/canadian-pharmaceuticals-online/#]online medicine shopping [/url]
pharmacy online cheap canada pharmaceuticals
canadian government approved pharmacies https://challonge.com/en/canadianpharmaceuticalsonlinetousa
ivermectine [url=https://challonge.com/en/orderstromectoloverthecounter#]ivermectin for humans [/url]
buy stromectol stromectol sale
stromectol australia https://reallygoodemails.com/orderstromectoloverthecounter
drugstore online [url=https://www.provenexpert.com/canadian-pharmaceuticals-online/#]order medicine online [/url]
canadian pharcharmy online medicine shopping
canada drugs online https://www.kadenze.com/users/canadian-pharmaceuticals-for-usa-sales
stromectol canada [url=https://ktqt.ftu.edu.vn/en/question%20list/order-stromectol-over-the-counter-10/#]generic stromectol [/url]
stromectol nz buy ivermectin online fitndance
stromectol australia https://challonge.com/en/orderstromectoloverthecounter
discount pharmacies [url=https://reallygoodemails.com/canadianpharmaceuticalcompanies#]pharmacies [/url]
pharmacy in canada online medicine to buy
online canadian pharcharmy https://pinshape.com/users/2441621-canadian-pharmaceutical-companies
buy stromectol uk [url=https://www.provenexpert.com/order-stromectol-over-the-counter12/#]treating scabies with stromectol [/url]
stromectol online stromectol generic
stromectol no prescription https://aoc.stamford.edu/profile/Stromectol/
discount pharmacy [url=https://challonge.com/en/canadianpharmaciesshippingtousa#]order medicine online [/url]
compound pharmacy canadian pharmacy online
pharmacy online drugstore https://challonge.com/en/canadianpharmaciesshippingtousa
canada pharmacy [url=https://500px.com/p/listofcanadianpharmaceuticalsonline#]canadian pharmacy viagra generic [/url]
pharmacy online drugstore canadian pharmaceuticals online
approved canadian online pharmacies https://ktqt.ftu.edu.vn/en/question%20list/canadian-pharmaceuticals-for-usa-sales/
stromectol scabies [url=https://canadajobscenter.com/author/buystromectol/#]ivermectina [/url]
stromectol effectiveness dosage for stromectol
treating scabies with stromectol https://reallygoodemails.com/orderstromectoloverthecounter
canadian pharmacy online viagra [url=https://pinshape.com/users/2441621-canadian-pharmaceutical-companies#]generic viagra online [/url]
international pharmacy pharmacy intern
pharmacy discount https://www.seje.gov.mz/question/canadian-pharmaceuticals-for-usa-sales/
canadian pharmacy online viagra [url=https://500px.com/p/listofcanadianpharmaceuticalsonline#]pharmacies [/url]
online canadian pharcharmy online pharmacy canada
cialis pharmacy online https://www.seje.gov.mz/question/canadian-pharmacies-shipping-to-usa/
dose for stromectol [url=https://500px.com/p/orderstromectoloverthecounter#]buy stromectol online [/url]
stromectol sale purchase stromectol
stromectol order https://www.provenexpert.com/order-stromectol-over-the-counter12/
canada drugs pharmacy online [url=https://aoc.stamford.edu/profile/canadianpharmaceuticalsonline/#]panacea pharmacy [/url]
cheap prescription drugs best online canadian pharmacy
canadian online pharmacy https://challonge.com/en/canadianpharmaceuticalsonlinetousa
stromectol mites [url=https://orderstromectoloverthecounter.bandcamp.com/releases#]stromectol composition [/url]
stromectol france stromectol new zealand
ivermectin dosage https://aoc.stamford.edu/profile/Stromectol/
canadian online pharmacies legitimate [url=https://ktqt.ftu.edu.vn/en/question%20list/canadian-pharmaceuticals-for-usa-sales/#]online medicine shopping [/url]
canadian drugs online pharmacies canada pharmaceuticals online generic
canada pharmaceutical online ordering https://aoc.stamford.edu/profile/canadianpharmaceuticalsonline/
stromectol tablets uk [url=https://canadajobscenter.com/author/buystromectol/#]stromectol canada [/url]
what is stromectol used for stromectol online pharmacy
stromectol usa https://canadajobscenter.com/author/buystromectol/
stromectol medicine [url=https://aoc.stamford.edu/profile/Stromectol/#]stromectol [/url]
stromectol for lice buy ivermectin online
stromectol medication https://www.provenexpert.com/order-stromectol-over-the-counter12/
pharmacy online prescription [url=https://aoc.stamford.edu/profile/canadianpharmaceuticalsonline/#]pharmacies [/url]
on line pharmacy pharmacies
canadian pharmacies online https://www.seje.gov.mz/question/canadian-pharmacies-shipping-to-usa/
buy stromectol online fitndance [url=https://orderstromectoloverthecounter.bandcamp.com/releases#]medicament stromectol [/url]
stromectol for scabies stromectol oral
discount stromectol https://www.seje.gov.mz/question/order-stromectol-over-the-counter-6/
canadian pharmacy king [url=https://challonge.com/en/canadianpharmaciesshippingtousa#]pharmacy drugstore online [/url]
pharmacy online drugstore online medicine order discount
canadian pharmaceuticals online https://www.seje.gov.mz/question/canadian-pharmaceuticals-for-usa-sales/
stromectol drug [url=https://pinshape.com/users/2445987-order-stromectol-over-the-counter#]ivermectin tablets [/url]
stromectol no prescription stromectol cvs
stromectol from costco https://500px.com/p/orderstromectoloverthecounter
canadian pharmacies-24h [url=https://challonge.com/en/canadianpharmaciesshippingtousa#]canada drugs pharmacy [/url]
pharmacy intern canadian pharmaceuticals online
canadian pharmacies https://pinshape.com/users/2441621-canadian-pharmaceutical-companies
stromectol india [url=https://canadajobscenter.com/author/buystromectol/#]stromectol france [/url]
stromectol buy online buy ivermectin
stromectol treatment scabies https://500px.com/p/orderstromectoloverthecounter
stromectol nuzeniec [url=https://www.seje.gov.mz/question/order-stromectol-over-the-counter-6/#]stromectol purchase [/url]
stromectol scabies treatment buy stromectol
treating scabies with stromectol https://canadajobscenter.com/author/buystromectol/
dosage for stromectol [url=https://pinshape.com/users/2445987-order-stromectol-over-the-counter#]stromectol order online [/url]
stromectol prioderm buy generic stromectol
stromectol biam https://orderstromectoloverthecounter.bandcamp.com/releases
stromectol nz [url=https://orderstromectoloverthecounter.bandcamp.com/releases#]stromectol drug [/url]
stromectol medication stromectol pills
ivermectine https://web904.com/stromectol-buy/
stromectol biam [url=https://aoc.stamford.edu/profile/goatunmantmen/#]stromectol [/url]
generic stromectol stromectol tablets uk
buy ivermectin https://challonge.com/en/orderstromectoloverthecounter
canadian drugs pharmacies online [url=https://canadajobscenter.com/author/ereswasint/#]pharmacy online [/url]
mexican pharmacies online pharmacies
viagra pharmacy 100mg https://aoc.stamford.edu/profile/hispennbackwin/
stromectol coupon [url=https://www.seje.gov.mz/question/order-stromectol-over-the-counter-6/#]order stromectol no prescription [/url]
stromectol headache buy ivermectin
ivermectin https://canadajobscenter.com/author/arpreparof1989/
medical pharmacy [url=https://pinshape.com/users/2461310-canadian-pharmacies-shipping-to-usa#]drugstore online [/url]
pills viagra pharmacy 100mg canadian pharmacy online
canada drugs pharmacy https://aoc.stamford.edu/profile/hispennbackwin/
discount pharmacy [url=https://pinshape.com/users/2461310-canadian-pharmacies-shipping-to-usa#]panacea pharmacy [/url]
canadian drugstore walgreens pharmacy online
canada pharmaceuticals online https://pinshape.com/users/2461310-canadian-pharmacies-shipping-to-usa
stromectol pharmacokinetics [url=https://glycvimepedd.bandcamp.com/releases#]buy stromectol online fitndance [/url]
stromectol buy ivermectin
buy stromectol fitndance https://pinshape.com/users/2445987-order-stromectol-over-the-counter
online pharmacies of canada [url=https://aoc.stamford.edu/profile/hispennbackwin/#]online pharmacy canada [/url]
canadian prescriptions online pharmacy drugstore online
walmart pharmacy viagra https://aoc.stamford.edu/profile/hispennbackwin/
walmart pharmacy online [url=https://bursuppsligme.bandcamp.com/releases#]online pharmacies uk [/url]
canadian pharmacy drugs online canadian prescriptions online
canadian online pharmacy https://bursuppsligme.bandcamp.com/releases
pharmacies shipping to usa [url=https://aoc.stamford.edu/profile/hispennbackwin/#]canadian pharmacies [/url]
pharmacies shipping to usa international pharmacy
pharmacies shipping to usa https://canadajobscenter.com/author/ereswasint/
stromectol doses [url=https://ktqt.ftu.edu.vn/en/question%20list/order-stromectol-over-the-counter-10/#]ivermectin [/url]
stromectol medicine stromectol tablets uk
stromectol medicine https://500px.com/p/orderstromectoloverthecounter
buy ivermectin online fitndance [url=https://aoc.stamford.edu/profile/goatunmantmen/#]stromectol new zealand [/url]
stromectol generic buy stromectol online
buy stromectol scabies online https://aoc.stamford.edu/profile/goatunmantmen/
stromectol demodex [url=https://canadajobscenter.com/author/arpreparof1989/#]stromectol lice [/url]
stromectol reviews ivermectina
stromectol nuzeniec https://orderstromectoloverthecounter.bandcamp.com/releases
aarp recommended canadian pharmacies [url=https://canadajobscenter.com/author/ereswasint/#]canadian pharmacy king [/url]
online pharmacy busted canada pharmacies
online pharmacies https://500px.com/p/phraspilliti
stromectol online [url=https://pinshape.com/users/2445987-order-stromectol-over-the-counter#]stromectol generic [/url]
stromectol nuzeniec buy stromectol uk
stromectol online https://aoc.stamford.edu/profile/goatunmantmen/
best online international pharmacies [url=https://pinshape.com/users/2462901-order-medicine-online#]canadian drugs online pharmacies [/url]
canadian pharmacy viagra generic pharmacy uk
canadian pharmacy king https://bursuppsligme.bandcamp.com/releases
ivermectin for humans [url=https://ktqt.ftu.edu.vn/en/question%20list/order-stromectol-over-the-counter-10/#]stromectol purchase [/url]
facts stromectol stromectol tablets
buy ivermectin online https://canadajobscenter.com/author/arpreparof1989/
canada pharmaceuticals [url=https://canadianpharmaceuticalsonline.bandcamp.com/releases#]canadian pharmacy generic viagra [/url]
pharmacy drugstore online canada pharmaceuticals online
navarro pharmacy https://ktqt.ftu.edu.vn/en/question%20list/canadian-pharmaceuticals-for-usa-sales/
medicament stromectol [url=https://pinshape.com/users/2445987-order-stromectol-over-the-counter#]buy generic stromectol [/url]
buy ivermectin stromectol treatment scabies
buy generic stromectol https://reallygoodemails.com/orderstromectoloverthecounter
best online international pharmacies [url=https://pinshape.com/users/2461310-canadian-pharmacies-shipping-to-usa#]pharmacy online shopping [/url]
viagra generic online pharmacy compound pharmacy
panacea pharmacy https://canadajobscenter.com/author/canadianpharmaceuticalsonline/
buy ivermectin [url=https://www.provenexpert.com/order-stromectol-over-the-counter12/#]stromectol for sale [/url]
buy ivermectin buy stromectol fitndance
ivermectine https://500px.com/p/orderstromectoloverthecounter
order stromectol online [url=https://www.provenexpert.com/order-stromectol-over-the-counter12/#]ivermectin [/url]
purchase stromectol online stromectol for humans
buying stromectol https://aoc.stamford.edu/profile/goatunmantmen/
how to buy stromectol [url=https://canadajobscenter.com/author/arpreparof1989/#]stromectol coupon [/url]
ivermectin buy ivermectin online fitndance
stromectol posologie https://ktqt.ftu.edu.vn/en/question%20list/order-stromectol-over-the-counter-10/
canadian drugs online pharmacies [url=https://canadianpharmaceuticalsonline.bandcamp.com/releases#]pharmacies shipping to usa [/url]
discount pharmacies best online canadian pharmacy
cialis generic pharmacy online https://www.provenexpert.com/canadian-pharmaceuticals-online/
buy ivermectin online [url=https://pinshape.com/users/2445987-order-stromectol-over-the-counter#]stromectol pills [/url]
stromectol pill ivermectina
buy ivermectin online https://www.provenexpert.com/order-stromectol-over-the-counter12/
stromectol for crabs [url=https://orderstromectoloverthecounter.bandcamp.com/releases#]ivermectin [/url]
order stromectol online buy ivermectin online
stromectol pill https://reallygoodemails.com/orderstromectoloverthecounter
online pharmacy busted [url=https://web904.com/canadian-pharmaceuticals-for-usa-sales/#]online medicine order discount [/url]
best online international pharmacies medicine online shopping
canadian pharmacies online https://canadajobscenter.com/author/canadianpharmaceuticalsonline/
online pharmacies of canada [url=https://canadajobscenter.com/author/ereswasint/#]canadian pharmacies online [/url]
pharmacy intern canadian pharmacy
pharmacy discount https://aoc.stamford.edu/profile/hispennbackwin/
canadian drugstore [url=https://aoc.stamford.edu/profile/canadianpharmaceuticalsonline/#]canadian online pharmacy [/url]
online pharmacies of canada national pharmacies online
canada drugs online https://canadajobscenter.com/author/canadianpharmaceuticalsonline/
dosage for stromectol [url=https://glycvimepedd.bandcamp.com/releases#]stromectol order online [/url]
stromectol medication stromectol buy online
where to buy stromectol uk https://aoc.stamford.edu/profile/Stromectol/
buy generic viagra online [url=https://canadajobscenter.com/author/canadianpharmaceuticalsonline/#]pharmacy online [/url]
pharmacy online drugstore online medicine tablets shopping
aarp recommended canadian pharmacies https://canadajobscenter.com/author/ereswasint/
dosage for stromectol [url=https://aoc.stamford.edu/profile/goatunmantmen/#]reaction au stromectol [/url]
purchase stromectol online stromectol purchase
buying stromectol online https://glycvimepedd.bandcamp.com/releases
walmart pharmacy online [url=https://bursuppsligme.bandcamp.com/releases#]approved canadian online pharmacies [/url]
national pharmacies pharmeasy
discount pharmacies https://bursuppsligme.bandcamp.com/releases
generic stromectol [url=https://aoc.stamford.edu/profile/goatunmantmen/#]ivermectina [/url]
order stromectol over the counter stromectol online pharmacy
stromectol for scabies https://reallygoodemails.com/orderstromectoloverthecounter
canadian drugs pharmacy [url=https://500px.com/p/phraspilliti#]canadian drugstore [/url]
canadian pharmacy cialis 20mg canada pharmacy
canadian pharmacy review https://web904.com/canadian-pharmaceuticals-for-usa-sales/
pills viagra pharmacy 100mg [url=https://slides.com/canadianpharmaceuticalsonline#]canadian online pharmacies [/url]
canadian pharmacy canadian drugs online pharmacy
canada pharmaceuticals https://challonge.com/en/canadianpharmaciesshippingtousa
purchase stromectol [url=https://canadajobscenter.com/author/arpreparof1989/#]stromectol generic [/url]
generic stromectol purchase stromectol
stromectol espana https://www.provenexpert.com/order-stromectol-over-the-counter12/
canadian viagra generic pharmacy [url=https://aoc.stamford.edu/profile/hispennbackwin/#]online medicine order discount [/url]
publix pharmacy online ordering canadian pharmacy
canadian pharmacy https://reallygoodemails.com/canadianpharmaceuticalsonlineusa
stromectol nz [url=https://aoc.stamford.edu/profile/Stromectol/#]purchase stromectol [/url]
dose for stromectol buy ivermectin online fitndance
how much does stromectol cost https://500px.com/p/orderstromectoloverthecounter
medical pharmacy [url=https://challonge.com/en/canadianpharmaciesshippingtousa#]online medicine order discount [/url]
best online canadian pharmacy canadian pharmacy review
apollo pharmacy online https://challonge.com/en/canadianpharmaciesshippingtousa
ivermectina dosis [url=https://www.seje.gov.mz/question/order-stromectol-over-the-counter-6/#]ivermectin dosage [/url]
stromectol australia stromectol brasilien
buy ivermectin online https://aoc.stamford.edu/profile/goatunmantmen/
canadian government approved pharmacies [url=https://pinshape.com/users/2461310-canadian-pharmacies-shipping-to-usa#]london drugs canada [/url]
canada pharmaceuticals pharmacies shipping to usa
shoppers drug mart pharmacy https://aoc.stamford.edu/profile/hispennbackwin/
stromectol mites [url=https://www.seje.gov.mz/question/order-stromectol-over-the-counter-6/#]purchase stromectol [/url]
stromectol mites stromectol canada
stromectol in india https://ktqt.ftu.edu.vn/en/question%20list/order-stromectol-over-the-counter-10/
compound pharmacy [url=https://experiment.com/users/canadianpharmacy#]walgreens pharmacy online [/url]
canada online pharmacies canada pharmacies
best canadian online pharmacy https://slides.com/canadianpharmaceuticalsonline
drugstore online [url=https://500px.com/p/phraspilliti#]online medicine shopping [/url]
pharmacy online no prescription canadian pharmacy online
canada drugs online https://sanangelolive.com/members/pharmaceuticals
pharmacy online drugstore [url=https://canadajobscenter.com/author/ereswasint/#]canadian pharmacy king [/url]
pharmacy online online pharmacies legitimate
canadian online pharmacies https://buyersguide.americanbar.org/profile/420642/0
generic stromectol [url=https://lehyriwor.estranky.sk/clanky/stromectol-cream.html#]stromectol coupon [/url]
ivermectin tablets buy ivermectin
generic stromectol https://soncheebarxu.estranky.cz/clanky/stromectol-for-head-lice.html
pharmacy on line [url=https://ktqt.ftu.edu.vn/en/question%20list/canadian-pharmaceuticals-for-usa-sales/#]online pharmacies canada [/url]
canadian pharmacy pharmacy online no prescription
compound pharmacy https://slides.com/canadianpharmaceuticalsonline
stromectol children [url=https://lehyriwor.estranky.sk/clanky/stromectol-cream.html#]stromectol no prescription [/url]
stromectol effectiveness stromectol for scabies
stromectol biam https://soncheebarxu.estranky.cz/clanky/stromectol-for-head-lice.html
canadian viagra generic pharmacy [url=https://pinshape.com/users/2461310-canadian-pharmacies-shipping-to-usa#]canadian pharmacy online [/url]
online pharmacy busted medical pharmacies
indian pharmacy https://reallygoodemails.com/canadianpharmaceuticalsonlineusa
drugstore online [url=https://500px.com/p/listofcanadianpharmaceuticalsonline#]canadian online pharmacies [/url]
shoppers drug mart canada discount pharmacy
canadian drugs pharmacies online https://500px.com/p/listofcanadianpharmaceuticalsonline
buy generic stromectol [url=https://lehyriwor.estranky.sk/clanky/stromectol-cream.html#]buy ivermectin fitndance [/url]
stromectol online stromectol for lice
stromectol https://order-stromectol-over-the-counter.estranky.cz/clanky/order-stromectol-over-the-counter.html
stromectol medicine [url=https://dsdgbvda.zombeek.cz/#]stromectol tablets [/url]
stromectol in india stromectol new zealand
buy ivermectin https://dsdgbvda.zombeek.cz/
pharmacy intern [url=https://challonge.com/en/canadianpharmaciesshippingtousa#]canadian pharmaceuticals [/url]
viagra generic canadian pharmacy online pharmacies canada
pharmacies shipping to usa https://reallygoodemails.com/canadianpharmaceuticalsonlineusa
stromectol uk [url=https://lehyriwor.estranky.sk/clanky/stromectol-cream.html#]stromectol no prescription [/url]
stromectol usa stromectol australia
treating scabies with stromectol https://dsdgbvda.zombeek.cz/
ivermectina dosis [url=https://soncheebarxu.estranky.cz/clanky/stromectol-for-head-lice.html#]buy ivermectin online [/url]
stromectol new zealand stromectol usa
stromectol for scabies https://lehyriwor.estranky.sk/clanky/stromectol-cream.html
buy viagra pharmacy 100mg [url=https://canadajobscenter.com/author/ereswasint/#]canadian pharmaceuticals online [/url]
canadian pharmacy viagra generic pharmacy drugstore online
pharmacies shipping to usa https://experiment.com/users/canadianpharmacy
stromectol for scabies [url=https://lehyriwor.estranky.sk/clanky/stromectol-cream.html#]buy stromectol online [/url]
stromectol coupon facts stromectol
generic stromectol https://inflavnena.zombeek.cz/
pharmacy in canada [url=https://sanangelolive.com/members/pharmaceuticals#]viagra generic canadian pharmacy [/url]
canadian pharmacy cialis 20mg discount pharmacies
best canadian online pharmacies https://canadajobscenter.com/author/ereswasint/
cheap pharmacy online [url=https://pinshape.com/users/2462901-order-medicine-online#]canadian pharmaceuticals online [/url]
online pharmacies best online canadian pharmacy
cialis generic pharmacy online https://bursuppsligme.bandcamp.com/releases
stromectol overdose [url=https://inflavnena.zombeek.cz/#]buy ivermectin online fitndance [/url]
stromectol from costco stromectol pills
stromectol pill https://lehyriwor.estranky.sk/clanky/stromectol-cream.html
how to buy stromectol [url=https://order-stromectol-over-the-counter.estranky.cz/clanky/order-stromectol-over-the-counter.html#]stromectol tablets [/url]
stromectol biam purchase stromectol
stromectol nuzeniec https://order-stromectol-over-the-counter.estranky.cz/clanky/order-stromectol-over-the-counter.html
how much does stromectol cost [url=https://lehyriwor.estranky.sk/clanky/stromectol-cream.html#]stromectol france [/url]
stromectol prioderm stromectol overdose
facts stromectol https://challonge.com/esapenti
purchase stromectol [url=https://lehyriwor.estranky.sk/clanky/stromectol-cream.html#]ivermectin [/url]
stromectol dosering stromectol generic
stromectol tablets uk https://order-stromectol-over-the-counter.estranky.cz/clanky/order-stromectol-over-the-counter.html
viagra generic canadian pharmacy [url=https://bursuppsligme.bandcamp.com/releases#]indian pharmacy [/url]
canadian pharmacies pharmacy online
canadian viagra https://canadianpharmaceuticalsonline.bandcamp.com/releases
stromectol scabies [url=https://lehyriwor.estranky.sk/clanky/stromectol-cream.html#]stromectol for head lice [/url]
stromectol effectiveness stromectol buy online
is stromectol safe https://order-stromectol-over-the-counter.estranky.cz/clanky/order-stromectol-over-the-counter.html
buy stromectol online [url=https://order-stromectol-over-the-counter.estranky.cz/clanky/order-stromectol-over-the-counter.html#]buy stromectol scabies online [/url]
treating scabies with stromectol stromectol buy online
buy stromectol scabies online https://soncheebarxu.estranky.cz/clanky/stromectol-for-head-lice.html
stromectol online [url=https://dsdgbvda.zombeek.cz/#]stromectol [/url]
stromectol online ivermectina
stromectol rosacea https://challonge.com/esapenti
national pharmacies online [url=https://buyersguide.americanbar.org/profile/420642/0#]canadian pharcharmy [/url]
pharmacy cheap no prescription walmart pharmacy online
online pharmacies canada https://sanangelolive.com/members/pharmaceuticals
stromectol generic [url=https://inflavnena.zombeek.cz/#]ivermectina dosis [/url]
medicaments stromectol stromectol drug
medicaments stromectol https://dsdgbvda.zombeek.cz/
stromectol oral [url=https://challonge.com/esapenti#]buy ivermectin online fitndance [/url]
buy stromectol uk stromectol france
stromectol mites https://soncheebarxu.estranky.cz/clanky/stromectol-for-head-lice.html
stromectol france [url=https://order-stromectol-over-the-counter.estranky.cz/clanky/order-stromectol-over-the-counter.html#]stromectol children [/url]
stromectol nz stromectol biam
stromectol nuzeniec https://soncheebarxu.estranky.cz/clanky/stromectol-for-head-lice.html
canadian viagra generic pharmacy [url=https://melaninterest.com/user/canadian-pharmaceuticals-online/?view=likes#]canadian pharmacy [/url]
canadian online pharmacies legitimate discount canadian drugs
canada discount drug https://www.myscrsdirectory.com/profile/421708/0
dose for stromectol [url=https://soncheebarxu.estranky.cz/clanky/stromectol-for-head-lice.html#]what is stromectol [/url]
stromectol online pharmacy ivermectina
ivermectina https://inflavnena.zombeek.cz/
pharmacy on line [url=https://haikudeck.com/canadian-pharmaceuticals-online-personal-presentation-827506e003#]pharmacies shipping to usa [/url]
pharmacy on line walmart pharmacy viagra
indian pharmacy https://experiment.com/users/canadianpharmacy
compound pharmacy [url=https://wefbuyersguide.wef.org/profile/421914/0#]canada pharmaceuticals online [/url]
canada drugs pharmacy pharmeasy
pharmacy online shopping https://supplier.ihrsa.org/profile/421717/0
generic viagra online pharmacy [url=https://haikudeck.com/canadian-pharmaceuticals-online-personal-presentation-827506e003#]canadian pharmacy generic viagra [/url]
pharmacy drugstore online online medicine shopping
canada pharmaceuticals online https://sanangelolive.com/members/pharmaceuticals
approved canadian online pharmacies [url=https://supplier.ihrsa.org/profile/421717/0#]discount canadian drugs [/url]
canadian online pharmacy medicine online shopping
canadian pharmacies online https://seedandspark.com/user/canadian-pharmaceuticals-online
buy stromectol fitndance [url=https://order-stromectol-over-the-counter.estranky.cz/clanky/order-stromectol-over-the-counter.html#]stromectol online pharmacy [/url]
stromectol canada stromectol composition
stromectol medication https://order-stromectol-over-the-counter.estranky.cz/clanky/order-stromectol-over-the-counter.html
canadian government approved pharmacies [url=https://wefbuyersguide.wef.org/profile/421914/0#]canadian drugs online pharmacy [/url]
pharmacies online canadian pharmacy online
canadian pharmaceuticals online safe https://seedandspark.com/user/canadian-pharmaceuticals-online
online pharmacies canada [url=https://buyersguide.americanbar.org/profile/420642/0#]pills viagra pharmacy 100mg [/url]
canadian pharmacy navarro pharmacy miami
canadian pharmacy viagra generic https://reallygoodemails.com/canadianpharmaceuticalsonlineusa
online pharmacy drugstore [url=https://sanangelolive.com/members/canadianpharmaceuticalsonlineusa#]canadian online pharmacies [/url]
pharmacy online drugstore online shopping
pharmacy online https://moaamein.nacda.com/profile/422018/0
buying stromectol online [url=https://inflavnena.zombeek.cz/#]stromectol canada [/url]
buy stromectol online fitndance facts stromectol
is stromectol safe https://dsdgbvda.zombeek.cz/
canada pharmaceuticals online [url=https://experiment.com/users/canadianpharmacy#]online medicine order discount [/url]
viagra pharmacy 100mg pharmacy online cheap
canadian drugs pharmacy https://seedandspark.com/user/canadian-pharmaceuticals-online
pills viagra pharmacy 100mg [url=https://buyersguide.americanbar.org/profile/420642/0#]medicine online shopping [/url]
canadian online pharmacy pharmacy online
pharmacy online shopping https://wefbuyersguide.wef.org/profile/421914/0
stromectol order [url=https://dsdgbvda.zombeek.cz/#]ivermectin for humans [/url]
what is stromectol used for stromectol online pharmacy
stromectol online https://lehyriwor.estranky.sk/clanky/stromectol-cream.html
walgreens pharmacy online [url=https://experiment.com/users/canadianpharmacy#]online medicine shopping [/url]
walgreens pharmacy online order medicine online
walmart pharmacy viagra https://www.giantbomb.com/profile/canadapharmacy/blog/canadian-pharmaceuticals-online/265652/
discount pharmacy [url=https://sanangelolive.com/members/canadianpharmaceuticalsonlineusa#]canadian pharmacies online [/url]
canadian pharmacy king best online canadian pharmacy
canadian pharmacies-24h https://slides.com/canadianpharmaceuticalsonline
buy ivermectin online fitndance [url=https://sanangelolive.com/members/girsagerea#]stromectol buy online [/url]
dose for stromectol stromectol medication
ivermectin dosage https://lehyriwor.estranky.sk/clanky/stromectol-cream.html
online pharmacies [url=https://wefbuyersguide.wef.org/profile/421914/0#]canada discount drug [/url]
canadian cialis canada pharmaceuticals online
buy generic viagra online https://seedandspark.com/user/canadian-pharmaceuticals-online
stromectol mites [url=https://dsdgbvda.zombeek.cz/#]stromectol price [/url]
stromectol tablets uk stromectol usa
stromectol lice https://lehyriwor.estranky.sk/clanky/stromectol-cream.html
online pharmacies canada [url=https://reallygoodemails.com/canadianpharmaceuticalsonlineusa#]canada drugs online [/url]
canadian government approved pharmacies pharmacies shipping to usa
canadian pharmaceuticals online safe https://www.provenexpert.com/canadian-pharmaceuticals-online-usa/
medical pharmacy [url=https://buyersguide.americanbar.org/profile/420642/0#]canada pharmacy [/url]
best online canadian pharmacy approved canadian online pharmacies
canadian pharmacies https://slides.com/canadianpharmaceuticalsonline
stromectol over the counter [url=https://order-stromectol-over-the-counter.estranky.cz/clanky/order-stromectol-over-the-counter.html#]stromectol pill [/url]
buy generic stromectol stromectol children
dose for stromectol https://order-stromectol-over-the-counter.estranky.cz/clanky/order-stromectol-over-the-counter.html
pharmacy online drugstore [url=https://www.audiologysolutionsnetwork.org/profile/422019/0#]canadian online pharmacies [/url]
canadian drugs online pharmacies online medicine shopping
canadian cialis https://buyersguide.americanbar.org/profile/420642/0
stromectol new zealand [url=https://lehyriwor.estranky.sk/clanky/stromectol-cream.html#]buy stromectol online [/url]
buy stromectol ivermectin
stromectol scabies treatment https://sanangelolive.com/members/girsagerea
canadian drugs online pharmacy [url=https://seedandspark.com/user/canadian-pharmaceuticals-online#]canadian pharmacy online [/url]
online pharmacies uk online medicine order discount
viagra pharmacy 100mg https://www.audiologysolutionsnetwork.org/profile/422019/0
pharmacy discount [url=https://sanangelolive.com/members/pharmaceuticals#]canada online pharmacies [/url]
pharmacy intern pharmacy on line
canadian online pharmacies legitimate https://reallygoodemails.com/canadianpharmaceuticalsonlineusa
generic viagra online [url=https://www.myscrsdirectory.com/profile/421708/0#]canada online pharmacies [/url]
pills viagra pharmacy 100mg drugstore online
canada pharmaceutical online ordering https://network.myscrs.org/profile/422020/0
canadian pharmacies-247 [url=https://legalmarketplace.alanet.org/profile/421920/0#]pharmacie [/url]
buy viagra pharmacy 100mg mexican pharmacies
buy generic viagra online https://www.myscrsdirectory.com/profile/421708/0
pharmacy online drugstore [url=https://network.myscrs.org/profile/422020/0#]canadian government approved pharmacies [/url]
walmart pharmacy online pharmeasy
canadian cialis https://legalmarketplace.alanet.org/profile/421920/0
pharmacies online [url=https://moaamein.nacda.com/profile/422018/0#]canadian online pharmacies [/url]
canadian pharmacies online order medicine online
cialis pharmacy online https://wefbuyersguide.wef.org/profile/421914/0
online pharmacies of canada [url=https://network.myscrs.org/profile/422020/0#]canadian pharmacy online [/url]
canada pharmaceuticals online generic buy viagra pharmacy 100mg
canadian online pharmacies legitimate https://www.giantbomb.com/profile/canadapharmacy/blog/canadian-pharmaceuticals-online/265652/
canadian drugstore [url=https://headwayapp.co/canadianppharmacy-changelog#]online medicine tablets shopping [/url]
canadian pharmaceuticals online canadian pharmacy
pharmacies shipping to usa https://legalmarketplace.alanet.org/profile/421920/0
canadian online pharmacies legitimate [url=https://www.giantbomb.com/profile/canadapharmacy/blog/canadian-pharmaceuticals-online/265652/#]canadian pharcharmy [/url]
panacea pharmacy online pharmacies
canada pharmaceuticals online https://headwayapp.co/canadianppharmacy-changelog
pharmacies online [url=https://seedandspark.com/user/canadian-pharmaceuticals-online#]canadian pharcharmy [/url]
pharmacy in canada order medicine online
prescription drugs from canada https://headwayapp.co/canadianppharmacy-changelog
stromectol stock [url=https://challonge.com/esapenti#]stromectol purchase [/url]
discount stromectol stromectol generic
stromectol nz https://soncheebarxu.estranky.cz/clanky/stromectol-for-head-lice.html
aarp recommended canadian pharmacies [url=https://www.audiologysolutionsnetwork.org/profile/422019/0#]pharmacy online no prescription [/url]
mexican pharmacies buy generic viagra online
aarp recommended canadian pharmacies https://wefbuyersguide.wef.org/profile/421914/0
pharmacies online [url=https://seedandspark.com/user/canadian-pharmaceuticals-online#]international pharmacy [/url]
online pharmacies in usa canadian pharmacies
cialis pharmacy online https://www.mojomarketplace.com/user/Canadianpharmaceuticalsonline-EkugcJDMYH
stromectol for humans [url=https://dsdgbvda.zombeek.cz/#]buy stromectol [/url]
ivermectine stromectol no prescription
stromectol lice https://soncheebarxu.estranky.cz/clanky/stromectol-for-head-lice.html
canadian pharmacies [url=https://wefbuyersguide.wef.org/profile/421914/0#]pharmacy in canada [/url]
discount pharmacy canada pharmacies
pharmacy on line https://canadianpharmaceuticalsonline.as.me/schedule.php
stromectol from costco [url=https://inflavnena.zombeek.cz/#]stromectol for sale online [/url]
generic stromectol stromectol purchase
stromectol for scabies https://sanangelolive.com/members/girsagerea
international pharmacy [url=https://moaamein.nacda.com/profile/422018/0#]order medicine online [/url]
canada pharmaceuticals online generic online medicine to buy
canada drugs online https://canadianpharmaceuticalsonline.as.me/schedule.php
facts stromectol [url=https://order-stromectol-over-the-counter.estranky.cz/clanky/order-stromectol-over-the-counter.html#]stromectol order [/url]
stromectol from costco stromectol new zealand
stromectol no prescription https://sanangelolive.com/members/unsafiri
cheap pharmacy online [url=https://network.myscrs.org/profile/422020/0#]pharmacie [/url]
canadian pharmacy generic viagra discount pharmacy
canadian pharmacy review https://canadianpharmaceuticalsonline.as.me/schedule.php
stromectol headache [url=https://sanangelolive.com/members/unsafiri#]ivermectin [/url]
how to buy stromectol what is stromectol used for
buy stromectol https://order-stromectol-over-the-counter.estranky.cz/clanky/order-stromectol-over-the-counter.html
pharmacy online [url=https://moaamein.nacda.com/profile/422018/0#]online order medicine [/url]
pharmacy drugstore online online pharmacy
canadian pharmacy cialis 20mg https://moaamein.nacda.com/profile/422018/0
pharmacies in canada [url=https://seedandspark.com/user/canadian-pharmaceuticals-online#]canadian drugs [/url]
national pharmacies canada pharmaceutical online ordering
pharmacy discount https://legalmarketplace.alanet.org/profile/421920/0
canadian pharmacy online viagra [url=https://canadianpharmaceuticalsonline.as.me/schedule.php#]canadian pharmacy cialis 20mg [/url]
publix pharmacy online ordering canadian pharmacy
canadian pharmacy king https://canadianpharmaceuticalsonline.as.me/schedule.php
prescription drugs from canada [url=https://sanangelolive.com/members/canadianpharmaceuticalsonlineusa#]online pharmacies [/url]
buy viagra pharmacy 100mg indian pharmacy
approved canadian online pharmacies https://sanangelolive.com/members/canadianpharmaceuticalsonlineusa
international pharmacy [url=https://sanangelolive.com/members/canadianpharmaceuticalsonlineusa#]walmart pharmacy online [/url]
apollo pharmacy online canadian drugs online pharmacy
mexican pharmacies https://www.audiologysolutionsnetwork.org/profile/422019/0
drugstore online shopping [url=https://seedandspark.com/user/canadian-pharmaceuticals-online#]medicine online order [/url]
medical pharmacy medicine online order
pharmacy online prescription https://canadianpharmaceuticalsonline.as.me/schedule.php
ivermectin dosage [url=https://sanangelolive.com/members/girsagerea#]stromectol buy online [/url]
stromectol buy online ivermectina
stromectol australia https://lehyriwor.estranky.sk/clanky/stromectol-cream.html
pharmacy on line [url=https://moaamein.nacda.com/profile/422018/0#]canadian pharmacy online [/url]
online pharmacies in usa canada pharmacy
canada pharmacy https://network.myscrs.org/profile/422020/0
stromectol treatment scabies [url=https://pinshape.com/users/2491694-buy-stromectol-fitndance#]buy stromectol [/url]
order stromectol no prescription purchase stromectol
stromectol nz https://pinshape.com/users/2491694-buy-stromectol-fitndance
canadian pharmacy king [url=https://sanangelolive.com/members/canadianpharmaceuticalsonlineusa#]online order medicine [/url]
pharmacies in canada canadian online pharmacies
compound pharmacy https://wefbuyersguide.wef.org/profile/421914/0
dose for stromectol [url=https://pinshape.com/users/2491694-buy-stromectol-fitndance#]stromectol tablets uk [/url]
stromectol headache stromectol tablets
stromectol medication https://tropkefacon.estranky.sk/clanky/buy-ivermectin-fitndance.html
canada discount drug [url=https://moaamein.nacda.com/profile/422018/0#]canadian pharmaceuticals online [/url]
best canadian online pharmacy canadian drugs
canada drugs pharmacy online https://www.giantbomb.com/profile/canadapharmacy/blog/canadian-pharmaceuticals-online/265652/
where to buy stromectol uk [url=https://pinshape.com/users/2491694-buy-stromectol-fitndance#]purchase stromectol [/url]
stromectol pills buy stromectol uk
what is stromectol used for https://reallygoodemails.com/orderstromectoloverthecounterusa
stromectol sale [url=https://dramamhinca.zombeek.cz/#]where to buy stromectol uk [/url]
stromectol order online stromectol generic
stromectol for lice https://www.provenexpert.com/medicament-stromectol/
pharmacy cheap no prescription [url=https://www.audiologysolutionsnetwork.org/profile/422019/0#]mexican pharmacies [/url]
canadian drugs online pharmacy cialis generic pharmacy online
24 hour pharmacy https://canadianpharmaceuticalsonline.as.me/schedule.php
stromectol generic [url=https://sanangelolive.com/members/thisphophehand#]stromectol generic [/url]
treating scabies with stromectol stromectol posologie
where to buy stromectol uk https://tropkefacon.estranky.sk/clanky/buy-ivermectin-fitndance.html
canadian drugs pharmacy [url=https://network.myscrs.org/profile/422020/0#]canada pharmacy [/url]
canadian pharmacy review generic viagra online pharmacy
online pharmacy https://moaamein.nacda.com/profile/422018/0
buying stromectol online [url=https://aoc.stamford.edu/profile/cliclecnotes/#]stromectol online pharmacy [/url]
stromectol headache buy ivermectin online
stromectol effectiveness https://aoc.stamford.edu/profile/cliclecnotes/
stromectol lice [url=https://orderstromectoloverthecounter.com/#]https://orderstromectoloverthecounter.com/ [/url]
stromectol no prescription https://orderstromectoloverthecounter.com/
medicament stromectol https://orderstromectoloverthecounter.com/
canada online pharmacies [url=https://www.midi.org/forum/profile/89266-canadianpharmaceuticalsonline#]online pharmacy drugstore [/url]
pharmacy online prescription canada pharmaceuticals
pharmacy online shopping https://canadianpharmaceuticalsonline.as.me/schedule.php
stromectol pharmacokinetics [url=https://orderstromectoloverthecounter.com/#]https://orderstromectoloverthecounter.com/ [/url]
ivermectina https://orderstromectoloverthecounter.com/
stromectol uk https://orderstromectoloverthecounter.com/
canadian online pharmacies legitimate [url=https://motocom.co/demos/netw5/askme/question/canadian-pharmaceuticals-online-5/#]medicine online shopping [/url]
discount pharmacies order medicine online
best online international pharmacies https://seedandspark.com/user/canadian-pharmaceuticals-online
buying stromectol [url=https://orderstromectoloverthecounter.com/#]https://orderstromectoloverthecounter.com/ [/url]
buy stromectol scabies online https://orderstromectoloverthecounter.com/
stromectol biam https://orderstromectoloverthecounter.com/
canadian pharmacy [url=https://sanangelolive.com/members/canadianpharmaceuticalsonlineusa#]pharmacy uk [/url]
canadian viagra discount pharmacy
online pharmacies legitimate https://canadianpharmaceuticalsonline.as.me/schedule.php
stromectol pills [url=https://orderstromectoloverthecounter.com/#]https://orderstromectoloverthecounter.com/ [/url]
stromectol from costco https://orderstromectoloverthecounter.com/
stromectol usa https://orderstromectoloverthecounter.com/
pharmacy intern [url=https://seedandspark.com/user/canadian-pharmaceuticals-online#]pharmacy online [/url]
canada drugs online shoppers drug mart canada
canada drugs pharmacy online https://seedandspark.com/user/canadian-pharmaceuticals-online
stromectol oral [url=https://orderstromectoloverthecounter.com/#]https://orderstromectoloverthecounter.com/ [/url]
stromectol for sale online https://orderstromectoloverthecounter.com/
stromectol for sale https://orderstromectoloverthecounter.com/
order stromectol no prescription [url=https://orderstromectoloverthecounter.com/#]https://orderstromectoloverthecounter.com/ [/url]
stromectol for crabs https://orderstromectoloverthecounter.com/
order stromectol over the counter https://orderstromectoloverthecounter.com/
stromectol composition [url=https://orderstromectoloverthecounter.com/#]https://orderstromectoloverthecounter.com/ [/url]
stromectol oral https://orderstromectoloverthecounter.com/
order stromectol over the counter https://orderstromectoloverthecounter.com/
viagra generic canadian pharmacy [url=https://sanangelolive.com/members/canadianpharmaceuticalsonlineusa#]canadian pharmaceuticals online [/url]
pharmacies in canada pharmacy online drugstore
cheap pharmacy online https://sanangelolive.com/members/canadianpharmaceuticalsonlineusa
stromectol for head lice [url=https://orderstromectoloverthecounter.com/#]https://orderstromectoloverthecounter.com/ [/url]
stromectol effectiveness https://orderstromectoloverthecounter.com/
stromectol medicine https://orderstromectoloverthecounter.com/
is stromectol safe [url=https://orderstromectoloverthecounter.com/#]https://orderstromectoloverthecounter.com/ [/url]
stromectol tablets https://orderstromectoloverthecounter.com/
buy stromectol fitndance https://orderstromectoloverthecounter.com/
canadian pharmacy review [url=https://www.midi.org/forum/profile/89266-canadianpharmaceuticalsonline#]pharmacy online [/url]
compound pharmacy canada drugs pharmacy
canada pharmaceuticals https://motocom.co/demos/netw5/askme/question/canadian-pharmaceuticals-online-5/
panacea pharmacy [url=https://sanangelolive.com/members/canadianpharmaceuticalsonlineusa#]canadian pharmaceuticals online [/url]
canadian online pharmacies legitimate pharmeasy
canadian pharmacy generic viagra https://motocom.co/demos/netw5/askme/question/canadian-pharmaceuticals-online-5/
stromectol medicine [url=https://orderstromectoloverthecounter.com/#]https://orderstromectoloverthecounter.com/ [/url]
stromectol oral https://orderstromectoloverthecounter.com/
buying stromectol online https://orderstromectoloverthecounter.com/
stromectol australia [url=https://orderstromectoloverthecounter.com/#]https://orderstromectoloverthecounter.com/ [/url]
stromectol rosacea https://orderstromectoloverthecounter.com/
stromectol cvs https://orderstromectoloverthecounter.com/
stromectol effectiveness [url=https://orderstromectoloverthecounter.com/#]https://orderstromectoloverthecounter.com/ [/url]
stromectol for lice https://orderstromectoloverthecounter.com/
stromectol treatment scabies https://orderstromectoloverthecounter.com/
canada online pharmacies [url=https://www.giantbomb.com/profile/canadapharmacy/blog/canadian-pharmaceuticals-online/265652/#]canadian pharmacy [/url]
prescription drugs from canada canadian pharmacy
canadian pharmacy drugs online https://www.midi.org/forum/profile/89266-canadianpharmaceuticalsonline
generic viagra online pharmacy [url=https://www.mojomarketplace.com/user/Canadianpharmaceuticalsonline-EkugcJDMYH#]online medicine to buy [/url]
online pharmacies canada canada pharmacies
drugstore online shopping https://motocom.co/demos/netw5/askme/question/canadian-pharmaceuticals-online-5/
buy ivermectin fitndance [url=https://orderstromectoloverthecounter.com/#]https://orderstromectoloverthecounter.com/ [/url]
what is stromectol https://orderstromectoloverthecounter.com/
reaction au stromectol https://orderstromectoloverthecounter.com/
canadian pharmaceuticals online safe [url=https://motocom.co/demos/netw5/askme/question/canadian-pharmaceuticals-online-5/#]canada drugs pharmacy online [/url]
compound pharmacy online order medicine
buy generic viagra online https://sanangelolive.com/members/canadianpharmaceuticalsonlineusa
stromectol overdose [url=https://orderstromectoloverthecounter.com/#]https://orderstromectoloverthecounter.com/ [/url]
buy generic stromectol https://orderstromectoloverthecounter.com/
what is stromectol https://orderstromectoloverthecounter.com/
purchase stromectol [url=https://orderstromectoloverthecounter.com/#]https://orderstromectoloverthecounter.com/ [/url]
stromectol tablets https://orderstromectoloverthecounter.com/
buy ivermectin https://orderstromectoloverthecounter.com/
canadian drugs pharmacy [url=https://www.mojomarketplace.com/user/Canadianpharmaceuticalsonline-EkugcJDMYH#]approved canadian online pharmacies [/url]
canadian drugstore walmart pharmacy online
canada pharmaceuticals online generic https://www.giantbomb.com/profile/canadapharmacy/blog/canadian-pharmaceuticals-online/265652/
buy stromectol online fitndance [url=https://orderstromectoloverthecounter.com/#]https://orderstromectoloverthecounter.com/ [/url]
stromectol australia https://orderstromectoloverthecounter.com/
stromectol oral https://orderstromectoloverthecounter.com/
online pharmacies legitimate [url=https://motocom.co/demos/netw5/askme/question/canadian-pharmaceuticals-online-5/#]canadian pharmaceuticals online [/url]
canadian pharmacy viagra generic pharmacy online cheap
pills viagra pharmacy 100mg https://www.mojomarketplace.com/user/Canadianpharmaceuticalsonline-EkugcJDMYH
canadian drugs pharmacy [url=https://sanangelolive.com/members/canadianpharmaceuticalsonlineusa#]viagra generic canadian pharmacy [/url]
canadian drugs pharmacies online canadian pharmacy drugs online
online pharmacies legitimate https://www.mojomarketplace.com/user/Canadianpharmaceuticalsonline-EkugcJDMYH
online canadian pharcharmy [url=https://sanangelolive.com/members/canadianpharmaceuticalsonlineusa#]canadian pharmacies online [/url]
canadian drugs pharmacy international pharmacy
london drugs canada https://www.giantbomb.com/profile/canadapharmacy/blog/canadian-pharmaceuticals-online/265652/
pills viagra pharmacy 100mg [url=https://seedandspark.com/user/canadian-pharmaceuticals-online#]walgreens pharmacy online [/url]
walmart pharmacy viagra pharmacies shipping to usa
canada pharmaceuticals online https://seedandspark.com/user/canadian-pharmaceuticals-online
pharmacy in canada [url=https://www.midi.org/forum/profile/89266-canadianpharmaceuticalsonline#]compound pharmacy [/url]
canada pharmaceuticals online pharmacies uk
pharmacies shipping to usa https://www.giantbomb.com/profile/canadapharmacy/blog/canadian-pharmaceuticals-online/265652/
canada pharmacy online [url=https://www.giantbomb.com/profile/canadapharmacy/blog/canadian-pharmaceuticals-online/265652/#]medicine online order [/url]
canadian prescriptions online online pharmacies legitimate
online pharmacies legitimate https://seedandspark.com/user/canadian-pharmaceuticals-online
shoppers pharmacy [url=https://sanangelolive.com/members/canadianpharmaceuticalsonlineusa#]canadian pharmacies [/url]
walmart pharmacy viagra pharmacies shipping to usa
viagra pharmacy 100mg https://motocom.co/demos/netw5/askme/question/canadian-pharmaceuticals-online-5/
stromectol nz [url=https://stromectoloverthecounter.wordpress.com/#]ivermectin [/url]
buy ivermectin fitndance ivermectina
stromectol in india https://buystromectol.livejournal.com/421.html
mexican pharmacies [url=https://www.giantbomb.com/profile/canadapharmacy/blog/canadian-pharmaceuticals-online/265652/#]canadian pharmaceuticals online [/url]
canadian cialis canadian drugs online pharmacy
shoppers drug mart canada https://seedandspark.com/user/canadian-pharmaceuticals-online
pharmacy discount [url=https://zencastr.com/@pharmaceuticals#]canadian drugs [/url]
aarp recommended canadian pharmacies canadian viagra
cheap pharmacy online https://sanangelolive.com/members/canadianpharmaceuticalsonlineusa
stromectol order online [url=https://stromectoloverthecounter.wordpress.com/#]stromectol online pharmacy [/url]
stromectol pill stromectol for sale online
stromectol espana https://orderstromectoloverthecounter.flazio.com/
stromectol mites [url=https://aleserme.estranky.sk/clanky/stromectol-espana.html#]stromectol prioderm [/url]
dose for stromectol stromectol order
stromectol medication https://aleserme.estranky.sk/clanky/stromectol-espana.html
canadia online pharmacy [url=https://www.giantbomb.com/profile/canadapharmacy/blog/canadian-pharmaceuticals-online/265652/#]pharmacy online [/url]
online pharmacies canada canada pharmacy
best canadian online pharmacies https://www.mojomarketplace.com/user/Canadianpharmaceuticalsonline-EkugcJDMYH
stromectol pill [url=https://orderstromectoloverthecounter.mystrikingly.com/#]stromectol children [/url]
is stromectol safe stromectol demodex
order stromectol over the counter https://stromectoloverthecounter.wordpress.com/
canadian viagra [url=https://www.mojomarketplace.com/user/Canadianpharmaceuticalsonline-EkugcJDMYH#]shoppers pharmacy [/url]
canadian prescriptions online online pharmacy
compound pharmacy https://zencastr.com/@pharmaceuticals
stromectol over the counter [url=https://orderstromectoloverthecounter.flazio.com/#]stromectol dosage table [/url]
stromectol espana buy stromectol
stromectol uk https://orderstromectoloverthecounter.mystrikingly.com/
shoppers drug mart canada [url=https://conifer.rhizome.org/pharmaceuticals#]online order medicine [/url]
medical pharmacies canadian pharmacy
canadian pharmaceuticals online https://www.giantbomb.com/profile/canadapharmacy/blog/canadian-pharmaceuticals-online/265652/
stromectol stock [url=https://orderstromectoloverthecounter.flazio.com/#]stromectol france [/url]
stromectol tablets facts stromectol
stromectol purchase https://buystromectol.livejournal.com/421.html
stromectol reviews [url=https://orderstromectoloverthecounter.mystrikingly.com/#]buying stromectol [/url]
stromectol buy buy ivermectin
what is stromectol used for https://orderstromectoloverthecounter.flazio.com/
purchase stromectol online [url=https://stromectoloverthecounter.wordpress.com/#]stromectol purchase [/url]
stromectol for scabies stromectol coupon
stromectol for head lice https://stromectoloverthecounter.wordpress.com/
pharmacy in canada [url=https://seedandspark.com/user/canadian-pharmaceuticals-online#]online pharmacy drugstore [/url]
online pharmacies legitimate canadian pharmacy
canadian pharmaceuticals online https://motocom.co/demos/netw5/askme/question/canadian-pharmaceuticals-online-5/
order stromectol online [url=https://buystromectol.livejournal.com/421.html#]stromectol usa [/url]
buy ivermectin fitndance stromectol
stromectol for sale https://telegra.ph/Order-Stromectol-over-the-counter-10-29
stromectol order online [url=https://orderstromectoloverthecounter.fo.team/#]stromectol reviews [/url]
stromectol nz buy generic stromectol
stromectol dosage table https://orderstromectoloverthecounter.mystrikingly.com/
canadian pharmacy king [url=https://motocom.co/demos/netw5/askme/question/canadian-pharmaceuticals-online-5/#]pharmacie [/url]
canadian online pharmacies viagra generic canadian pharmacy
online pharmacies legitimate https://www.mojomarketplace.com/user/Canadianpharmaceuticalsonline-EkugcJDMYH
stromectol prioderm [url=https://buystromectol.livejournal.com/421.html#]stromectol doses [/url]
stromectol cream stromectol new zealand
stromectol generic https://orderstromectoloverthecounter.proweb.cz/
canadian cialis [url=https://sanangelolive.com/members/canadianpharmaceuticalsonlineusa#]medicine online order [/url]
panacea pharmacy online medicine shopping
best canadian online pharmacies https://conifer.rhizome.org/pharmaceuticals
stromectol for crabs [url=https://orderstromectoloverthecounter.fo.team/#]stromectol [/url]
stromectol canada buy stromectol online
how to buy stromectol https://aleserme.estranky.sk/clanky/stromectol-espana.html
canada drugs pharmacy online [url=https://sanangelolive.com/members/canadianpharmaceuticalsonlineusa#]canadian drugstore [/url]
canadian pharmacy king canada pharmacies
international pharmacy https://www.midi.org/forum/profile/89266-canadianpharmaceuticalsonline
order stromectol over the counter [url=https://orderstromectoloverthecounter.proweb.cz/#]stromectol for sale [/url]
stromectol price stromectol lice
stromectol online pharmacy https://buystromectol.livejournal.com/421.html
online drugstore pharmacy [url=https://sandbox.zenodo.org/communities/canadianpharmaceuticalsonline/#]canadian pharmacy viagra generic [/url]
publix pharmacy online ordering online pharmacy busted
viagra generic canadian pharmacy https://sanangelolive.com/members/canadianpharmaceuticalsonlineusa
canadian pharmacy [url=https://seedandspark.com/user/canadian-pharmaceuticals-online#]walgreens pharmacy online [/url]
pharmacies shipping to usa canada pharmacy
canada pharmaceuticals online generic https://www.midi.org/forum/profile/89266-canadianpharmaceuticalsonline
canada pharmaceuticals [url=https://www.midi.org/forum/profile/89266-canadianpharmaceuticalsonline#]pharmacy online cheap [/url]
cheap prescription drugs online medicine to buy
aarp recommended canadian pharmacies https://seedandspark.com/user/canadian-pharmaceuticals-online
erectile supplements [url=http://www.dungdong.com/home.php?mod=space&uid=2527925&do=profile#]ed drugs [/url]
cheapest erectile disfunction drug what erectile dysfunction drug works best
erectile mastery exercises http://www.ribinad.com/forum/profile.php?id=2957
erectile function [url=https://towyardcars.com/author/ignaciomcc/#]erectile supplements [/url]
which erectile dysfunction foods work fast best ed drugs
best erectile https://www.reliabilityextranet.com/forums/users/ezekielmac/
erectile means [url=https://towyardcars.com/author/ignaciomcc/#]botox for erectile dysfunction [/url]
erectile exercises video top erectile dysfunction pills
erectile dysfunction medications https://lx.ahjxc.xyz/home.php?mod=space&uid=4685569&do=profile&from=space
erectile health [url=http://www.pakbrowse.com/user/profile/8290#]ed drugs generic [/url]
erectile disorder treatment erectile doctors
erectile pills sample https://ririokoye.com/members/chaudibell/
is erectile dysfunction secondary to ptsd [url=https://www.icsp-hyderabad.com/forums/users/blpedmundz/#]solutions to erectile dysfunction [/url]
erectile stimulus buy erectile dysfunction pills online
erectile solutions that work at walmart https://yazdkhodro.ir/author/kevinledes/
erectile function after prostatectomy [url=https://www.bgaudio.org/modules.php?name=Your_Account&op=userinfo&username=Morganbumq#]help with erectile dysfunction [/url]
top erectile urologists in san francisco best erectile dysfunction drug
does erectile dysfunction cause infertility https://www.cotizaciondemetales.com/foro/forums/users/sophiabrer/
erectile dysfunction symptoms [url=https://bizzultz.com/component/k2/itemlist/user/46471-ordermedicineonlineguidetocommunicatingvalue#]erectile nerve regeneration [/url]
erectile hopeless new ed drugs
erectile vitimans http://www.dungdong.com/home.php?mod=space&uid=2527925&do=profile
erectile pump reviews [url=https://www.fitnessgeared.com/members/dannycarne/1806-lies-youve-been-told-about-online-medicine-shopping.html#]best ed drugs [/url]
erectile dysfunction pump can erectile dysfunction delay pregnancy
erectile dysfunction pump https://oglaszam.pl/author/ujuemanuel/
erectile disorder exam [url=https://poweredgemag.com/forums/users/chelseaath/edit/?updated=true/users/chelseaath/#]top erectile pills [/url]
improving erectile dysfunction erectile on demand scam
cheapest erectile dysfunction https://www.buy1on1.com/user/profile/2156385
best erectile herbs [url=http://bbs.boway.net/home.php?mod=space&uid=268495&do=profile&from=space#]buy erectile dysfunction pills [/url]
erectile dysfunction icd erectile with long time
can erectile dysfunction be cured https://toppazar.com/author/pxhbeatriz/
does erectile dysfunction end [url=https://neurofeedbackalliance.org/community/profile/gladysdura/#]does erectile dysfunction affect fertility [/url]
erectile nerves erectile pills canada
erectile pills for sale http://86x.org/home.php?mod=space&uid=1980778&do=profile&from=space
erectile ring walmart [url=https://bizzultz.com/component/k2/itemlist/user/46471-ordermedicineonlineguidetocommunicatingvalue#]is erectile dysfunction dangerous [/url]
erectile tissue in men erectile hypertension
erectile hopeless https://forum.veriagi.com/profile.php?id=3186327
which erectile dysfunction pills work [url=http://brianknapp.co/community/profile/dillondeet/#]erectile mastery exercises [/url]
erectile cherries can erectile dysfunction caused by guilt
erectile pillole https://forum.veriagi.com/profile.php?id=3186327
erectile booster method reviews [url=https://piesapalbe.estranky.sk/#]erectile dysfunction injections [/url]
erectile function scale erectile booster method pdf
does erectile dysfunction ever go away https://plancaticam.estranky.cz/
erectile machines [url=http://bbs.boway.net/home.php?mod=space&uid=268495&do=profile&from=space#]erectile pills over the counter [/url]
erectile pain after peyronie s surgery erectile curvature
is erectile dysfunction a chronic condition https://ririokoye.com/members/chaudibell/
fix erectile dysfunction without drugs [url=http://allstamps.ru/author/aldavanzet/#]best erectile dysfunction medication [/url]
top erectile dysfunction supplements erectile pills
erectile tissue quizlet http://yinyue7.com/space-uid-603820.html
erectile trick [url=https://clicavisos.com.ar/author/erniepmsiw/#]ed drugs list [/url]
discount erectile dysfunction pills erectile pills over the counter
erectile health https://bizzultz.com/component/k2/itemlist/user/46471-ordermedicineonlineguidetocommunicatingvalue
which erectile dysfunction drugs cost more [url=https://www.globale-evolution.de/member.php?u=30767-AugustusZe#]erectile remedies [/url]
erectile transplant ed drugs list
does erectile dysfunction affect fertility https://www.cotizaciondemetales.com/foro/forums/users/sophiabrer/
erectile dysfunction clinic [url=http://7pdf.ir/unknown-facts-about-pharmacy-uk-made-known/#]ace inhibitors erectile dysfunction [/url]
is erectile dysfunction reversible erectile pills canada
best ways to help erectile dysfunction https://toppazar.com/author/pxhbeatriz/
erectile psychological [url=https://500px.com/p/stofovinin/?view=groups#]best erectile dysfunction medication [/url]
erectile enhancement solutions to erectile dysfunction
best erectile dysfunction medication http://www.nyc366.com/nycfind/learning-pods-3/three-rules-about-international-pharmacy-meant-to-be-damaged.html
will erectile dysfunction go away [url=https://homemdigital.com/forums/users/chaunceytu/#]which erectile dysfunction pills work [/url]
is erectile dysfunction caused by diabetes cheapest ed drugs
erectile hypertension https://dohabb.com/index.php?page=user&action=pub_profile&id=3277956
erectile massage rochester ny [url=https://electricalcars.net/index.php?qa=326752&qa_1=why-online-pharmacies-succeeds#]best drugs for ed [/url]
erectile dysfunction injections buy erectile dysfunction meds online
erectile winstrol https://homemdigital.com/forums/users/chaunceytu/
is erectile dysfunction a va disability rates [url=https://www.bgaudio.org/modules.php?name=Your_Account&op=userinfo&username=Morganbumq#]ed drugs list [/url]
erectile malfunction ed drugs over the counter
erectile dysfunction with diabetes https://gravesales.com/author/serenakenn/
erectile products [url=https://www.laojintuan.com/space-uid-127705.html#]improve erectile dysfunction [/url]
is erectile dysfunction secondary to ptsd erectile disorder exam
does erectile disfunction affect mastarbation https://worldtaxi.org/2023/02/25/the-one-thing-to-do-for-canadian-pharmacies/
erectile organs crossword [url=https://dgtss.gouv.sn/fr/content/every-little-thing-you-wanted-learn-about-online-medicine-buy-and-have-been-afraid-ask#]erectile com [/url]
top erectile pills best ed drugs
erectile device https://www.qzqcfw.com/home.php?mod=space&uid=157003&do=profile&from=space
erectile muscle [url=https://gravesales.com/author/serenakenn/#]erectile dysfunction injections [/url]
best erectile medication erectile enhancement pills
erectile stimulus https://poweredgemag.com/forums/users/chelseaath/edit/?updated=true/users/chelseaath/
erectile tissue [url=http://allstamps.ru/author/aldavanzet/#]cheap ed drugs [/url]
erectile hardening cream comparing erectile dysfunction drugs
princeton guidelines erectile dysfunction https://yazdkhodro.ir/author/kevinledes/
erectile dysfunction symptoms [url=https://piesapalbe.estranky.sk/#]ed drugs generic [/url]
erectile pumps and rings ed drugs list
erectile dysfunction reviews https://lx.ahjxc.xyz/home.php?mod=space&uid=4685569&do=profile&from=space
erectile destroyer [url=https://ririokoye.com/members/chaudibell/#]best erectile pills [/url]
youtube erectile dysfunction erectile pills over the counter
erectile device https://thegameofcareers.com/forums/users/claricezro/edit/?paged=0/users/claricezro/
is erectile dysfunction a va disability [url=https://www.reliabilityextranet.com/forums/users/ezekielmac/#]buy erectile dysfunction pills [/url]
is erectile dysfunction common does erectile dysfunction ever reverse
compare erectile dysfunction medication https://www.globale-evolution.de/member.php?u=30767-AugustusZe
are erectile dysfunction pills dangerous [url=https://plancaticam.estranky.cz/#]erectile pills [/url]
erectile implants video buy erectile dysfunction pills
erectile vacuum systems https://thegameofcareers.com/forums/users/claricezro/edit/?paged=0/users/claricezro/
cheapest erectile dysfunction pill [url=https://www.laojintuan.com/space-uid-127705.html#]is erectile dysfunction a chronic disease [/url]
is erectile dysfunction secondary to ptsd erectile curvature
erectile organs pha https://ai.igcps.com/home.php?mod=space&uid=439125&do=profile&from=space
erectile cherries [url=https://neurofeedbackalliance.org/community/profile/gladysdura/#]erectile herbs [/url]
erectile strength help with erectile dysfunction
for erectile dysfunction ptx http://www.dungdong.com/home.php?mod=space&uid=2527925&do=profile
do erectile sprays work [url=https://worldtaxi.org/2023/02/25/the-one-thing-to-do-for-canadian-pharmacies/#]buy erectile dysfunction pills [/url]
erectile medication over the counter solutions to erectile dysfunction
is erectile dysfunction a chronic condition https://homemdigital.com/forums/users/chaunceytu/
top erectile dysfunction doctors in tx [url=http://www.dungdong.com/home.php?mod=space&uid=2527925&do=profile#]erectile with long time [/url]
erectile boosting medication erectile support
erectile vasectomy https://bizzultz.com/component/k2/itemlist/user/46471-canadianpharmaceuticalsonlinereviewsguide
erectile diet [url=http://bbs.boway.net/home.php?mod=space&uid=268495&do=profile&from=space#]is erectile dysfunction real [/url]
erectile medication bimix tens 7000 erectile dysfunction
is erectile dysfunction treatable https://plancaticam.estranky.cz/
erectile creams walgreens [url=https://dgtss.gouv.sn/fr/content/every-little-thing-you-wanted-learn-about-online-medicine-buy-and-have-been-afraid-ask#]erectile pills over the counter [/url]
do erectile sprays work cheapest ed drugs
erectile treatment https://www.reliabilityextranet.com/forums/users/ezekielmac/
erectile ring walmart [url=https://poweredgemag.com/forums/users/chelseaath/edit/?updated=true/users/chelseaath/#]ed drugs [/url]
erectile therapy after prostatectomy solutions to erectile dysfunction
erectile exercises video http://allstamps.ru/author/aldavanzet/
do erectile dysfunction pills really work [url=https://nienalo.strikingly.com/#]erectile supplements that work [/url]
low cost erectile treatment best ed drugs
erectile dysfunction icd 10 https://piesapalbe.estranky.sk/
erectile photos [url=http://brianknapp.co/community/profile/dillondeet/#]new drugs for ed [/url]
erectile dysfunction when trying to conceive erectile disorder treatment
erectile medicine for men https://doska.philatelie.ru/author/vilmacluca/
erectile rehabilitation [url=https://gravesales.com/author/serenakenn/#]new drugs for ed [/url]
erectile blogs is erectile dysfunction a va disability
top erectile dysfunction pills https://www.fitnessgeared.com/members/dannycarne/1806-lies-youve-been-told-about-online-medicine-shopping.html
erectile smoothie [url=http://www.ribinad.com/forum/profile.php?id=2957#]erectile medication bimix [/url]
erectile dysfunction treatment erectile dysfunction pills
erectile disorder https://toppazar.com/author/pxhbeatriz/
can erectile dysfunction be prevented [url=https://www.bgaudio.org/modules.php?name=Your_Account&op=userinfo&username=Morganbumq#]erectile tissue in the nose [/url]
erectile dysfunction in children erectile pills over the counter
erectile male enhancement http://yinyue7.com/space-uid-603820.html
erectile discharge [url=https://www.globale-evolution.de/member.php?u=30767-AugustusZe#]buy erectile dysfunction medications online [/url]
erectile problems home remedies can erectile dysfunction be cured naturally
service connected erectile dysfunction https://umaco.de/to-ensure-that-you-to-be-successful-in-online-order-medicine-listed-below-are-5-invaluable-things-to-know/
are erectile dysfunction pills covered by aca [url=https://www.karcinomdojke.rs/forums/users/sabinalamm/edit/?updated=true/users/sabinalamm/#]erectile pills without a doctor prescription [/url]
erectile food discount erectile dysfunction
erectile dysfunction guide https://www.zonamobile.net/forums/profile/garnetpguk/
erectile tissue around the urethra [url=https://www.sitiosecuador.com/author/yaniraxwq/#]ed drugs list [/url]
erectile dysfunction and treatments herbs for erectile dysfunction
erectile function clinic in san antonio https://www.sex8.zone/home.php?mod=space&uid=7340985&do=profile
erectile shots diagram [url=https://www.sitiosecuador.com/author/yaniraxwq/#]erectile pills without a doctor prescription [/url]
erectile tissue erectile function magnesium vitamin k
can erectile dysfunction come on suddenly https://farawaykingdom.net/2023/02/28/are-you-embarrassed-by-your-online-pharmacy-skills-here%c2%92s-what-to-do/
erectile deficiency [url=http://www.dungdong.com/home.php?mod=space&uid=2527925&do=profile#]ed drugs generic [/url]
erectile damage ed drugs list
is erectile dysfunction life threatening http://promoaja.com/members/chauhillar/
erectile nerves [url=http://86x.org/home.php?mod=space&uid=1980778&do=profile&from=space#]is erectile dysfunction secondary to ptsd [/url]
erectile pills that work buy erectile dysfunction meds online
erectile clamp https://yazdkhodro.ir/author/kevinledes/
which erectile dysfunction pills work [url=https://bizzultz.com/component/k2/itemlist/user/46471-canadianpharmaceuticalsonlinereviewsguide#]erectile enhancement pills [/url]
which erectile dysfunction drugs work best erectile pills over the counter
erectile dysfunction treatment https://challonge.com/afersparun
erectile examination [url=https://www.laojintuan.com/space-uid-127705.html#]buy erectile dysfunction meds online [/url]
erectile response erectile tissue in the nose
erectile on demand https://www.buy1on1.com/user/profile/2156385
is erectile dysfunction a va disability [url=http://www.pakbrowse.com/user/profile/8290#]erectile organs crossword clue [/url]
icd 10 erectile erectile food
erectile creams rite aid https://doska.philatelie.ru/author/vilmacluca/
erectile tissue function [url=https://www.unitenplay.com/forums/users/staceyhutc/#]fast erectile repair [/url]
ace inhibitors erectile dysfunction is erectile dysfunction a disease
tens 7000 erectile https://lx.ahjxc.xyz/home.php?mod=space&uid=4685569&do=profile&from=space
what erectile dysfunction herbs effect her es [url=http://contractorsadvisor.net/forums/users/issacbrode/edit/?updated=true/users/issacbrode/#]best ed drugs [/url]
buy erectile dysfunction pump cvs cheapest ed drugs
erectile creams walgreens https://neurofeedbackalliance.org/community/profile/gladysdura/
erectile support [url=https://doska.philatelie.ru/author/vilmacluca/#]new drugs for ed [/url]
treating erectile dysfunction without drugs erectile d with matt lauer
is erectile dysfunction a symptom of diabetes https://lx.ahjxc.xyz/home.php?mod=space&uid=4685569&do=profile&from=space
erectile dysfunction remedies [url=https://www.buy1on1.com/user/profile/2156385#]icd 10 erectile [/url]
is erectile dysfunction psychological help with erectile dysfunction
erectile restoration centers llc http://www.batumirent.com/author/cecillogsd/
can erectile dysfunction be temporary [url=http://www.wirsindfoto.de/?option=com_k2&view=itemlist&task=user&id=326396#]ed drugs list [/url]
erectile 20170 elderly can erectile dysfunction be cured
erectile https://yazdkhodro.ir/author/kevinledes/
how erectile dysfunction affects men [url=https://www.laojintuan.com/space-uid-127705.html#]botox for erectile dysfunction [/url]
erectile function score problems with erectile dysfunction
erectile organs crossword https://yazdkhodro.ir/author/kevinledes/
erectile dysfunction when trying to conceive [url=https://www.globale-evolution.de/member.php?u=30767-AugustusZe#]buy erectile dysfunction meds online [/url]
low cost erectile treatment how erectile dysfunction affects marriage
erectile synonym https://www.cotizaciondemetales.com/foro/forums/users/sophiabrer/
erectile disorder symptoms [url=https://www.zonamobile.net/forums/profile/garnetpguk/#]ed drugs [/url]
erectile bands new drugs for ed
erectile enhancer https://ai.igcps.com/home.php?mod=space&uid=439125&do=profile&from=space
erectile function after prostate cancer [url=https://www.zonamobile.net/forums/profile/garnetpguk/#]is erectile dysfunction treatable [/url]
erectile bleeding erectile gel
new york erectile dysfunction http://brianknapp.co/community/profile/dillondeet/
erectile dysfunction prognosis [url=https://www.unitenplay.com/forums/users/staceyhutc/#]herbs for erectile dysfunction [/url]
erectile on demand best ed drugs
yoga for erectile dysfunction http://bbs.boway.net/home.php?mod=space&uid=268495&do=profile&from=space
erectile natural diet pdf [url=https://www.carhubsales.com.au/user/profile/1177795#]help with erectile dysfunction [/url]
erectile stamina fast acting erectile pills
erectile dysfunction remedies https://pinshape.com/users/2517016-cheap-ed-drugs
erectile booster [url=https://bizzultz.com/component/k2/itemlist/user/46471-canadianpharmaceuticalsonlinereviewsguide#]best erectile pills [/url]
can erectile dysfunction be permanent erectile definition
erectile on demand pdf http://7pdf.ir/unknown-facts-about-pharmacy-uk-made-known/
erectile on demand [url=http://www.wirsindfoto.de/?option=com_k2&view=itemlist&task=user&id=326396#]best erectile dysfunction medication [/url]
do erectile pills permanently increase size erectile massage rochester ny
erectile dysfunction medications https://www.provenexpert.com/best-erectile-pills/
erectile on demand scam [url=https://worldtaxi.org/2023/02/25/the-one-thing-to-do-for-canadian-pharmacies/#]erectile means [/url]
improving erectile dysfunction help with erectile dysfunction
tens 7000 erectile dysfunction https://wallsawadar.zombeek.cz/
erectile clinic tulsa ok [url=https://www.karcinomdojke.rs/forums/users/sabinalamm/edit/?updated=true/users/sabinalamm/#]erectile natural remedies [/url]
erectile remedies for men new ed drugs
michael douglas erectile dysfunction https://yazdkhodro.ir/author/kevinledes/
erectile implants [url=https://worldtaxi.org/2023/02/25/the-one-thing-to-do-for-canadian-pharmacies/#]erectile enhancement pills [/url]
princeton guidelines erectile dysfunction erectile pills from canada
erectile function restored after turp https://wallsawadar.zombeek.cz/
erectile tissue location and function [url=https://piesapalbe.estranky.sk/#]erectile herbal supplements [/url]
erectile examination does erectile dysfunction affect desire
erectile disorder treatment https://homemdigital.com/forums/users/chaunceytu/
is erectile dysfunction a va disability [url=https://piesapalbe.estranky.sk/#]are erectile dysfunction not curable [/url]
erectile pictures erectile desensitization
erectile functioning https://gravesales.com/author/serenakenn/
erectile pills china [url=https://pinshape.com/users/2517016-cheap-ed-drugs#]erectile pills over the counter [/url]
erectile pills for sale erectile injections pics
erectile photos https://gravesales.com/author/serenakenn/
best erectile dysfunction treatment [url=https://www.carhubsales.com.au/user/profile/1177795#]erectile reflex [/url]
best erectile dysfunction meds erectile enhancement pills
erectile suppliers https://lx.ahjxc.xyz/home.php?mod=space&uid=4685569&do=profile&from=space
erectile disorder 38 cfr [url=http://yinyue7.com/space-uid-603820.html#]compare erectile dysfunction medication [/url]
10 best erectile supplements ed drugs list
erectile smoothie https://thegameofcareers.com/forums/users/claricezro/edit/?paged=0/users/claricezro/
erectile cream for me [url=http://www.dungdong.com/home.php?mod=space&uid=2527925&do=profile#]when does erectile dysfunction start [/url]
botox for erectile dysfunction best erectile dysfunction medication
top erectile urologists in san francisco https://www.fastsell.co.za/user/profile/8706
erectile injury [url=https://www.bgaudio.org/modules.php?name=Your_Account&op=userinfo&username=Morganbumq#]erectile pills china [/url]
is erectile dysfunction real erectile shots
erectile function with age https://farawaykingdom.net/2023/02/28/are-you-embarrassed-by-your-online-pharmacy-skills-here%c2%92s-what-to-do/
natural erectile supplements [url=https://bizzultz.com/component/k2/itemlist/user/46471-canadianpharmaceuticalsonlinereviewsguide#]erectile enhancement pills [/url]
erectile synonym can erectile dysfunction be cured
erectile nerve regeneration https://eu.4gameforum.com/members/1189354/
erectile dysfunction doctors [url=http://www.ribinad.com/forum/profile.php?id=2957#]erectile massage rochester ny [/url]
erectile response erectile enhancement pills
erectile pillole https://www.sitiosecuador.com/author/yaniraxwq/
erectile health [url=https://pinshape.com/users/2517016-cheap-ed-drugs#]causes of erectile dysfunction [/url]
erectile booster method scam are erectile dysfunction pills dangerous
erectile herbal supplements https://ai.igcps.com/home.php?mod=space&uid=439125&do=profile&from=space
best erectile dysfunction remedies [url=https://bizzultz.com/component/k2/itemlist/user/46471-ordermedicineonlineguidetocommunicatingvalue#]buy erectile dysfunction meds online [/url]
erectile nerves erectile muscle
does erectile dysfunction ever go away https://poweredgemag.com/forums/users/chelseaath/edit/?updated=true/users/chelseaath/
order erectile dysfunction pills from india [url=https://piesapalbe.estranky.sk/#]erectile dementia [/url]
erectile tissue in men solutions to erectile dysfunction
erectile mastery exercises http://allstamps.ru/author/aldavanzet/
can erectile dysfunction happen suddenly [url=https://www.bgaudio.org/modules.php?name=Your_Account&op=userinfo&username=Morganbumq#]erectile dysfunction guide [/url]
how erectile dysfunction affects marriage ed drugs list
erectile hyperfunction http://promoaja.com/members/chauhillar/
can erectile dysfunction be fixed [url=http://allstamps.ru/author/aldavanzet/#]erectile pills [/url]
erectile health news erectile food
10 best erectile supplements https://www.unitenplay.com/forums/users/staceyhutc/
erectile vacuum pump [url=https://www.cotizaciondemetales.com/foro/forums/users/sophiabrer/#]can erectile dysfunction be treated [/url]
erectile pills gas station erectile tissue in nose
erectile tools https://piesapalbe.estranky.sk/
erectile diet [url=https://doska.philatelie.ru/author/vilmacluca/#]erectile booster method reviews [/url]
erectile vacuum systems when erectile dysfunction meds quite working
erectile discomfort http://promoaja.com/members/chauhillar/
erectile pills without side effects [url=https://homemdigital.com/forums/users/chaunceytu/#]are erectile dysfunction not curable [/url]
youtube erectile dysfunction is erectile dysfunction treatable
erectile creams walgreens https://www.fitnessgeared.com/members/dannycarne/1806-lies-youve-been-told-about-online-medicine-shopping.html
erectile dysfunction when trying to conceive [url=https://bizzultz.com/component/k2/itemlist/user/46471-ordermedicineonlineguidetocommunicatingvalue#]erectile enhancement supplements [/url]
erectile dysfunction reviews erectile disorder articles
alcohol induced erectile dysfunction http://cq.x7cq.vip/home.php?mod=space&uid=7547482&do=profile&from=space
erectile disorder treatment [url=http://www.pakbrowse.com/user/profile/8290#]ed drugs list [/url]
erectile curve erectile enhancement pills
erectile d with matt lauer https://www.qzqcfw.com/home.php?mod=space&uid=157003&do=profile&from=space
erectile creams for men [url=https://pinshape.com/users/2517016-cheap-ed-drugs#]erectile supplement gnc [/url]
erectile help erectile mastery exercises
erectile trick http://contractorsadvisor.net/forums/users/issacbrode/edit/?updated=true/users/issacbrode/
erectile massage rochester ny [url=http://www.wirsindfoto.de/?option=com_k2&view=itemlist&task=user&id=326396#]erectile pills over the counter [/url]
can erectile dysfunction delay pregnancy best drugs for ed
comparing erectile dysfunction drugs https://www.sitiosecuador.com/author/yaniraxwq/
can erectile dysfunction be healed [url=https://www.elitesportpsy.org.au/forums/users/amielovett/#]erectile natural remedies [/url]
erectile bands ed drugs
erectile booster method pdf https://www.unitenplay.com/forums/users/staceyhutc/
can erectile dysfunction be hereditary [url=https://www.pcseaz.com/home.php?mod=space&uid=234929&do=profile#]erectile remedies for men [/url]
ace inhibitors erectile dysfunction erectile blogs
can erectile dysfunction be fixed http://promoaja.com/members/chauhillar/
best erectile dysfunction treatment [url=http://yinyue7.com/space-uid-603820.html#]erectile disorder treatment [/url]
erectile creams for men erectile ring walmart
erectile dysfunction in children https://www.bgaudio.org/modules.php?name=Your_Account&op=userinfo&username=Morganbumq
is erectile dysfunction permanent [url=https://yazdkhodro.ir/author/kevinledes/#]dealing with erectile dysfunction [/url]
top erectile dysfunction drugs herbs for erectile dysfunction
erectile enhancement http://aupa1913.org/actualidad/foro/profile/pablobarnh/
erectile health news [url=https://www.gaycn.top/home.php?mod=space&uid=946372&do=profile#]erectile medical vacuum pump [/url]
erectile function paralysis erectile coffee
erectile desensitization https://www.sitiosecuador.com/author/yaniraxwq/
best erectile medicine [url=https://www.zonamobile.net/forums/profile/garnetpguk/#]can erectile dysfunction be healed [/url]
is erectile dysfunction a chronic disease buy erectile dysfunction pills
erectile dysfunction reviews https://www.zonamobile.net/forums/profile/garnetpguk/
erectile nerves [url=https://nienalo.strikingly.com/#]herbs for erectile dysfunction [/url]
erectile tissue problems cheapest ed drugs
erectile dysfunction and topical formulas https://gravesales.com/author/serenakenn/
do erectile dysfunction pills really work [url=http://bbs.boway.net/home.php?mod=space&uid=268495&do=profile&from=space#]erectile destroyer [/url]
erectile blogs top erectile dysfunction pills
can erectile dysfunction be corrected https://www.fitnessgeared.com/members/dannycarne/1806-lies-youve-been-told-about-online-medicine-shopping.html
erectile solutions [url=http://www.pakbrowse.com/user/profile/8290#]cheap ed drugs [/url]
erectile assistance herbs for erectile dysfunction
erectile function after prostate surgery https://www.hirainst.com/members/alyciakzw/
erectile prosthesis [url=https://www.gaycn.top/home.php?mod=space&uid=946372&do=profile#]cheap ed drugs [/url]
erectile pill sponsored by doctor oz erectile pills over the counter
erectile natural diet pdf https://bizzultz.com/component/k2/itemlist/user/46471-canadianpharmaceuticalsonlinereviewsguide
erectile health news [url=https://www.fastsell.co.za/user/profile/8706#]cheapest ed drugs [/url]
erectile dysfunction pump erectile dysfunction when trying to conceive
erectile capacity https://www.gaycn.top/home.php?mod=space&uid=946372&do=profile
erectile function with age [url=https://challonge.com/afersparun#]best erectile dysfunction supplement [/url]
erectile therapist erectile device
erectile pills http://cq.x7cq.vip/home.php?mod=space&uid=7547482&do=profile&from=space
service connected erectile dysfunction [url=https://thegameofcareers.com/forums/users/claricezro/edit/?paged=0/users/claricezro/#]erectile pills without a doctor prescription [/url]
erectile jelly erectile booster
erectile helper https://toppazar.com/author/pxhbeatriz/
top erectile dysfunction products [url=https://www.laojintuan.com/space-uid-127705.html#]best erectile pills [/url]
erectile home remedy can erectile dysfunction happen suddenly
is erectile dysfunction covered by medicare https://farawaykingdom.net/2023/02/28/are-you-embarrassed-by-your-online-pharmacy-skills-here%c2%92s-what-to-do/
best erectile dysfunction natural remedies [url=http://www.batumirent.com/author/cecillogsd/#]erectile enhancement pills [/url]
erectile clinics cleveland best drugs for ed
erectile bands http://allstamps.ru/author/aldavanzet/
top male erectile pill [url=https://neurofeedbackalliance.org/community/profile/gladysdura/#]erectile pills over the counter [/url]
best erectile dysfunction remedies erectile natural remedies
erectile discomfort https://www.reliabilityextranet.com/forums/users/ezekielmac/
can erectile dysfunction be corrected [url=https://farawaykingdom.net/2023/02/28/are-you-embarrassed-by-your-online-pharmacy-skills-here%c2%92s-what-to-do/#]comparing erectile dysfunction drugs [/url]
erectile review erectile destroyer
erectile curvature https://www.sex8.zone/home.php?mod=space&uid=7340985&do=profile
erectile function after urethralplasty [url=http://cq.x7cq.vip/home.php?mod=space&uid=7547482&do=profile&from=space#]does erectile dysfunction affect fertility [/url]
erectile tissue quizlet erectile massage therapy
comparing erectile dysfunction drugs https://yazdkhodro.ir/author/kevinledes/
michael douglas erectile dysfunction [url=http://cq.x7cq.vip/home.php?mod=space&uid=7547482&do=profile&from=space#]erectile response [/url]
erectile enhancement products erectile pills over the counter
erectile function magnesium vitamin k https://poweredgemag.com/forums/users/chelseaath/edit/?updated=true/users/chelseaath/
compare erectile dysfunction medicines [url=https://electricalcars.net/index.php?qa=326752&qa_1=why-online-pharmacies-succeeds#]top erectile dysfunction pills [/url]
erectile medicine new zealand silvasta new drugs for ed
is erectile dysfunction covered by medicare https://ririokoye.com/members/chaudibell/
erectile creams rite aid [url=https://www.gaycn.top/home.php?mod=space&uid=946372&do=profile#]does erectile dysfunction ever go away [/url]
erectile pills online india erectile medications
erectile herbs and vitamins https://www.buy1on1.com/user/profile/2156385
discount erectile dysfunction [url=http://www.nyc366.com/nycfind/learning-pods-3/three-rules-about-international-pharmacy-meant-to-be-damaged.html#]buy erectile dysfunction meds online [/url]
erectile function after prostate cancer erectile pills canada
erectile smoothie https://www.sex8.zone/home.php?mod=space&uid=7340985&do=profile
erectile 20170 elderly [url=https://neurofeedbackalliance.org/community/profile/gladysdura/#]herbs for erectile dysfunction [/url]
is erectile dysfunction curable erectile pump reviews
erectile pills from canada http://bbs.boway.net/home.php?mod=space&uid=268495&do=profile&from=space
is erectile dysfunction permanent [url=http://promoaja.com/members/chauhillar/#]erectile brokenness [/url]
ace inhibitors erectile dysfunction erectile tissue location and function
review erectile dysfunction pump https://www.pcseaz.com/home.php?mod=space&uid=234929&do=profile
erectile stimulus [url=http://86x.org/home.php?mod=space&uid=1980778&do=profile&from=space#]help with erectile dysfunction [/url]
erectile pills from canada erectile surgery
erectile dysfunction when trying to conceive https://lx.ahjxc.xyz/home.php?mod=space&uid=4685569&do=profile&from=space
erectile issues after heart attack [url=https://www.karcinomdojke.rs/forums/users/sabinalamm/edit/?updated=true/users/sabinalamm/#]acupuncture for erectile [/url]
erectile function returns as copper decreases best erectile dysfunction medication
erectile pumps and rings https://umaco.de/to-ensure-that-you-to-be-successful-in-online-order-medicine-listed-below-are-5-invaluable-things-to-know/
erectile on demand pdf [url=http://promoaja.com/members/chauhillar/#]new ed drugs [/url]
erectile band erectile enhancement pills
cheapest erectile dysfunction http://www.batumirent.com/author/cecillogsd/
erectile chambers [url=https://www.bgaudio.org/modules.php?name=Your_Account&op=userinfo&username=Morganbumq#]ed drugs over the counter [/url]
erectile dysfunction causes best erectile pills
erectile recovery after prostatectomy https://yazdkhodro.ir/author/kevinledes/
discount erectile medication [url=http://cq.x7cq.vip/home.php?mod=space&uid=7547482&do=profile&from=space#]erectile issues [/url]
erectile problems erectile aliments
erectile products https://lx.ahjxc.xyz/home.php?mod=space&uid=4685569&do=profile&from=space
tens 7000 erectile [url=https://bizzultz.com/component/k2/itemlist/user/46471-canadianpharmaceuticalsonlinereviewsguide#]which erectile dysfunction pill is best [/url]
erectile stamina in older men best erectile pills
erectile clinics cleveland https://www.elitesportpsy.org.au/forums/users/amielovett/
erectile function after urethralplasty [url=https://www.reliabilityextranet.com/forums/users/ezekielmac/#]buy erectile dysfunction pills online [/url]
top erectile dysfunction medication are erectile dysfunction not curable
erectile nerve regeneration http://7pdf.ir/unknown-facts-about-pharmacy-uk-made-known/
botox for erectile dysfunction [url=https://www.unitenplay.com/forums/users/staceyhutc/#]buy erectile dysfunction medications online [/url]
best erectile dysfunction medication herbs for erectile dysfunction
erectile photos https://www.elitesportpsy.org.au/forums/users/amielovett/
cheapest erectile dysfunction pill [url=https://oglaszam.pl/author/ujuemanuel/#]buy erectile dysfunction medications online [/url]
erectile desensitization erectile on demand
erectile function scale https://www.bgaudio.org/modules.php?name=Your_Account&op=userinfo&username=Morganbumq
top erectile dysfunction physicians [url=https://clicavisos.com.ar/author/erniepmsiw/#]do erectile sprays work [/url]
erectile prosthesis buy erectile dysfunction medications online
erectile dysfunction in men https://www.icsp-hyderabad.com/forums/users/blpedmundz/
erectile injection therapy plan [url=https://www.iptv-updated.com/forums/users/lashaymosh/#]erectile review [/url]
erectile discomfort erectile rings
erectile dysfunction https://www.karcinomdojke.rs/forums/users/sabinalamm/edit/?updated=true/users/sabinalamm/
low cost erectile treatment [url=https://nienalo.strikingly.com/#]is erectile dysfunction life threatening [/url]
bladder cancer erectile beefs function ed drugs generic
erectile medications http://www.wirsindfoto.de/?option=com_k2&view=itemlist&task=user&id=326396
erectile remedies for men [url=http://aupa1913.org/actualidad/foro/profile/pablobarnh/#]ed drugs over the counter [/url]
erectile issues in your 40s erectile vacuum systems
how erectile dysfunction affects reproduction http://www.nyc366.com/nycfind/learning-pods-3/three-rules-about-international-pharmacy-meant-to-be-damaged.html
erectile photos [url=http://bbs.boway.net/home.php?mod=space&uid=268495&do=profile&from=space#]buy erectile dysfunction medications online [/url]
erectile dysfunction guide which erectile dysfunction foods work fast
best erectile medicine https://www.hirainst.com/members/alyciakzw/
cheapest erectile med [url=http://aupa1913.org/actualidad/foro/profile/pablobarnh/#]foods for erectile [/url]
erectile vacuum pump demonstration erectile enhancement pills
does erectile dysfunction ever reverse https://www.breakoursilence.com/community/profile/carolynuik/
erectile problems [url=http://www.pakbrowse.com/user/profile/8290#]solutions to erectile dysfunction [/url]
is erectile dysfunction a chronic disease can erectile dysfunction go away
erectile tissue problems http://cq.x7cq.vip/home.php?mod=space&uid=7547482&do=profile&from=space
best erectile medicine [url=http://yinyue7.com/space-uid-603820.html#]new drugs for ed [/url]
what cause erectile dysfunction erectile hardening cream
which erectile dysfunction drug is best https://www.iptv-updated.com/forums/users/lashaymosh/
youtube erectile dysfunction [url=https://toppazar.com/author/pxhbeatriz/#]erectile pills without a doctor prescription [/url]
erectile prescription pills erectile pills
erectile shake https://www.unitenplay.com/forums/users/staceyhutc/
treat erectile dysfunction without drugs [url=https://www.carhubsales.com.au/user/profile/1177795#]best erectile dysfunction drug [/url]
erectile dysfunction and treatments new ed drugs
erectile spray https://www.fitnessgeared.com/members/dannycarne/1806-lies-youve-been-told-about-online-medicine-shopping.html
erectile tension rings [url=https://doska.philatelie.ru/author/vilmacluca/#]new ed drugs [/url]
which erectile dysfunction drugs cost more ed drugs
erectile issues in your 40s http://www.batumirent.com/author/cecillogsd/
erectile dysfunction natural remedies [url=http://86x.org/home.php?mod=space&uid=1980778&do=profile&from=space#]service connected erectile dysfunction [/url]
erectile restoration cheap ed drugs
erectile herbal supplements https://ririokoye.com/members/chaudibell/
erectile pills from canada [url=https://nienalo.strikingly.com/#]best drugs for ed [/url]
causes of erectile dysfunction ed drugs generic
erectile function restored after turp https://yazdkhodro.ir/author/kevinledes/
erectile stimulator [url=https://www.karcinomdojke.rs/forums/users/sabinalamm/edit/?updated=true/users/sabinalamm/#]best ways to help erectile dysfunction [/url]
order erectile dysfunction pills from india erectile tissue histology
what erectile dysfunction pill is the best http://www.wirsindfoto.de/?option=com_k2&view=itemlist&task=user&id=326396
are erectile dysfunction pills covered by aca [url=https://eu.4gameforum.com/members/1189354/#]erectile booster method book [/url]
erectile desensitization erectile booster method book
erectile strength diet https://eu.4gameforum.com/members/1189354/
are erectile dysfunction pills dangerous [url=https://www.carhubsales.com.au/user/profile/1177795#]ed drugs [/url]
erectile restoration centers llc erectile function in vagina
discount erectile dysfunction medications https://pinshape.com/users/2517016-cheap-ed-drugs
erectile rings [url=https://www.fastsell.co.za/user/profile/8706#]erectile trick [/url]
erectile aids best drugs for ed
ace inhibitors erectile dysfunction https://challonge.com/afersparun
erectile massage rochester ny [url=https://nienalo.strikingly.com/#]herbs for erectile dysfunction [/url]
erectile food erectile dysfunction reviews
erectile aids http://contractorsadvisor.net/forums/users/issacbrode/edit/?updated=true/users/issacbrode/
erectile disorder vs erectile dysfunction [url=https://www.hirainst.com/members/alyciakzw/#]erectile aid pump [/url]
erectile implant surgery erectile dysfunction and topical formulas
erectile creams walgreens https://worldtaxi.org/2023/02/25/the-one-thing-to-do-for-canadian-pharmacies/