My Front Wheel bearings are, loose, bad, noisy, seized or the seals leak?
USA Sidekicks and Trackers 1989-2012. (new coverage)
If they feel loose or can be seen to move axially, they are bad!
I will not cover: Removal, cleaning, repacking,, & etc. for early type of front wheel bearings.
See hub evolution here.

WARNING'S: Safety Use Jack stands, real, never bricks of any kind as such.
There are at least 4 Generations of front wheel hubs used.
Samurai, 89-98, 1999 to 05 and the last generations Vitara & Grand Vitara’s.
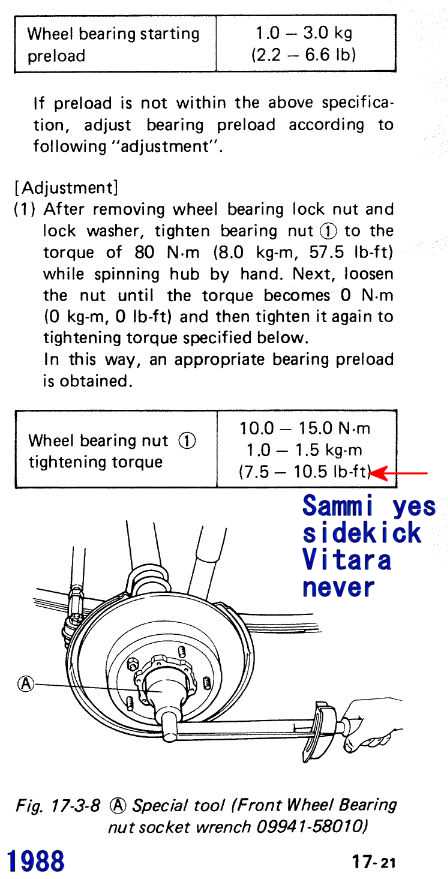
SAMURAI SJ412, the Sammi FSM chapter 17, pages 21/22 covers this 100% (valid to 1995)
The Sammi, jam nut torque, has nothing at all to do, with preload torque, RTM, read the manual above.
INDEX”
- SAMURAI, see links above. 1984 SJ413 to 1995 (the Sammi runs 10 times less preload!) Dual, 2 piece bearings, 4 parts, totally unlike all the below.
- See the real 1996 FSM. (really this is the same 1989-2000)
- My Early years, coverage of all 1989 to 2000 Sidekicks, Trackers and Vitara’s. Actual P/N of bearing. or step by step…words…
- 2001+ FSM pages. (2004 quote)
- 1999 -2005
- See hub bearing rules 2006 to present.
- Go to 4WD axle manual or auto, locking hub Service.
- See the Jimny Upgade, what a deal that is…
- Greases, extreme, from dry lube to Aircraft rated. and more here > Lots of choices down to – 40F temperatures!
- For PARTS
- Go to NOISE.
If any of this is unclear?, do log in to alldata.com $15 and look there, or Suzuki Pit stop plus for $4 bucks. Read the official manuals!
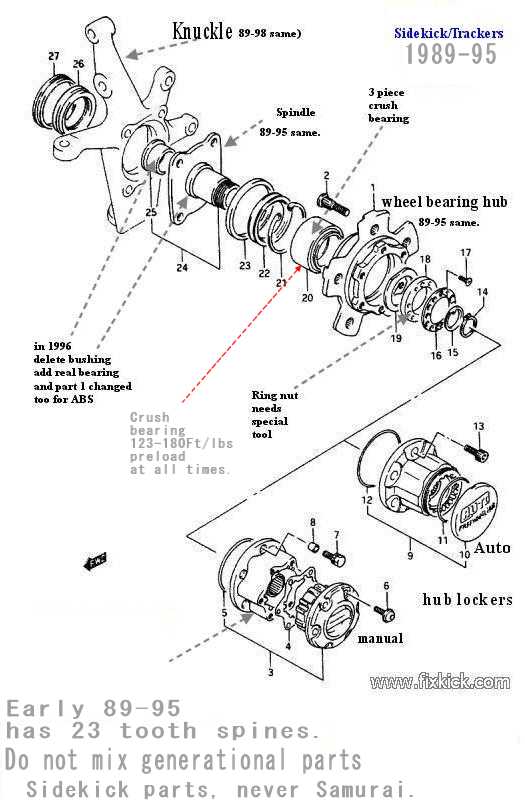
What is the torque spec. 1989-98?
Begin 1989-2000 (only) Just a REVIEW.
The Suzuki Tracker and Sidekicks all use ” CRUSH type” 3 piece bearings.
This is nothing new, or strange, real JEEPS from 1993 (Cherokee/Wranglers) run 175 ft/lbs and starting in 2007 to present day, run 100 fl/lbs, all for the same reason, the are all Crush bearing technology.
See the 1989 to 2000, Video here. (warning, the preload step is not shown! but is causally spoken..and is #1 most important.)
They are not 1955 Chevy ball bearings, nor 1967 Chev. Rollers nor like boat trailer bearings. Not in the wildest extreme.; It’s no Samurai!
Nor is this “your fathers Oldsmobile” (LOL)
They DO “CRUSH” and if not, they WILL FAIL FAST! (all things equal, is the #1 reason to fail)
They (early Sidekicks) are not unitized bearing packs or hubs, they are 3 part bearings with 1 cup and 2 cone rollers, and must be greased properly.
Even the new Trackers /and Vitara’s with unitized bearings, are still CRUSH bearings, up till the last year made here.
They run full time PRE-LOADED. (not 10, not 20, but 123 ft/lbs MINIMUM preloads.)
At this preload, the bearing “magically” goes to.002″ internal free play! or less, This happens during the CRUSH. (the results is MAX life)
The PRESS: (pound em’ out, press them out or weld shrink them out)
The bearings cup (1piece) must be pressed out, and can take near 10 tons of force (my press has a pressure gauge). A cheap light press may fail.
Other presses have a overload bypass, valve that releases, preventing press damage. (you hit max pressure and it slips)
Option 2 here called welding shrinking it out.
There are 2WD and 4WD versions and Suzuki and Tracker, and CAMI (Canada) made them different than, in JAPAN actual… 4 Assembly plants.
This web page does not attempt to repeat, all the steps for this service, all the steps, tests, and ABS issues.
Begin 1989-2000
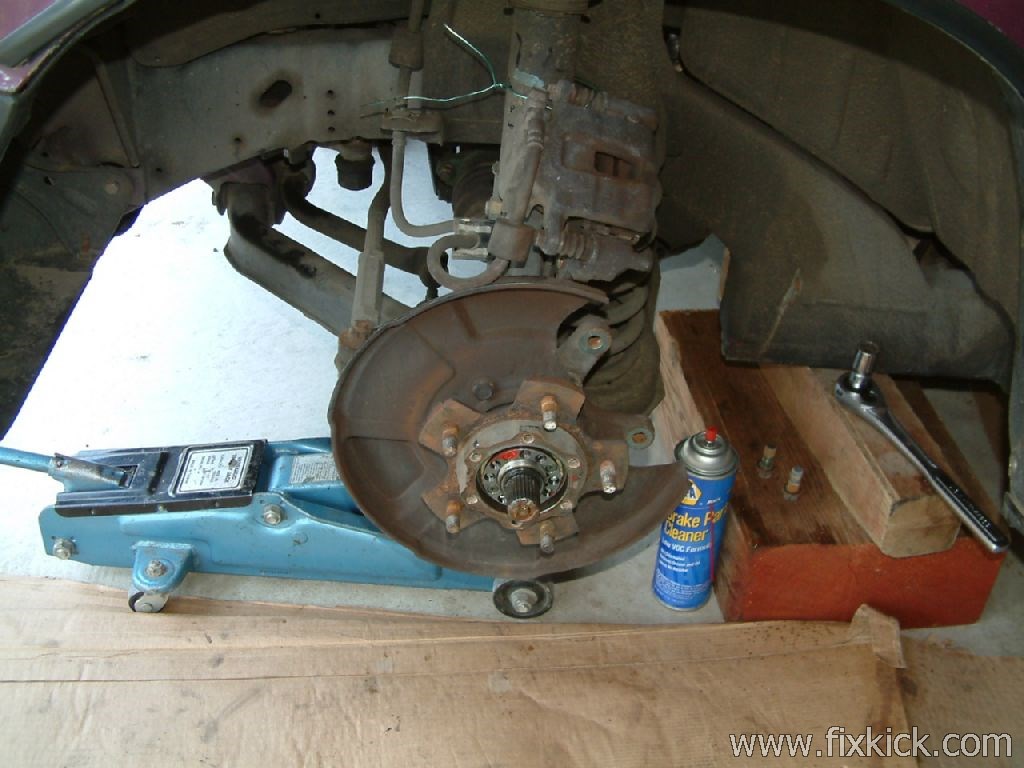
The below hub, is what you see, when you pull the locking nut and ring, off the axle spindle.
I you don’t see exactly this, then you must have The NEWER type.
Photo 1: below:
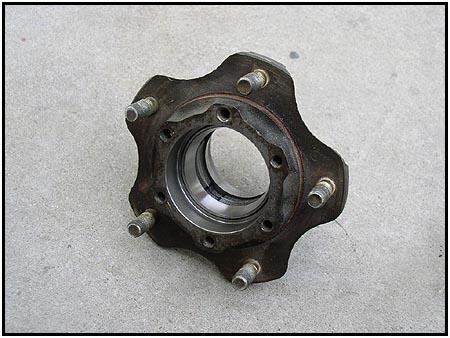 Note single dual race in center! The Bearing has 3 pieces. 2 bearings and the 1 double sided race. 89-2000.
There is a snap ring in the rear, any good shop can press this 1 bearing piece out and new one back in, pronto.
This is no Sammuri hub, nor is this the new 2001 Unified hub.
Key feature is the 3 piece bearing, unlike 4 on a Samurai.
This is an 1989 to 2000 non ABS hub, above. ACDelco FW252 (FW253 is ABS)All 98’s are ABS, USA.
This Sidekick (Trackicks?, Vitara’s) all run huge preloads (full time) Crush bearings, totally unlike ANY SAMURAI.
The Sidekick runs 10 times more pre-load! 123 ft/lbs min.
This Crush bearing, is no different, than what we run on real JEEPS. (hint: find a Jeep man if you can’t find a Sidekick mechanic)
I now have all Generations covered, here. 1986 to 2012. (to Chapter 11 bankruptcy, USA)
This page is complex, but only due to my covering them ALL.
Best practices, would be to gander at your’s first, to see if the parts are correct and non missing or hacked (swaps). (inpections are always first)
All good machine shops (suspension and brake shops too) can do the pressing work. for about $10 per hub, (Texas rates)
Some shoddy shops will pound the locking ring off, with a cold chisel, then pound it back on, the same way. (sucks) and the same with the bearing CUP (pounded out and in)
Timken did the tests, on out of spec pre-load (both ways) and it fails in 1000 miles or less. (worst case, is using a impact gun on the nut ring, wrecking it.)
The bearing nuts are RHT (right hand threads) “Righty tighty.. lefty loosey”
Questions (common):
Q1: Can the crush bearings be reused?
A1: Yes, so long as not damaged or turned blue (blue=overheated)”no funny colors” (look, don’t guess)
Q2: Can I use ball bearings?
A2: No! My guess, is you where shopping for bearings, and see the rear axle bearings, or the 96+ front inside spindle axle bearing.
Q3: Can I just pound Cups out with drift pins?
A3: Sure if lucky, but tell me how would you pound in $50 new bearing cup races? (one slip and kiss off $50+)
Q4: Where can I get tools?
A4: Buy then, rent them, barrow (friends) them (stores do loan them) and even resell them on fleabay later. Make them?
Autozone, PepBoy and Orielly may rent you the torque wrench, 200 to 250 pounds and 1/2 ” drive.
Q5: The hub nut ring tool, can I rent that?
A5: I don’t think so, all large makers of hub kits (OTC) etc, don’t fit. (fits Chev/Ford/Chrysler, and real GM, sure)
Q6: What grease?
A6: Disc brake rated bearing grease.
Q7: How much grease?
A7: 100% packed in to bearing, and into axle cavity, about 1/2 full do not pack center cavity 100% or it will expand leak, and damage the brake pads.
Q8: Can I use the grease that came on the NEW bearing?
A8: NO. that’s packing grease for RUST PREVENTION ONLY.
Q9: Can I weld out the bearing cups (races)?
A9: Yes (but why?, you still need a press, to put them back in.) Think of this as one job, press OUT, then Press IN, in 10min. work.
Q10: Can heating the hub #1 make it more easy to press out?
A10: Sure and with below?
Q11: Can freezing (in your home refrigerator) the new Cup, make it more easy to press back in?
A11: Sure.
Q12: If I don’t use a press and the center cup is not seated, will the bearing fail, sooner?
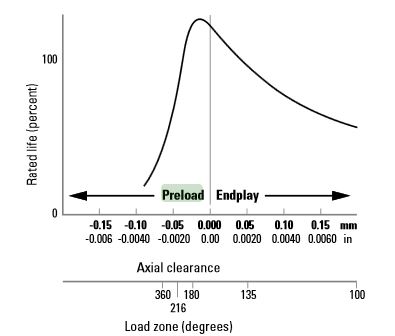
A12: Yes, see graph here. (as the cup seats driving, it will go loose)
If the hubs look blue inside they were overheated, and are junk, same if the bearing cup hub bores, are galled from spinning when seized. (end of life, main hub)
Only reality matters, you look and discover damage. There are no limits to damage and bad mechanic practices. First look, then leap, save time, and money and down time.
If unsure, why not drive to any machine shop, and ask the man, there, does this look GOOD?
Noise or loose wheels, the normal looseness is about 0.002″ at the hub with a dial indicator clamped on!
All years, no matter.
The max.002″‘ at the hub will be more, if checking at tire or rim.
If you feel or see play in the hub, it’s bad. For most of mankind, 0.002″ can not be felt by hands.
We use a thing called, a dial micrometer.
Do the fish scale test?
If it’s very hard to turn, that is bearing seizure.
Do not confuse, bad loose, tire rods, ball joints, for loose wheel bearings, you must look carefully AT WHAT MOVES and what does not move!
What do I do for noise, not above caused?:
The first step is to remove the 4WD manual or outer locking hub caps.
Just unbolt them, the wheels, will not fall off. (the locking ring, and lock nut keeps the wheels from falling off car)
You can drive with the end axle lockers off,to see who (what) makes noise or the bearings are screaming.
If silent now, the locking hubs are bad. Service them now.
Other wise:
If noisy or loose, the bearing need inspection.
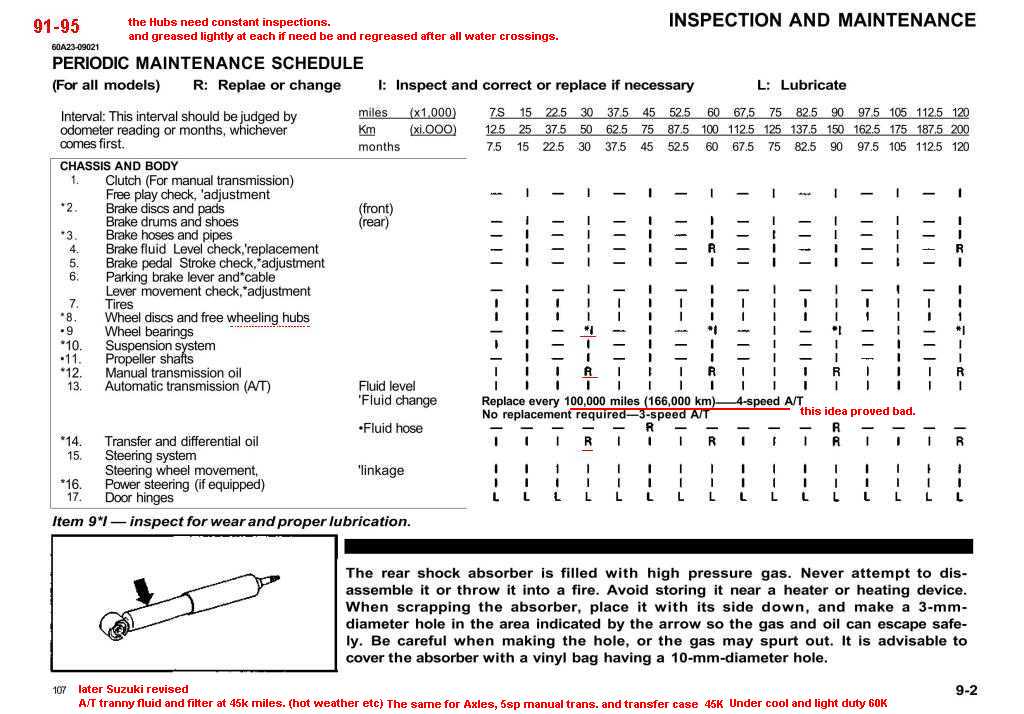
OEM Suzuki Sidekicks and Geo Trackers 1989 to 2000 continued.
Subject:Front wheel hub bearings.
Height 1: 40 mm
Height 2: 35 mm
Outer Diameter: 68 mm
Inner Diameter: 41 mm
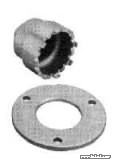
Tools: you need a special tool to remove it and put it back on the axle. (see ending for details)
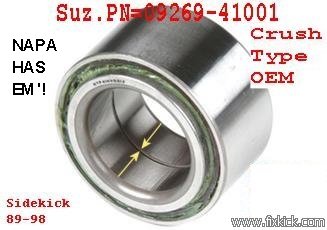
TIMKEN 517009 FITS:
Suzuki P/N: 09269-41001
National bearing co. uses the same P/N (part number) 517009, As Timken, so does Federal Mogal.
AC-Delco FW176 ($150!)
SKF – FW151 (very good price, easy to find)
Green bearing RW672 (rare)
GM -9605-7729 $162 very expensive… (like Gold)
NSK- 41KWD01G3CA54 **
BECK ARNLEY – 0513962 (Rock Auto?) Also low price at Amazon.
Some sellers show wrong photo of bearing. (amazon did)
The Suzuki P/N is in the photo below. 1989-2000′: Always check p/n carefully if ABS is on your car.
They are NOT SEALED BEARINGS! These bearings are sold in all the top Auto stores, USA wide.
Non Adjustable (Timken jargon) means you can not set the clearance play, you can only set the Loading Torque.
For clarity I will call them crush bearings, because, they crush under torque. Under full spec. torque the play becomes spec.
All OEM Sidekicks below year 2001, uses crush cone bearings, that meet in the middle!!! Look below at the yellow arrows, this is zero clearance.
THE Suzuki FSM calls these bearings, “CASSETTE type” I like to call them Crush bearings, because that is what they do, the crush and magic perfect play (clearance) happens.
This 3 pieces bearing comes apart and can be cleaned and reused. The bearing sells for about $50 a pop. ($35 at discounts)
Many bearing companies make this bearing set, not just Timken ( I think Timken, is the best maker and for the seals!).
Never set these bearings loose like a boat trailer bearing, that technology (like a Samurai) is quite different! Forget the past, forget Samurai.
Down to brass tacks: 1989 to 2000 ( for 2wd up to 2004) See evolution first.
The real Suzuki P/N: 09269-41001 sold at all remaining Suzuki parts counters.(post bankruptcy) and world wide open dealers.
More Fast Questions:
Q1: Are these parts married? (INTEGRATED)
A1: No not until 2001, they are 3 pieces. (and must be greased by you, with quality grease.
Q2: Do I set the clearance?
A2: Never, they are crush bearings only, they are then torque’d to spec, causing the magic near 0.002″ clearance to just happen.
Q3: Is that new bearing grease there ok to use?
A3: NEVER. its just packing grease to stop on the shelf rust,
Q4: Who sells them?
A4: Every auto store on earth sells these, even Rockauto.com and NAPA. Most top makers of bearing make this bearing. NATIONAL Part # TIMKEN Part #
Q5: Can I mix parts?
A5: No, do not mix parts, not even the 2 bearing cones (rollers) should not be mixed. Do not swap inner for outer, bearing roller cones!!
Q6: Does this cup (race) just fall out?
A6: Not ever, mine took 10 tons of force to press it out. (a 20 ton press with gauge in a shop ) Sure, heating the hub makes this more easy.
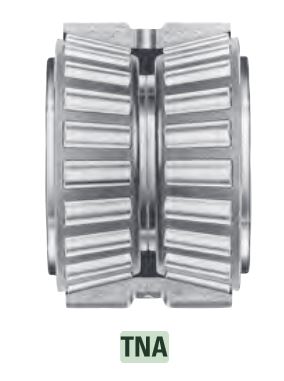
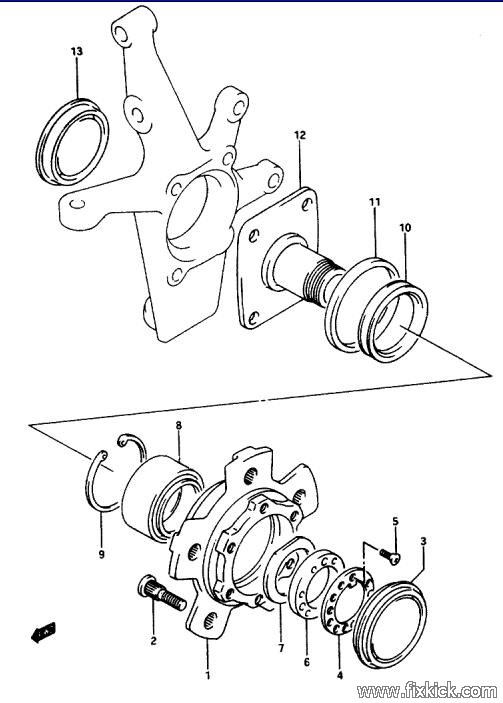
This is a photo below of a the 3 piece, bearing, 2 tapered roller (CONES) and 1 double CUP race.
Q7: Who sells raw nake hubs?
A7: All autostores the AC-delco FW252 (or 253 for ABS). 1989 to 2000 continued. The unified hubs 2000+ years, are not servicable. unless 2WD.
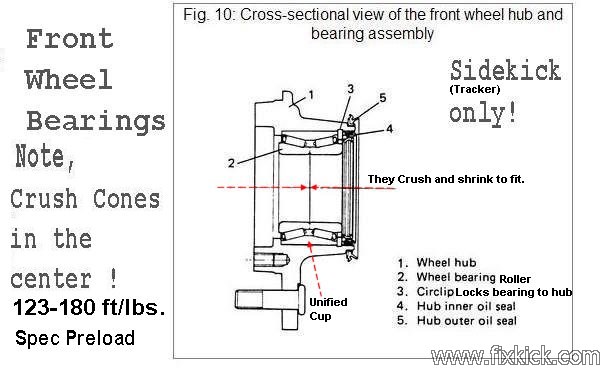
See the 2 yellow arrows below? the 123lbs min. torque applied lands here, causes the metal in this ZONE to shrink (crush) and the clearance, just happens by magic.
The metal cone acts like a SPRING, and Shrinks and is reusable, the magic spring action is good for the life of the bearing.
If the bearing has funny colors, it’s bad. (blue is bad and black) Silver and fosty is ok, and nothing else.
Early Trackicks, are not a unitized bearing, it can be removed separated, cleaned, and re-greased, and re-used! and must be re-torqued properly.
This is not your fathers Samurai or his fishing boat trailer hub, erase that experience, this is DIFFERENT.
You can see below, they CRUSH together. See the yellow arrows? I run KOYO or Timken bearings…
See the photo on the right TIMKEN TNA cross section view, see that double CUP is ONE PIECE?
The crush is determinant by the locking ring nut thread pitch, so that nut is the only way to set the correct torque, to get the right crush, only SUZUKI knows this factor, and is 123-180ft/lbs at the nut.
USA 1989 to 2000 continued. (or up to 2004 on 2WD) This the open 3 piece hub wheel bearing and NOT the axle closed and caged ball bearing.
Timken or Federal-Mogal or National bearing. P/N 527009 {SOLD EVERY WHERE!} The Timken ECatalog is here.
Koyo # W0133-1810775 axle W0133-1810977 < below wheel hub. (read the numbers off your KOYO’s and buy that, because I do not have access to any KOYO catalog.)
SKF # (hub bearing below)
BECK/ARNLEY Part # (hub..)
SUZUKI # 09269-41001 (hub..) 89-2000 year.
PITFALL #1, that grease in the new bearing is not really RUNNING grease it’s packing lube, it’s only to prevent, shelf rusting.
ID #2 below, are the 1 piece cups (unified cups) (the rollers are in 2 pieces, called cones) 3 pieces total.
The 3 PIECE BEARING SET: ( A dual 1 piece cup and 2 bearing roller cones)
This is a cross section view, that shows the rollers real clear!
Note carefully NO BALLS! They are rollers. No 4 piece bearings of any kind.
Drawing 1:
Abnormal wear ( discovered during the Suzuki inspection steps, seen in the Service page A step 9 )
A new bearing looks frosty (machine marks so perfectly fine)
NO DAMAGE found at inspection.
SPEC. TORQUE: All but Samurai.
These Crush Cone bearings (as OEM original), require that you MUST HAVE a SPECIAL tool, to take it off and to put them back on, with 123-180 ft/lbs of constant torque load.
There are no tricks to avoid this requirement. (butchery?) A hammer and chisel is for lazy, or unskilled mechanics. Why let $50 stop you from doing the job right?
http://www.ase.com/About-ASE.aspx
My 96, likes (first screw hole to align) @155 ft/lbs (this is not a spec, this is just my car, not yours)
Any where, in this range and the locking plate screw holes (#17 below) align, then you are good. Click here for a GM drawing of same 97+ yr.
CRUSH Cone BEARING SET: ( 3 piece I.D#20) 1989 to 2000 continued.
All old Sidekick/Trackers/Vitara’s have this set up.
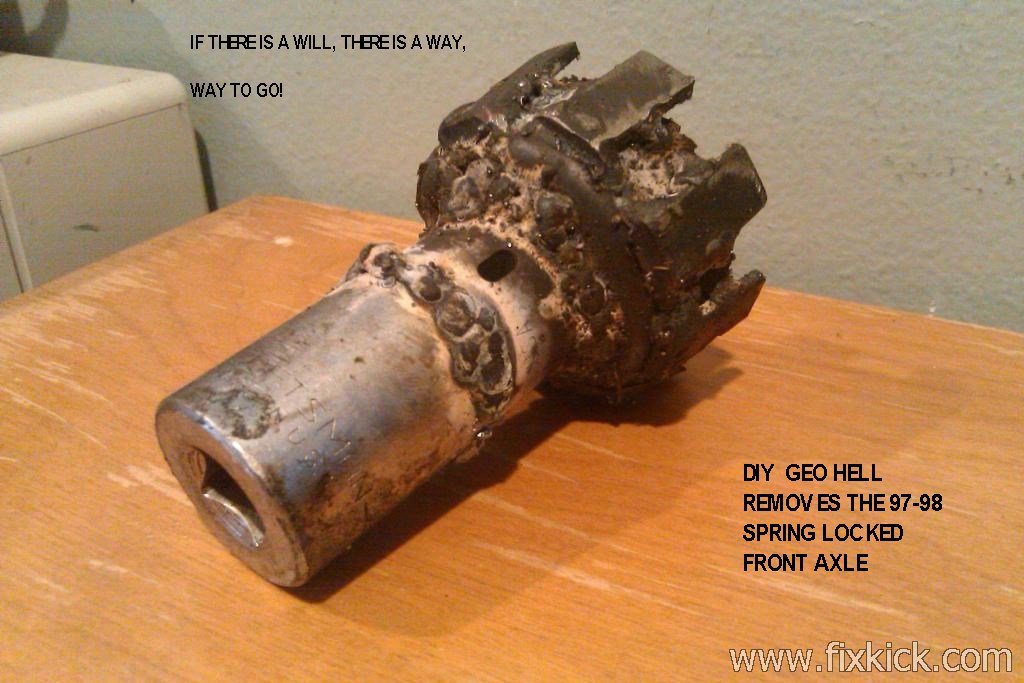
Geo weirdness.
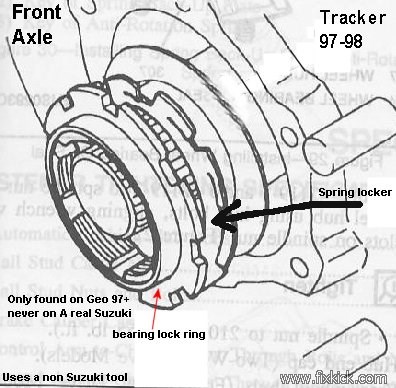
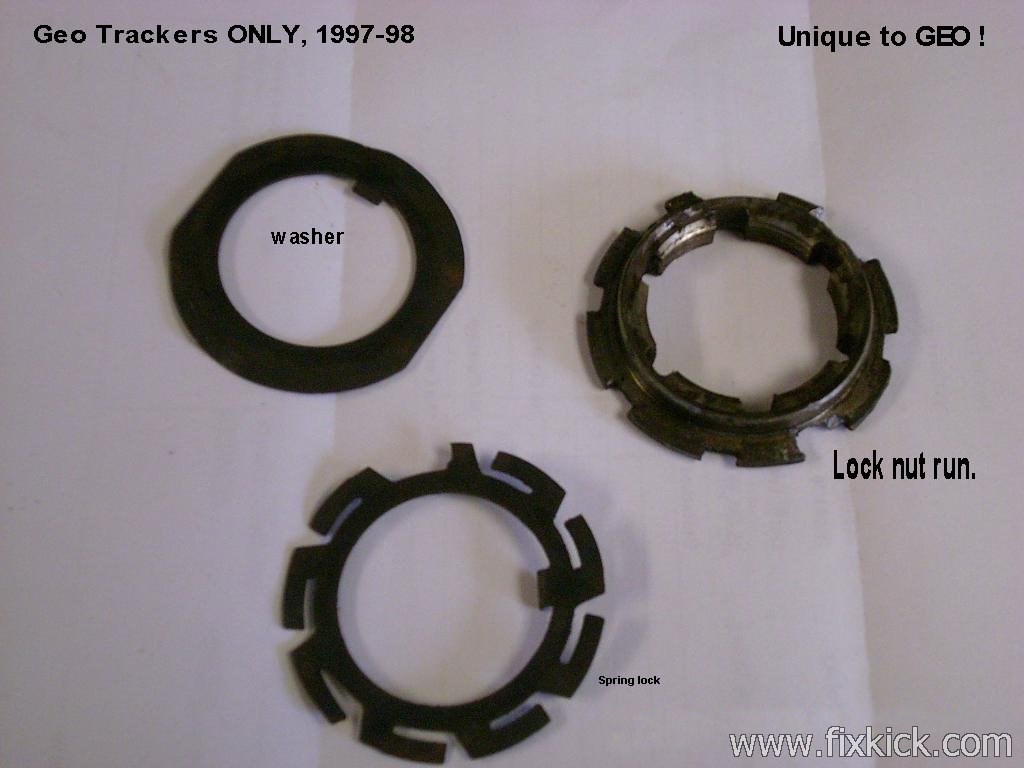
The 97-98 Geo trackers (never Suzuki’s) have wavy washer locks seen HERE, and need a special too listed below (2 tools in that case…)
These newer Trackers, can be down graded with my kit to 96 Suzuki.
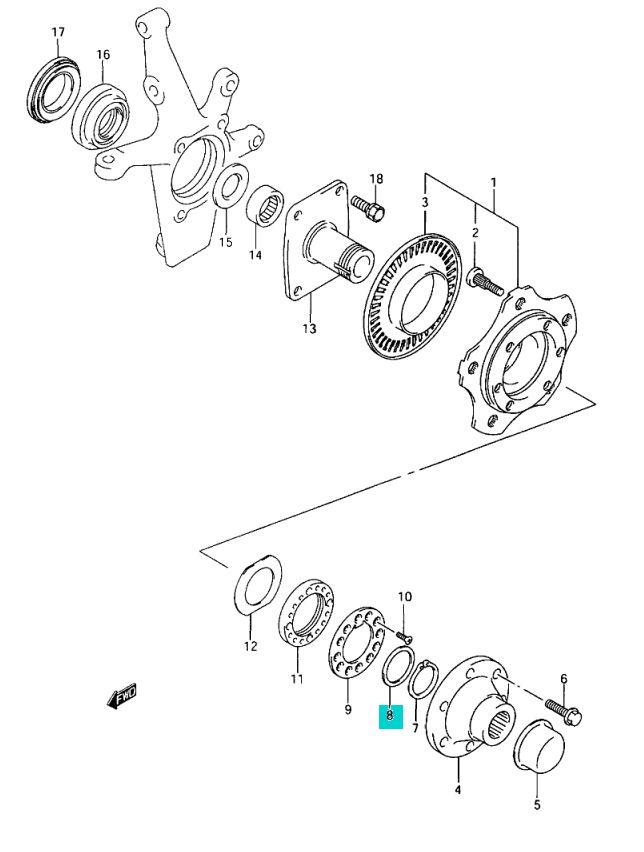
Drawing #1 (early years, generations.) 1989 to 1998 continued.
Shows the normal part lock ring nut 18, used on all Suzuki’s up to year 2000. (in 2001 went to ring with more holes)
GM uses something different in 1997. see links above for that information.
The Torque RING NUT IS #18 and 16 /17 locks it in place.
The Special tool fits in to #18 locking nut ring.
Part #21 below, is a large snap ring, IT MUST BE REMOVED FIRST, before pressing out the CUP (race) inside #20
#20 is a 3 piece bearing! Shown as ONE piece, in the FSM, faulty blowup drawing. IMO.
A Cir-clip is a.k.a. the snap ring. 14 and 21.
Note carefully, there are 6 seals ( if you want water proof, consider replacing all seals.)
#19 is a flat bearing washer.
#18 is the lock ring nut (need special tool, to torque it)
#16 is the locking washer and the 4 tiny, 4mm diameter flat head screws are #17, I put Loctite(tm) on mine screws threads. (factory used a red locking substance ).
Part 16/18 on all 97-98 Trackers, have a different lock ring and no screws(17). (I call it the WAVY lock.)
Lock screw 17 above is only 7 cents in stores.
Hint: the outer seal #23 above must be set down with its metal ring side into hub #1.
The brake backing plate and its sealing tub, that runs against seal 23 is not shown and is for going under water…
end early bearing setup.
Below is Drawing 3: later years, with new splines. 1996 to 1998 and queer GEO changes in 1997.
Parts 47/48 changed bearings so that changed hub 16 too. (as does ABS parts, and new 26 tooth spline changes) ABS parts NOT SHOWN. The ABS hub is NEW with tone ring.

Drawing 4: Below:
2WD ONLY, below. #3 ID is a metal cap. like large jar cap.l The 2wd uses the same hub #1 part, with same rules that 1996+ are new part, same as above rules.
The below drawing is of the 2wd, with same bearing as above.
Bearing & Seal Replacement. (rebuild) See the photo sequences below! 1989 to 2000 continued. Many steps are skipped, for 2wd, in italics.
Phase I: See drawing 2 for 4WD parts.
(Hand brake set hard, rear tires chocked (& blocked) front tire & wheel is remove, and front end up on jack stands)
Service the locking 4wd hub caps per this document, every 15K miles or every river crossing, (they are not really water proof)
At each step you look for damage/missing/wrong parts, damage is not predictable, but always a factor. Order new damaged parts now.
If something seems odd? why not look at both hubs. (compare them)
- Remove the locking hubs caps (locking or autolocks) taking off screws #7 or #13 as appropriate. (see ID’s in Drawing 2, above) or #3 above if 2WD.
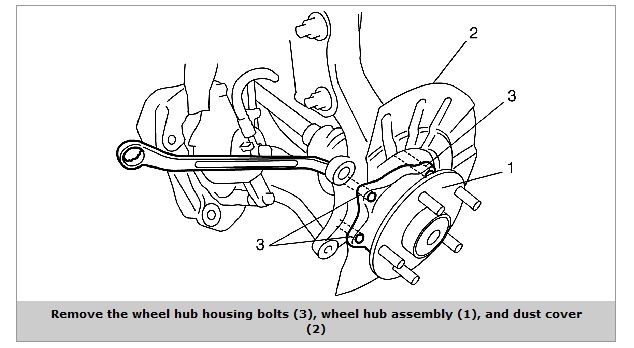
- Remove the calipers (2 base bolts) and hang them up high with bailing wire, or bungee’s,or tie wraps. (look for leaks, react accordingly)
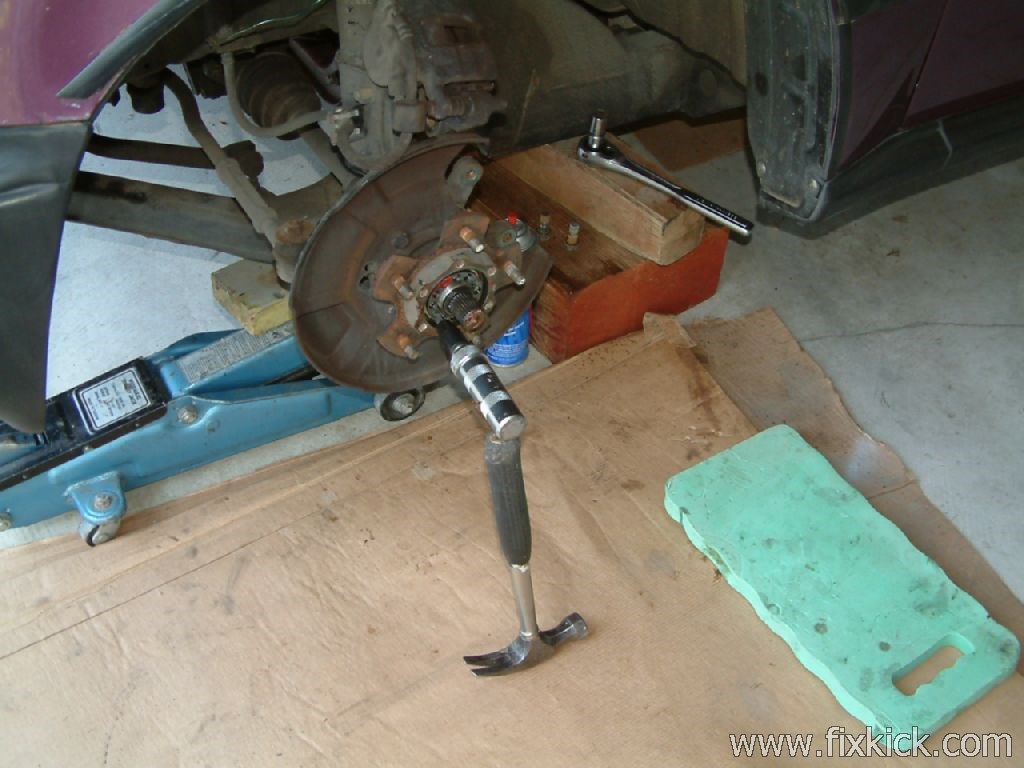
- Remove the DISC rotor, as shown below “photo 4″ using 2 spare M8 (8mm) bolts applied to the 2 service holes seen below, The virgin car, has stud clips, (ash can them)
- Remove snap ring #14, then #15 washer and 2 Phillips screws, and its lock ring #16, exposing #18 (if you have the queer GM locks see them in #37/40 drawing 3, a special tool is needed)
- Remove #18 torque nut ring (threaded), using the correct tool listed below, counter clockwise (no left hand threads) It will take up to 200 pounds of force to do that. (Impact gun works best)
- Here is a video of how to wreck #18 (the man with no Suzuki tools) and for sure never do this, putting the nut back on. (he is using, an exhaust pipe cut off gun) < no respect for car or the owners.!
- Remove part #19 washer.
- Slide off the wheel bearing hub #1 (a slam hammer may be needed, rust happens on part #24 (dwg#2) sometimes. or all the time in the salt belt)
- Pull hub whole, from the spindle. (take hub to the work bench)
- Pull seals noting orientation, or if on wrong way, and remove the LARGE snap RING #21 (don’t forget! to put back later, PLEASE! or you are in great danger!).
- Clean all parts as you go.
- Clean in Paint Tinner or Stoddard parts cleaner (never use Gasoline to clean anything, ever). I like to finish off cleaning, with brake cleaner spray, it leaves NOTHING.
- Inspect all bearing rollers and race surfaces for any damage whatsoever. (frosty is ok)
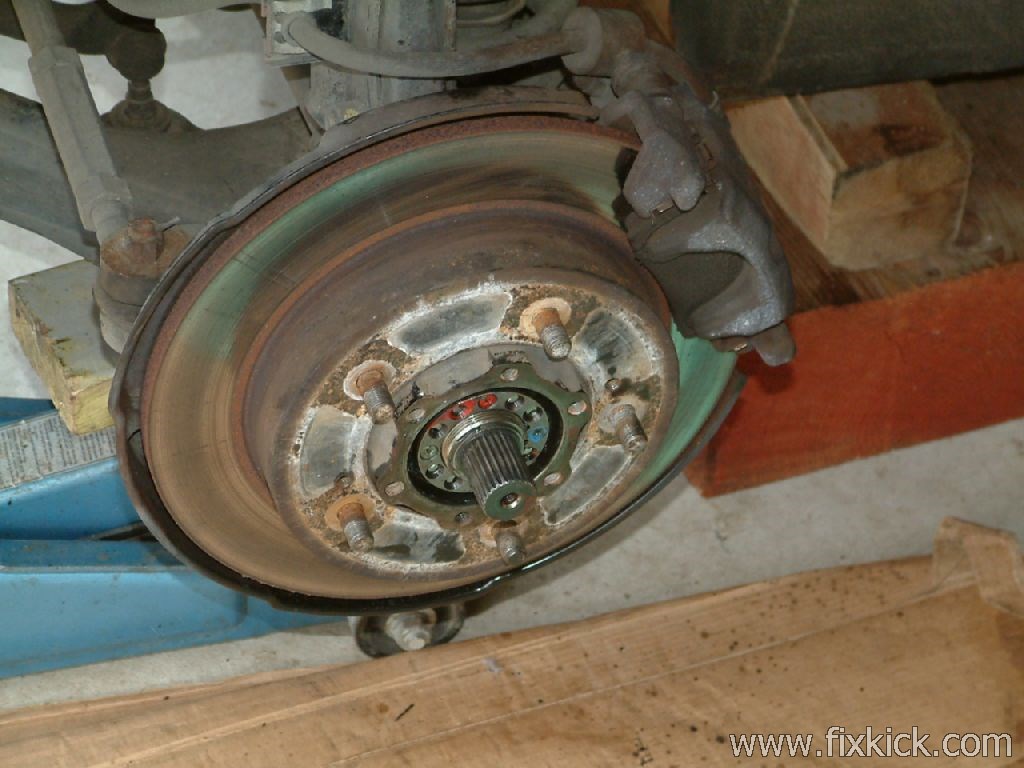
At this point, the bearing Hubs are clean and only have 1 bearing unified CUP is left inside the hub, nothing else. See photo 1 above, like THIS.
If the bearings are bad?:
Take the Hubs to a shop that has a Press. (mine took 6 tons pressure to remove them) (my press has GAUGES) I have a press and cup press adapters.
The best place to do this, is a real machine shop. Many here, only charge $10 to press in your new bearing. (avoid middle men and save cash.)
Press time?
You Press out the bearing cup (1 piece), never try to pound the race out or and for 10x sure IN. Why do that?, when the machine shop pushes it out for free, just before the new goes in, right?
Some pro shops weld a bead in the inner CUP surface, that shrinks the cup and can be easily punched out. (saves time in a busy shop or on huge truck hubs, same with TRAINs)
Machine shops do this, as does all suspensions shops in town (they do ball joints all day long this is childs play)
Or any ASE rated shop in town can do this, most mechanics shops have a press. (No ASE shop will ever cheat you, they DON’T NEED TO EVER!)
They can setup the hub or do the whole job. For sure.
The FREEZE MAGIC WAY, sure… luck does happen. sure.
You might get the CUP back in, by freezing the CUP (0 degree’s F) and heating the HUB. (I’ve done this many a time. It can work)
But, what ever you do, do not pound in new $50-$100 new bearings.
Phase II:
- Press in the new cup (race), using a cup washer tool at its upper RIM. See a kit here. All shops with a press has this tool set. ALL! If not, find a pro shop shop that does.
- Newer use old bearings CONE’s (roller side) to press in the new CUP. (the new CUP will be damaged.) But using and old CUP to push in the new CUP is one trick to consider. If above is too small.
- Reverse the dis-assembly process. In Phase I.
- Install the bearings fully packed with DISC BRAKE rated GREASE ONLY. do not over pack the center section, only pack that about 1/2 full. (leave and air pocket in the center (some)).
- Put back that snap ring #21 (Dwg#2) above and put grease on all seal lips (inside) and mount all the NEW seals exactly, as you found them.
- The BRAKE backing plate has a tub for the outer seal, it will be filthy, so clean it and lube it, lightly,on the inside lip. (this seal is for Fording streams,)
- Mount the bearing hub unit back to the spindle shaft, gently.
- Packing grease to outer bearing inside and out, no air gaps in the rear BEARING portions. (As you can see there is little spare there for grease, as most cars have, so grease it well)
- Install #19 washer and the main torque ring nut #18 above using the special tool. Setting the CRUSH preload.
- With the special tool, torque the Lock ring #18 to 123-180 ft/lbs. (use the appropriate tool for year and 2wd/4wd seen below)
- Attach the nut lock ring #16 and 4mm M4 screws #17. (if it don’t align, then go a tad tighter in the nut ring, in above step 10.)
- The Reverse from here is easy. Part 15 and 14 then 3 or part 9 back on., rotor, calipers and wheel, car back on the ground. At the READY.
- Some Pro’s, don’t trust the bearing press man and assume the cup is not seated, they drive 20 miles, turning fast and aggressive, and repeat step 10 above.
- You could drive and check the rotational force below, before and after driving, this would only take like 15 minutes work. If 8 pounds is 0, do #10 again.
I repeat in brief, these words again in the show an tell section below.
This torque setting is most critical.
Just now, I increased the torque to 155 lbs/ft, from 123 until the locking ring screws, aligned. #16 above and screw 17 would fit. @ Drawing #2.
Attach lock ring #16 and small Phillips screws. ( some cars have different locking devices) 97’+ Trackers use a different lock. and SPRING.
I used Loctite(tm) on locking Phillips screw threads. (#17) Lock screw 17 above, is only 7 cents in stores.
My 1996 GM Tracker FSM is full of bunk. as it does not show the range of torque. (GM loves simple things, they like only 1 number for torque, forget GM, use the Suzuki spec.)
GM Blunder 2 was showing foot pounds for inch pounds, in many places and, on their cam cap screw, settings!
It must be a range, why? Because you must land on a screw plate, that is aligned and that fact mandates a range. ( tis a fact.)
My safety check. (see in many Samurai FSM and is valid here, too)
ROTATIONAL TORQUE CHECK:
This check is best done just before mounting the Axle lockers. PN #3 or 9. Above.
When all done, check the rotation force with a fish scale. (cheap and easy to find in your tackle box).
Put scale on the top lug stud and pull the hub assembly and notice the maximum resistance to rotate the bearing hub unit.
At the top Lug nut and pull 90 degrees away. When hub moves look at scale. (use the old Samurai FSM for details )
Should be 8-10 Lbs. ( fish pounds, hah hah). Give or take, Not 1 LB, Not 25 LBS. (I get 8 lbs, and so do others).
I stole the procedure from the Samurai FSM manual. ( it correlates with mine!) The test is valid.
The bearing is at about.002″ max play, at spec, at 100% full pre-load, this check helps VALIDATE your work.
If the fish pounds are wrong, your torque, on the bearings is wrong. ( or cups are not seated properly or the bearings are the wrong P/N bearing)
Adjust the Torque (in range) as necessary.
Double check all locking devices.!! ( It is good practice to replace the locking device when doing hub maintenance) [ in this case the tiny 4mm screws).
Photo sequences below.
Below is photo story click to zoom. 1989 to 2000 continued. SHOW AND TELL, section:
Get ready. 1996, no wavy washer axle locks.
Photo 1: Manual axle lockers, automatic locks unbolt the same way.

Wheel off:
Photo 2:
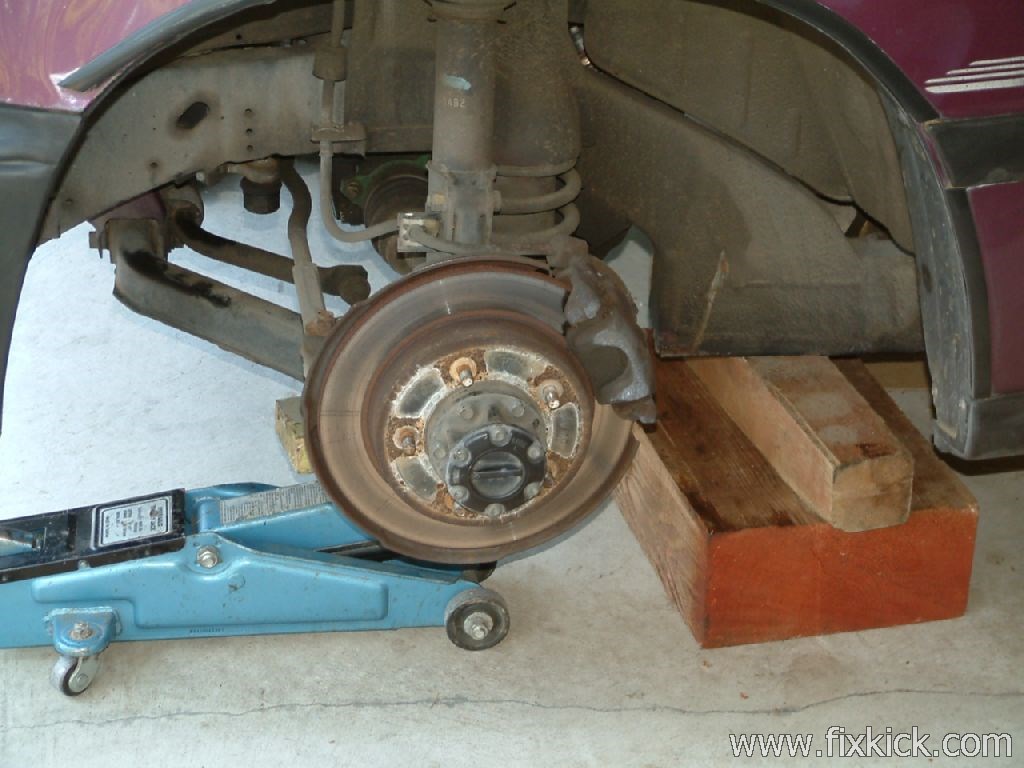
Caliper off, 2 x 17mm bolts on its mount. Tie it up with bailing wire.
Remove the locking hub by unscrewing the 12mm bolts ( sometimes, needs to be hit from side gently).
Photo 3: Day one in the factory are stud spring clips for (automated robot reasons, ditch them)

Pull Rotor Disc. by inserting two 8mm x 1.25 bolts and wrenching, Pop off she comes. (this is covered in the FSM)
This keeps disc free of grease by removing and and placing it out of the way of flying grease and dirty hands.
Photo 4.
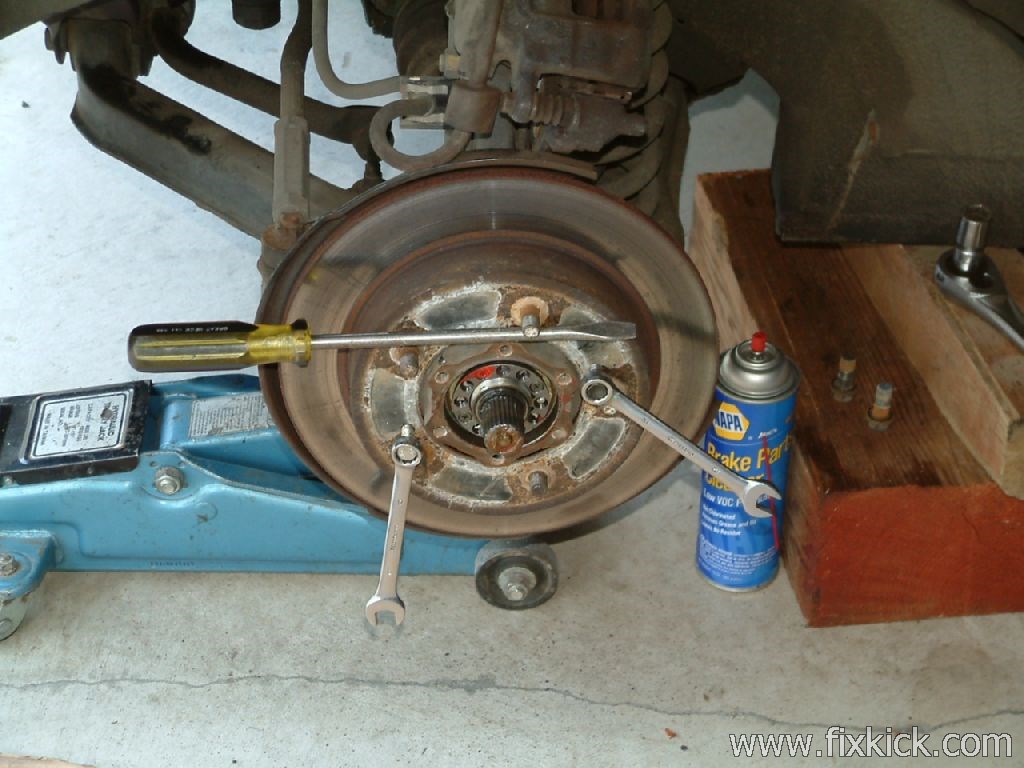
Rotor disc, is off now,
Photo 5: next is axle bearing lock ring.
Red Paint, is GEO mark for factory QA. (double checked in factory)
Remove four 4mm screws with an impact screw driver. (zoom by clicking all) they are real tight.
New screws are best to buy and replace, 4mm flat head screws.
Photo 6:
Using an Impact air tool below, take off the Ring Nut. (near 200 pounds force on mine)
I Tried a 3 foot breaker bar, to no avail. So out comes, Mr. Impact gun. and 175PSI shop air.
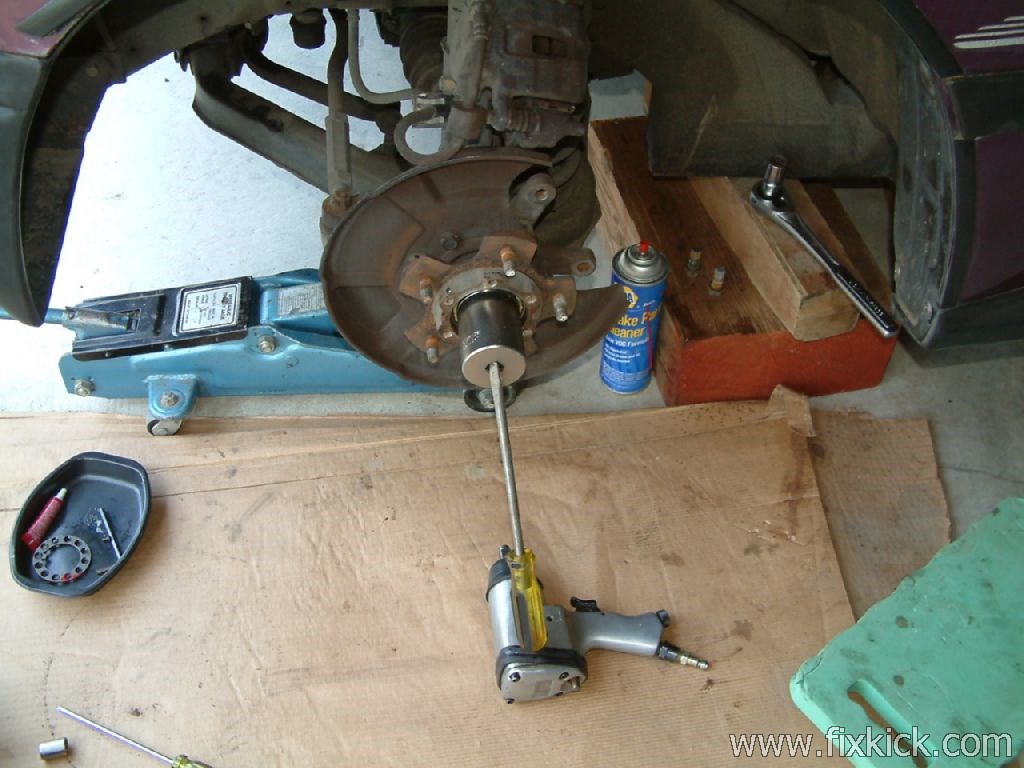
Naked before the world. The spindle and axle.
Photo 7:

Needless to say, if caliper leaks, it is bad. It must look dry, dry as a cracker.
1989 to 2000 continued.
I then removed the wheel bearing hub and benched it, and then: (in brief see above section for long wind version)
- Removed the front bearing and washer, it just pops out.
- I them pried the rear seal out of the hub. (with a tire iron)
- Next remove the hubs rear snap ring. Need a beefy snap ring tool. “K-D Tools” #3151 (NICE)
- I then removed the rear bearing, I inspected both bearings for damage.
- If they are bad, buy new bearings and have a shop with a press, press in the cup bearing, do not pound bearings in with a DRIFT.
- Next I cleaned both bearings and repacked them with disc brake grease. ( I use Paint thinner for solvent, Safe.)
- Now, I Put back the rear bearing (packed) and snap ring and new seal (outer edge of seal flush, no more)
- Then the packed front bearing and put it back in with its washer. (packed full of grease inside) {Disc Brake rated!}
- I mounted the hub back on the spindle and the ring nut.
- Finally I torqued it to 123 to 155 lbs/ft and then affixed the locking ring seen below. (if it don’t align, then go tighter on the nut)
- I then applied loctite to the 4mm screws and put them back in the ring. (med. strength loctite) see blue below that is Loctite(tm).
- If the bearings are bad, press out the old ones and press back in the new double Cups. ( took a 20 ton press last time)
Back goes the DISC and caliper. Torque on caliper bolts are 65 lbs/ft.
I used the lug bolts to seat the ROTOR DISC.
Main bearing hub is finished below:
Keep in mind the 1997 GeoTracker has those silly wavy locks, I kick them to the curb and use real Suzuki lock ring/nut and screws.
Ready for a fully serviced 4wd locking hubs or what came off the car.
Comments:
Having a bearing parker for bearings, is bliss. as is a 10 hydraulic press and bearing cup press tools..
Some people use many different greases or oils ( above is OEM method!),these people living in extremely cold elements.
The above grease is rated to -40F per ASTM spec. If your hub is cleaned and lubed you should not have any problems.
See Premature failures.
FRANKEN-KICKS: Some cars are no longer stock, my page will not attempt or guess, what that might be there, or how to work on non stock cars.
Standard shop Tools: (plus 1 special at #4) All ID # are from Graphic #1——- 1989 to NOW. ALL TOOLS. all metric.
- A jack and 1 jack stand. never use a simple jack as a real jack stand, ever. (Do not jack up any car, without some training, Be safe)
- A snap ring tool for both snap rings seen in above, ID. 14 & 21
- A 150+ foot pound torque wrench. (and breaker bar to remove part ID 18) You could go to 123 ft/lbs, then use a breaker bar to align the 4mm screw locking ring. SURE.
- spare line
- A special tool for part 18 Drawing 2 or the GM tool if that?
- A Phillips head screw driver for ID 17 dwg2. (not used on GM 97-98)
- A shop press 10 tons or more. (depends and reality). (and a set of press arbor plates, for bearings) all machine shops have one, and is a low cost labor fee. 10 to 25 bucks.
- Two 8mm bolts and wrenches to match. (rotor pull per FSM )
- spare
- A Slam (slide) hammer. (rust on spindle happens) (or use a chain tied to the wheel hub stud and a weight on the end, “desesperado” ways?)
- A Lug nut wrench to remove tire and wheel. (comes free with any new car) or a deep wall socket to match your 1/2″drive set.
- If flush with cash?, a bearing grease packing tool or just use gloves, nitrile and hand pack them.
- New grease
- spare
- Paint thinner to clean parts. (safer) sold at walfart, dirt cheap. and brake cleaner for a final clean, same place in blue/red cans…
- Metric ratchet Socket sets / spanner and METRIC box wrenches to remove caliper. (everyone has at least this, or working on cars is impossible.)
- If parts are very rusty, you will need more tools and more parts.
- Penetrating oil, to free rusty parts.
- A 1/2 + inch drive breaker bar, to remove the nut ring. Can be near 200 ft./lbs after 20 years of service, sure can be…
- An impact gun to do the same. (but never, to put it back on) sure shop air, all shops have air.
I’m sure I missed a tool.
If you get this far just reading,, I bet you are at some 4wd shop getting this done. (ASE cert. shops are best)
SPECIAL Tools for bearing removal: To torque these special axle nuts the tool costs. $50-$100
There is a clone tool now (2014) on ebay. about $50 ( the real tool keeps getting more expensive every day, nearing $100)
The locking ring nut on all Suzuki’s are all the same, in 1997 they started using CAMI made nuts, but is not a new design.
The Suzuki nut part number from 1989 to 2003 are all the same, p/n# 43461-60A01 (or change to A30 for CAMI parts)
The spec. torque is 123-180 ft/lbs.
Your Samurai does not need these special tools. (nor does it ever use Crush Bearings, but in fact is preloaded bearings about 1/10th of ours)
This tool below, only fits GEO TRACKERS 1997 and newer! Never on any Suzuki!
(Some 98 Tracker were built in Japan actual, and are missing this wavy locker nut! due to a CAMI shut down that year) So, look first!
This is a GM crazy idea and many people change their locks over, by putting on Suzuki actual parts to make your Suzuki tools work.
I trash these locks, I mangle them to get them off and then upgrade to real Suzuki parts.
——————————————————————————————————————————————
 GM/GEO ONLY Wavy Washer lock nut type!
WARNING, your must buy both tools above (2 orders) to get both parts!!!
I’d never buy this tool, but would buy a new 1996 Sidekick stock locking ring, ring Nut and 4mm locking screws.
For way less money and use a normal tool below.
1997 or newer ONLY USED ON GM -GEO Trackers these years.
J-421191-1 (SPX Corporation/otc) Giant washer is dash -2 this washer compresses the spring!
The Washer tool above, must be ordered separately (oddly).$$$ crazy expensive they are.
Alternate tool:
OTC 7913 has both washer and nut tool. both -1 and -2.
Using this tool can be confusing for any pro or beginner. Do not force it, or parts can be broken.
See the GM drawing and parts ID for this locking device.
One guy did this. YMMV!
Your mileage may vary.
The normal Suzuki special tools. 1989 to NOW continued.
Fact is, the bearing hub and locking ring nut, are all the same 2wd and 4wd! 1989-96. (ABS changes after)
The below tool is too short the clear the 4wd axle ends, so why make this 2wd tool at all, they hoped it would be cheaper. (and failed)!
But in reality its $60- 70 bucks and the clone 4wd tool is $50. Making this tool just useless (new ) and very RARE.
The whole idea is crazy, as “economies of scale”, making just 1 tool would have lowered the total cost. (sure would)
1989-’96 Fits only, 2WD SideKick and Trackers.
For setting torque at about 123-180 ft/lbs.
I’d not buy this because the 4WD fits both and you can re-sell the 4wd way more easy for more cash later.
SPX Axle Socket per Suzuki FSM: There is no reason to own this tool,it’s only made because its cheaper to make but only fits 2WD, I ignore it and use the next too below. that fits them all.
“Spanner wrench J-37760”

The most common tool for 1989-2005 Sidekicks and Trackers and Vitara’s (and Grands),
But never fits Geo Trackers 1997 /98, but do look first Geo’s, what you have there, if it has wavy washer locks, you need a special GM tools)
123-180 ft/lbs. Is the spec. torque. (it’s a range, so you can align the 4mm screw locks)
Timken R/D labs, do show fast failure rates outside this range!
When torqued right, the final play is about or near to.002” or less (the magic of crush bearing )
The play can be measures with any dial indictor tool..002″ can not be felt.
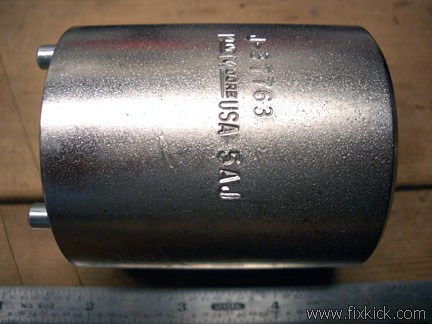
4WD tool: J-37763. 1989 to 2005 continued.
This tool will fit 2WD and 4WD. The SUZUKI nut ring is the same!
The only differance is the deeper socket to clear the 4wd axle end. This is the tool to buy, bingo.!
Suzuki #09951-16050 ( discontinued and was $119 on that last day) But OTC makes it still.
Fits all Suzuki’s with Crush bearings. (and Vitara’s) 1989-2005 years. or more?
There is a clone tool now (2014) on ebay is $50.
This tool below fits up to Suzuki NUT RING lock, p/n# 43461-60A01 (or change to A30 for CAMI parts 97+)
This tool fits the lock nut ring #18 above in graphic 1.
On little oddity, in 1998 CAMI shut down the GM line (GEO) was moved to Japan and GM dropped using the wavy lock and uses real Suzuki lock tool below.
So, LOOK first, then buy tools. (as always)

For setting torque at about 123-180 Ft/lbs.
DIY home made tools? sure! Ebay seller have $50 clone.
Those pins are very hard steel. Tool steel grade, not weak CRS “cold rolled steel” or extruded steel rod.
One could use cut down drill bit shanks, and make your own tool easy. (many have)
One good use for China made drill bits. (no?) best usage of China tools,ever?
The hard part, is finding pipe with this very think wall size.
Do not use a cold chisel to pound off and back on, the lock ring nut.
1989 to 2005 continued.
TOOL SOURCES!
$82 4WD
http://www.etoolcart.com/index.asp?PageAction=VIEWPROD&ProdID=4431
$72 2WD
http://www.etoolcart.com/index.asp?PageAction=VIEWPROD&ProdID=3597
$50
There is a clone tool now (2014) on ebay.
A COOL, Home made 97+ Geo wavy type, It don’t need to be pretty, just work!
Bad news: ( real people with hub problems).
Dealer experience:, after driving only 3000 miles, with all new bearings and seals:
“When I took the lock rings off they had chisel marks on them from the dealer using a hammer and chisel to remove and reinstall the bearing retainers.”
I found another unhappy customer with the same issue and his bearings failed at 8000 miles, All new parts! TOP BRANDS!
If your locking nut ring is damaged, replace it. #18 ID. (yes, Suzuki sells it)
Not torquing the locking ring to spec. will destroy the bearings in short order! 123 Ft/Lbs is THE ABSOLUTE minimum torque!
The Timken bearing company has white paper and a testing graph show how fast it fails under and over torqued, it’s not magic, it will fail, with the wrong torque. (crush)
Advice!
Find a mechanic that promises to install it correctly with the correct tool. ( I wonder if someone, makes a calibrated cold Chisel, with foot/pound scale, LOL).
KEY POINTS:
They (Nut ring) must be torqued properly. 123 ft/lbs, minimum. Do set it starting at 123/ft/lbs and work UP, until the screw holes align! In the locking ring. (4mm screws)
I Use Marine General purpose grease in the locking hub cap parts., grease the cap knob juncture, on the back side of the Locking Cap Dog unit, lightly greased.
Do not Pack locking hub cap fully of grease or it will expand and leak out.
The Wheel bearing side:
Use the best quality Disc brake wheel bearing grease you can find, for the wheel BEARINGS. Disc brake grease is HIGH Temperature rated for Discs.
Set main NUT torque, to the in range value and still get the index ring to align. The FSM doesn’t show the range of torques, but Timken does and so does SUZUKI!
Make sure to grease the Brake backing plate bearing socket pit, outer wall and the match ing seal on the HUB.
This keeps water off the back side of the Spindle.
Parts Sources:
See my parts list.
Both bearings and seals and freewheeling front axle hub o-rings.
“Disc” Brake bearing GREASES!
Do not use general purpose grease or chassis grease or other low temperature greases, like trailer bearing grease only use DISC BRAKE rated grease or better.
The disc brake runs real hot. 500F is the Minimum spec. Aka.Drop point F.
However Valvoline makes multipurpose grease that is great. called Palladium.
See grease extreme here. (very cold or very hot)
One of the best greases for the dollar, is Valvoline’s Palladium
Mobil 1 Synthetic Grease (passes ASTM D4693 low temp spec) < I use this in both hubs, bearing and locker.
“It is particularly suited for applications such as disc brake wheel bearings and ball and steering joints.
It will provide outstanding bearing protection under heavy loads at any highway speed, and where moisture or condensation is a factor. “
The Infamous 97-98 GM/GEO Wavy washer, wheel bearing locking device photo:
Uses only the J-421191-1 and -2 tool above. (it’s 2 tools, not just 1)
Most 1996 (later built) may have this non SUZUKI locking ring.
Found on CAMI Tracker only (some 98s were made Japan, during the 98 CAMI refit, and may have SUZUKI lock rings. (DO LOOK first)
The tool is crazy expensive, I’d by real suzuki locking rings from any Suzuki dealer and upgrade this, so the $50 tool works.
Drawing 5:
Full Blow up of GM axle: 97-98
The above setup can be change back to pre-97 style, by buying part ID 14-19 shown in graphic #1 above.
Real photos 97+ Geo/GM only: Notice damage by the bad Chisel man. Bottom center is the wavy lock washer.
The spring must be compressed for the locking ring to be free and then come off with 123 to 180ft/lbs reverse torque.
Note that pressing down on 9 spring taps with 9 screw drivers is going to be problematic, so some hackers snap off spring tabs until
they manage that, lil’ magic. (9 people with 9 screw drivers? a 10th mad man? with a Chisel ;sure.?) Send videos please.
Premature failure:
Almost all fails (common) are due to lack of maintenance, WRONG TORQUE, wrong grease type.(or water ingress, fording steams?)
- Using NO “NAME” China Clone or Counterfeit Crap, C4
- Wrong grease, not Disc brake rated, or running the came with, packing grease, found in new bearing (do not use that grease)
- Not running the spec preloaded torque on this page. (to little or too much) “using the wrong TOOLS”
- Pounding bearing cups. ( damage for 2 reasons, distortion to cup or you slip and kiss off $50 new bearing, or it don’t seat right and later, comes loose and fails)
- Any Contamination. (water, dirt, salt, due to bad seals.)
- re-using old bad bearings.
End, Generation 1,2 and 3 Suzuki’s ending in 1998.
END 1989-2000 facts,
Begin last generations of UNIFIED bearing hubs.
Newer Suzuki SUV’s., not GM/GEO, I have no idea how GM built the cars after 1998, except 2004 this these hubs)
Suzuki P/N is # 43401-65D00 (non/abs) or 65D10 suffix for ABS vehicles. Do not confuse axle ball bearings with the HUB/bearing assembly.
Timken P/N # 513193 (the full catalog is here) The Timken ECatalog is here.
RAYBESTOS Part # (see em’ at Rockauto?)
Federal-Mogul may have same p/n as Timken.
USA spec. cars, 2WD and 4WD are different, as are cut in dates for changes at GM (Geo) and Suzuki.
This new section is my attempt to cover all years, (not Samurai)
If car is 4WD, the change over year was 2000 to 2001.
This section is mosty, for those owners that have this UNITIZED hub, that means the hub bearings are NOT serviceable, as older (Vitara’s, Sidekicks and Trackers were)
Not serviceable means, nobody has tried to remove the bearing inside and report makers name and it’s part number markings. (seals and bearings) Nor if it is even possible.
The FSM tells you, if you attempt to remove the bearings, in this hub, it will render it unsafe to use. (RTM!)
NO, they can not be repacked with grease. Not correctly.
Are these Serviceable, NO. If bad, the whole thing needs to be replaced. (seen below)
Sure you can replaced bad studs.
You still need 2 tools, a generic Slide(slam) hammer, and a real Suzuki 4wd lock ring tool, shown above.
(unless you love using a cold chisel and pounding the crap, out of that poor lock ring #11 and guess?) <<, this SUCKS! and is very common in schlock-shops. (Schlag-shops, or Jerry Rigged)
They Still have CRUSH bearings inside. (just like most real Jeeps from 1993 to now) Crush bearing are NOT a SUZUKI INVENTION, not in the least. 93’+ Jeeps have this too…
Photo 10: (Unitized hub, UNIFIED?) 2001, 2WD and 4WD, first year.
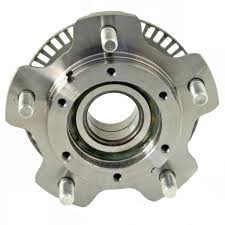 See the grease in there, it’s Pre-lubed and uses the same heavy preload, just like the older pre 2001 cars.
The hub, comes ready to run.
Many stores in town sell cheap low grade parts, for this part. (dirt cheap from non name CHINA makers…, is a RED FLAG)
The year 2004, the locking nut ring, changed to P/N 434612-54J00 (so the above tool many not work well? but my FSM says it does work. 2004)
Pitfall 1: front hub #4 axle end rusted, to axle spline (use a slam/slide hammer)
Pitfall 2: the bearing inner race, is rusted to the spindle collar #13,and same solution.
History / evolution and Variances;
Samurai is unique. 1984 to 1995
My list is USA centric, other countries or the other 4 factories world wide, many in fact change over on, different years.
what years GEO changed hubs, I do not know but is close to Suzuki’s)
Convoluted and complex this is, making pre parts orders hard.
All hubs are old style (seperate bearings) except the following years below and 2/4wd.
New hubs:
SQ416/420 2WD and 4WD. Unified hubs. starts in 2001. Suzuki Sidekicks, Vitara’s with G15 or J20 engines.
SQ625 2001, both 2wd and 4WD starts this year. V5 H25 engines, Vitara’s and Grand Vitara’s SQ625s
I can not promise is true with all 4 factories, and GM (Geo) changes. All this is CAMI data.
XL7 2002 to 2006. same, as photo 10. UNITIZED.
Below is the newer setup. The axle bearing is at 14. This is not the wheel bearing. You buy the hub #1 and the bearings are already loaded inside.
In 2005 GM makes this car for USA, on the GM Theta platform, the newer generation uses its own new hubs, (looks same, but is NOT)
The newer design (gen4) the hubs bolt to the spindle plate with 4 bolts, but the axle nut still gets huge torque. qouted next.
2005+ (look first, then buy parts)
- Depress the foot brake pedal and hold it there. Tighten a new halfshaft nut to 160 ft. lbs. (220 Nm). (just one key step here, for these newer years)
WARNING Never reuse the halfshaft nut.
end history /evolution.
Bearing Confusions: 1989 to 2000 continued.
The 2 BALL bearing sets seen at NAPA? bottom of page. SKF 62062-RSJ are really front spindle axle shaft in-board. bearings..? RSJ= Sealed one side, steel cage. 30x62x16mm.
Some web stores show rear bearing in front bearing selections (classic this is, in the business…),or confuse wheel hub bearings with axle bearings or bushings.
The hub bearing drawing 6 or graphic 10, are normally not replaceable in the #1 hub.
Just the whole unitized hub. Suz. Hub p/n. #43401-65D00 (no-ABS) or suffix -65D01 with ABS. Suzuki sells one hub for near $250 bucks. (must be gold plated)
NSK $100 Top Japan made.
China hubs are as low as $30 (trash?)
I’d buy Raybestos or Timken for $72. (2001) I’d buy a Timken,
Knee jerk KOYO bearing buys, are a win.Most of these cars shipped with KOYO bearing, when new.
The hubs #1 are pre-loaded, are all sold at Rockauto.com and many brands. (more than 10 makers) and are sold at almost every auto store in the USA.
As you can see, there are no replaceable discrete newer wheel hub bearings from Suzuki, #1 (graphic 10) it’s preloaded at the factory.
You can switch to Timken, Koyo, FAG, SKF, Fed-Mogal, Beck_Arnley, BEARINGS or other top brands. See Timken on line crossover pages. 1989 to 1998 continued.
If you see dirt cheap loaded hubs. look in side for no name China parts. (I’d skip these)
Loaded hubs:
Raybestos makes the whole thing cheap $73. (after all, the old car had $50 crush bearings)
The low ball on fleabay is $46 each or 2 for $73, good luck there…
Here is the Rockauto.com link to the hub.
| TIMKEN | 513193 |
| FEDERAL MOGUL | 513193 |
Many companies make 513193 hubs.
Part 10 is a flat head screw, ISO spec. 4mm x 0.7pitch. (IIRC) Suzuki does sell all these parts, GM uses wrong drawings, in many cases; note early wrong drawings; for 2004 Tracker.
Rule 1: (really for all cars) is that cut over dates on parts can happen even mid year builds. (at specific, VIN serial numbers (the Suzuki parts list is clear there) GM,not so…clear.)
What you have 20 years later, is anyones guess? ( not stock anymore)
If my #1 hub failed, I’d attempt press them out. ( The are junk now, so you can’t make it worse, so press them see if you can dismantle them and get the P/n on those bearings/seal)
Now the Key points, (it’s in the FSM, page. 2B-16)
If you live in the SALT BELT, all this can be a private horror, but the hub will need to be pulled off with a slide hammer (aka. a slam hammer) or large gear puller.
#4 likes to rust on to axle, use a slide hammer there too, all good shops have this hammer. (aka: slam hammer)
One more red neck tool, is a chain to the wheel stud and nut and the other end attached to 5 lb dead weight. then yank the weight outward, bam it’s off. (seen on youtube, endless)
The 2004 Suzuki book shows setting ring nut 11 to, 156.5 ft/lbs. (for sure the lock ring #9 must align, the book says go tighter, to align the lock ring) I say 180lbs max.
The spec. is a range, allowing hole alignments to happen at ring 9, this is a fact. 123-180 ft/lbs.
The final bearing “endplay is, 0.002” max. (dial indicator checks) (FSM quote 2004) See 2004 FSM steps (key 3 pages, PDF)
New style Hub bearings. 2001 to 2005 or XL7 -2006
Photo 10: 4WD for 2001 to 2005 and XL7 to 2006
Part ID #11 needs to be torqued right, just like the older cars and using same tool.
The 2WD car has no axle here, and less parts and less steps but #11 and friends are the same and the same rules apply.
Drawing 6: (2001- 2005 new design here) if NO ABS then part 3 is missing. Part 1 is sold everywhere, even at rockauto.com
 FixKick forum
2006+ major changes. SAME PRELOAD as above.
Get a new hub from Timken P/N # HA590178 (2006+ front/rear)
The Hub no longer mounts to a spindle. 13 above. But is still CRUSH bearings. It needs the full torque, just the same.
If your car is 2005 or newer, look for these 4 bolts first at wrench below! Then buy parts.
They got rid of part 4 in the drawing 6
Drawing 7: below:
FSM quotes to follow:
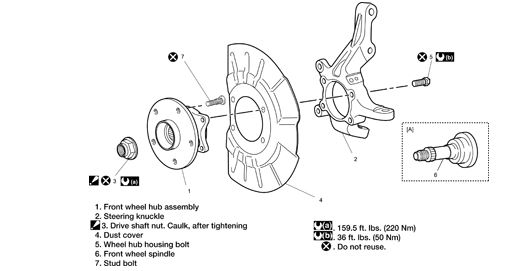
Never disassemble the front wheel hub assembly #1. Disassembly may spoil its original function.
Depress the foot brake pedal and hold it there. Tighten a new halfshaft nut to 160 ft. lbs. (220 Nm). (parts 3 and 6 do the crushing)
Read the X marks and belive it, it’s from your Suzuki engineer to you. a fact.
Those screws, are near grade ISO 10.9, my estimate, use real SUZUKI bolts or grade 10.9 min.
or SAE grade 8. 120000 Psi/min tensile rating., Do not use less or the wheel may fall of the car.
Max. Grade 12.9 are hard to find. (159,541 PSI/min) I mention all this, due to, how hard it is to find, a open Suzuki parts counter, after Chapter 11.
 h
h
Bearing Damage?, there are no limits to damage but good bearings look shiny, when new and fosty for normal. (If not sure?, replace them)
The problem with preloads, is you can’t inspect them. Only feel play (measure it) or feel the lumpiness turning, or noise.
You can see the outer bearing grease, see if it looks, Happy?
Happy means looks like grease, not cracker dust, or tar, or ground sand, rust, or chock.
A good used bearing looks, like the new perfect surface but now is just frosty looking.
No discoloration, no pits, galling chipping, rust, Brinelling, rilling, or other odd surface damage.
SEE lots of bearing failure photos here, very good.
A great page on bearing failure (54 ways) by SKF.
More Grease facts:
Four sure, use a grease that is rated for Disc brakes (hot temp. rated). Spindle ultra high speed rated.
Wheel Bearing Life, ASTM D3336, hrs@300° F 1500 1750 2000 2000+ (4 grades; last being best)
Pour Point, ASTM D97, ° F, Max. -45 -55 -60 -65 (4 grades, last is the best )
Odd facts:
Cleaning bearings (Timken quotes…)
“How do I clean the lubricant out of my bearing? Start by wiping off all the oil or grease you can reach. Then, for mineral and synthetic oils and greases, wipe all surfaces with hydrocarbon solvent such as mineral spirits or kerosene, followed with an isopropyl alcohol wipe.
The color of my oil/grease has darkened compared to when it was new. Is it still OK to use?
Yes, it’s still OK to use. Some oils and greases contain small amounts of additives that will darken with exposure to sunlight, UV light, temperature or air. Since this color change is the result of oxidation of the additives, which make up a very small portion of the oil or grease, there would be very little, if any, functional change to the lubricant. ”
“Is there a problem with using a combination of two types of oils/greases in the same component where they may come in contact with each other? I want to replace the grease in an existing system with different grease. I can’t clean out all the old grease. Will there be a compatibility issue between the new and old grease?
As long as the two lubricants have similar thickener systems and base fluids, there should not be any compatibility issues. If there is a difference between the base fluid viscosities of the two lubricants, a mixture of the two will result in a base fluid viscosity somewhere between the two. A different viscosity oil may not cause compatibility problems, but it may result in performance problems. It is important to thoroughly clean or purge the old grease from the part to ensure that the new lubricant properties are not changed significantly as a result of being mixed with the old. Perfluoropolyethers and silicone based fluids should not be mixed with any other base fluids. Hydrocarbons (mineral and synthetic) and ester base fluids are somewhat compatible. Clay and conventional polyurea thickeners systems should not be mixed with any other thickener types or a softening or breakdown of the grease could occur.”
In my opinion never mix grease or oil products. (and win every time). or never mix chemistries, of any kind.
Lock screws are counter sunk flat heads. ISO standards. 7 cents each. Seen as id 10 above in Graphic 10.
M4 pitch 0.7 by length of 10mm
Crush bearings, what are they? I will use Timken terminology (speak) “TNA type”, bearings) ALL YEARS! (non Samurai)
Used on JEEPS 1993′ plus and all Suzuki SUV. Sidekicks, and Vitara’s.
This Timken PDF covers both kinds, 0 play and Preload bearings. See the LIFE 10 graph. I show this page, only to demonstrate the many different types of bearings used on vehicles and trailers.
Here are the different type rollers, at Timken, the TNA bearing is like ours. “Supplied with a built in clearance to give a standard setting range, as listed,”
TIMKEN 517009 FITS:
Timken (p/n: 517009) “non-adjustable TNA “Tapered roller bearings, see this interchangeability catalog!
More TNA data: Non Adjustable means, set the torque and the clearance, is magic.
If you set the preload correctly you will land at the life peak below, all by magic. All by DESIGN!
In all cases, of rollers, this is the final results, how you get there?, RTM read the manual…(this Suzuki does use PRELOADED bearings)
BTW, your bearing maker does not know the preload, needed, because they don’t know the spindle tread pitch on this Suzuki, see? The Torque + pitch sets the crush factor.
Only the Suzuki spec, matters.
The life of the bearing is shown here, based on using the correct or wrong TORQUE..002″ live clearance is best (for complex reasons “thermodynamic”)
Even some older technology rollers, can benefit from light preload. Like Samurai’s
(the graph above is from real data and load testing, by Timken) In fact, some trucks, they use this special tool now.
This last report and the best, Best Practice on all bearings like this.
I mention all this, only to show how serious they are, on life span of seals, tires and the bearing. Doing it right, does PAY BACK.
On most new heavy trucks:
“The preset or pre-adjusted hubs are now the most common OE drive axle spec. Preset and pre-adjusted hubs are set up at the factory and can be installed without the need for bearing adjustment.”
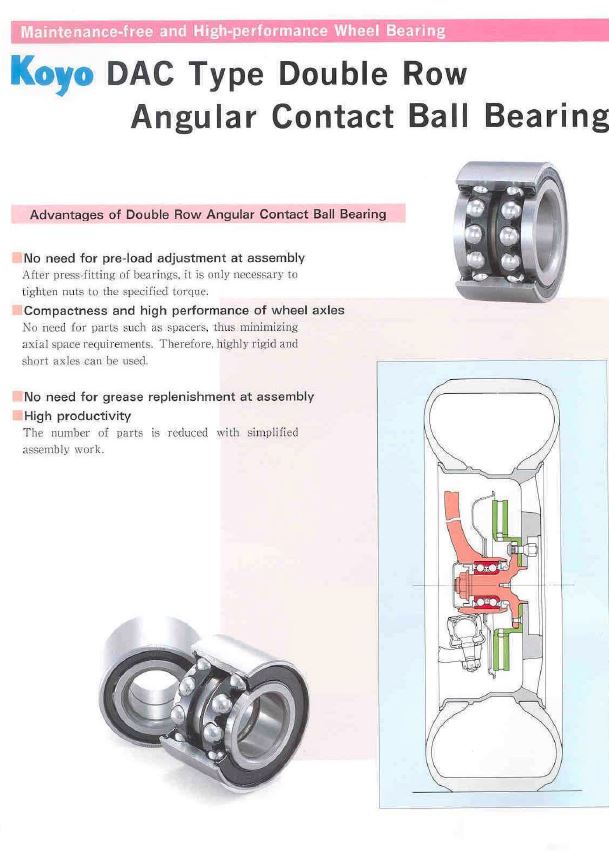
Last and best? is what I will coin the phrase “, The Jimny Upgrade”.
We discovered (helpers world wide) that only these Jimny cars and no others, were sold by Suzuki with no crush bearings, only these newer VINs and never inside USA.
The 41001 is same are our tapered bearings. The 84A00 is the ball bearings.

These bearings are not sold here, (in USA) are KOYO DAC bearings, See this document on what they do.
The need no lube added, new, like our do.
They do not need 123 pounds min. of torque ever, in fact, that would kill them, IMO. This bearing does not need PRELOAD.
I’d set the nut ring, to 25-50 foot/pounds max. I have no Jimny books, it’s not sold here, so can find one.
The koyo part number is: These are Ball bearings and NOT tapered rollers.
DAC4168whr-4cs23
I see no other makers of this bearing, no subsitutes. (but will keep looking)
More facts, sure, the hubs have same part numbers and all parts inside same, except this newer bearing sets…
The axles are different in these newer VIN cars, but they don’t really touch the bearings ever.
This bearing makes service much more easy. (just press them in, hand torque the lock nut to firm, hold, done.) I’d set that same as caliper main bolt torque. (firm)
Many parts houses show the bearing as same as the roller, yes it fits, but is setup totally differently, they are not direct subs, but same fit up.
I see a China bearing company calling their DAC4168whr-4cs23 by this name(p/n) and it’s a roller bearing, totally wrong!
Logo’s and names: (none are mine, they belong to their respective owners. my mention of these names, is only for finding safe good parts.
Timken, Loctite, NAPA are all private companies and are not associated with me, nor am I paid to recommend their products or ANY PRODUCTS.
Same with Autozone, Pepboys, and Orilleys, ACdelco, etc.
This document is just a journal of my repairs. Nothing more or less.
I hope I saved you a ton of cash, and life and limb.
SAFTEY FIRST!
This is really good but not specific enough to those who have 2 wheel drive. I would like to see more schematics for how the front bearing is replaced when there is not an axle going through it.
How about info on 1987 Samari with wheel bearing nut ring vice the two nut method?
Appreciate any insight since the manual I bought is useless in that regard because I don’t have two nuts on my wheel bearings but have a ring that torques the whole wheel bearing mess down. Obviously need a special tool – can’t find the torque value….
Hello there! I simply would like to give you a huge thumbs up for your excellent information youve got here on this post. I will be returning to your site for more soon.
catamaran hire caribbean