Do you have LOW POWER , or MISFIRNG , dead engine?
These tests, discover a bad engine, it can not pump air! Jump to Compression now.
Please keep in mind a melted TWC or CAT will cause a dead , no pumping engine.

Warning all Suzuki connectors have locks, never force them , unlock them, then extract. Take your time here, to learn the correct way.
See here, for list of cheap tools. (see photo reviews, at end and links)
Targets of Opportunity (Valve cover off or or Tbelt cover ) and how to find that leak....?
This pages covers all 3 tests, compression, leak down gauge ,and vacuum testing.
All three tests prove a good motor. (as does, above target inspections!)
COMPRESSION TESING: ( Is best done on HOT MOTOR (at ≈ 130F (warm) to 195F) if you desire a good bench mark, to the FSM data.
This test is a bench mark, not doing it correctly makes your tests useless, in that done wrong , you can not compare your data to all others done.
The FSM book shows 2 bench marks, hot and cold and is done at sea-level.
Doing a good bench mark test, you can see a cam belt that slipped just 1 cog. Saving you from pulling covers on the belt.
(if you discover spark timing is way off , check the cam belt first)
The PSI readings done right are a function of engine compression ratio and the altitude (and cam profile that don't change)
If motor is dead, it can not be done hot.
Almost all engines here, can do 150 psi dead cold. (other web sites say 100 PSI this is a PURE LIE at sealevel , 100 psi is my lawn mower with CR of 7:1)
It MUST BE DONE at about WIDE OPEN THROTTLE. (here is my meaning on that)
One can say , "crack the throttle mate and crank."
Typical Symptoms:
- Never put in a new Timing belt at the repeating 60k mile TUNE UP?, (now
compression is 80- 100PSI? no surprise there,)
- A great loss of power, and or poor fuel economy.
- Motor shakes violently at idle (misfire) EGR is closed. or shakes at any time, or in 1996+ the Scan tool shows"MISFIRE"
- The vacuum gauge bounces like mad. (a tool called a vacuum gauge)
- Oil in coolant or coolant in oil?
- Green leaking down the side if block? (head warp or gasket
bad)
- Never set lash , at the
60k Service MARK (Really?) now the valves leak?
- head bolts found loose at the 60k service?
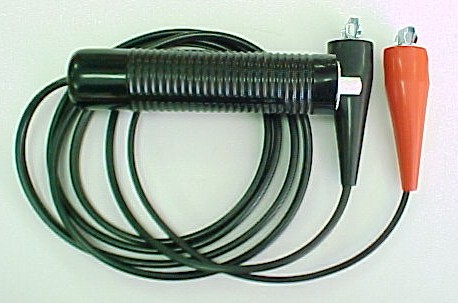
I ALWAYS use a remote start button, a $5 tool, so one person can do the test. (crank and watch the needle peak, do not count seconds)
The Compression gauge is cheap use 14mm adaptor ,screw in type..
Safety FIRST, no fires, no electrocution, got a pace maker?, read carefully, Pull the correct fuses.
Best is to use the remote start cable, keys on pocket to do this test.
For safety we kill spark first. and for super safety fueling too. Not using the above cable (button cable)
If all this is too complex,this killing of the fuel, then you can in fact, remove the rear tail light (left) and pull the PINK wired connector in under 5min flat. (this is the fuel pump power , PINK)
There are 2 dangers?, the spark flashing jumping out at you at 50,000 volts, can be very dangerous. (and will hurt you bad...pain and if you jump cut up your elbow)
Or worse the spark catches the fuel on fire. (together, this can be deadly) The spark can sometimes jump 1/2 inch , 12mm easy, keep hands away from ALL spark parts, if active.
At the least, kill the fuel Injection pump:
The below are the TRACKER and SIDEKICK only and varies by year, using just the fuse pulls.
TO KILL FUEL and Spark:
Fuse Secrets:
The FI (Fuel Injection, fuse) cuts the main relay & fuel pump & spark generation.
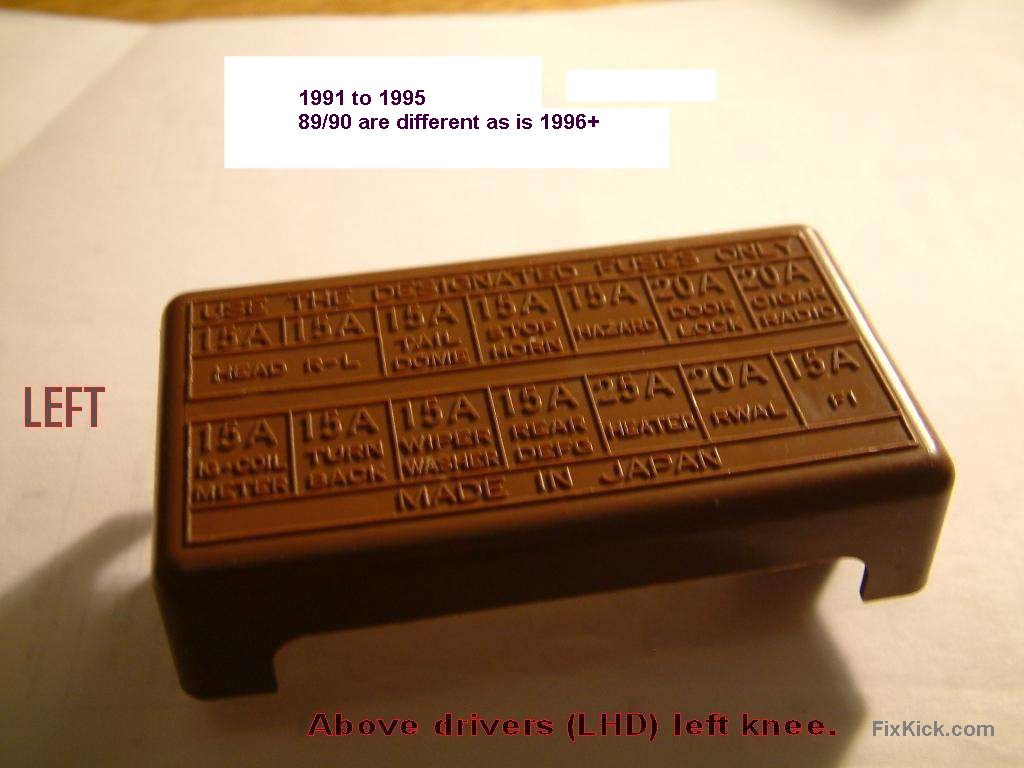
Pull the FI fuse seen here> "photos" . 91-95 96/97 some pre 91's on 89/90' years, this correct fuse is marked IG-Coil Meter. (most easiest) 89/90 are very unique, wiring.
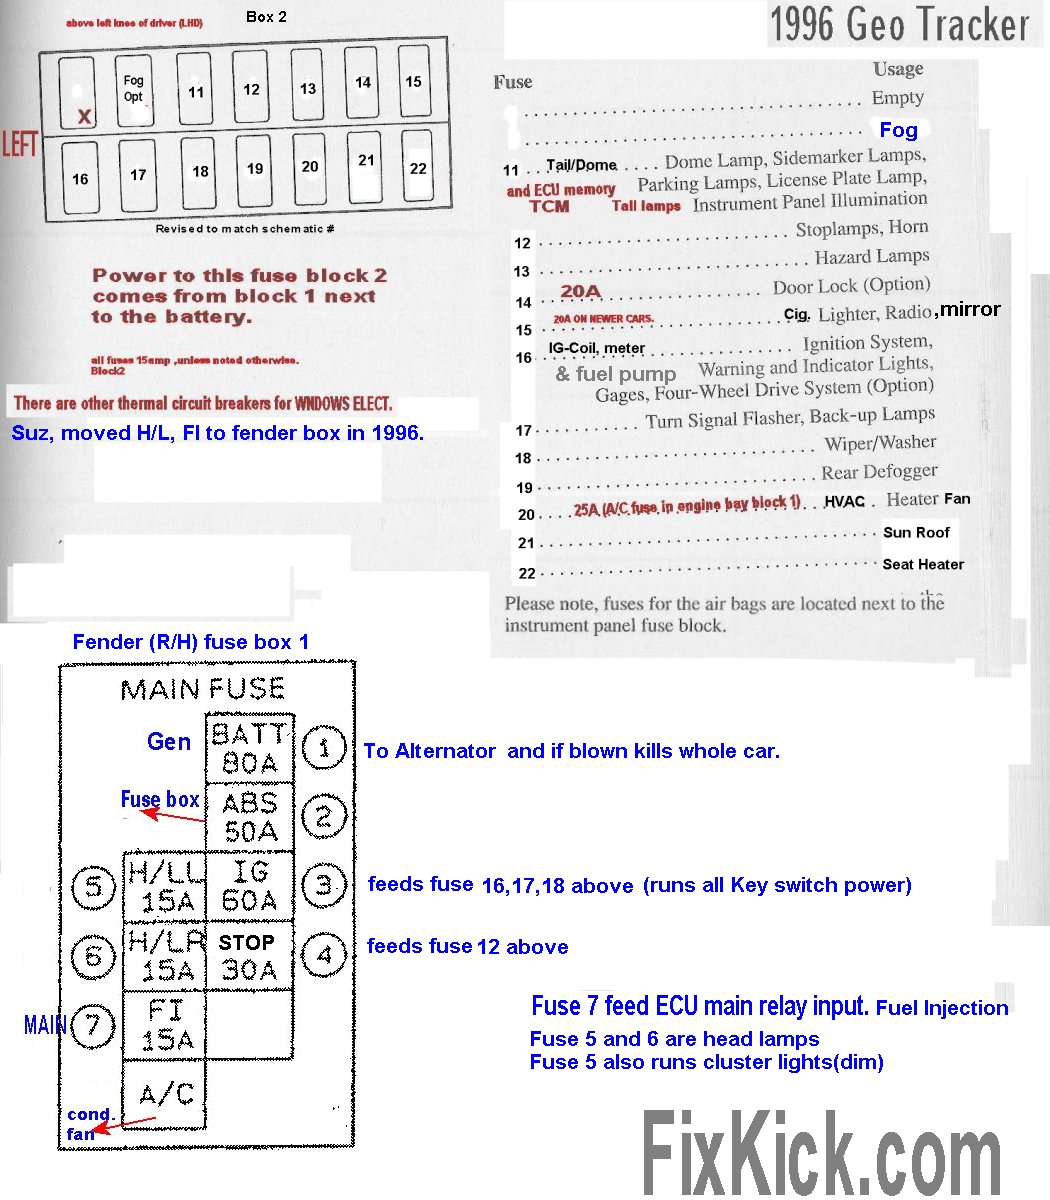
Starting (no pun) in year 1996 the FI fuse is now moved to the right fender fuse box, do not pull the IG fuse in 96+ cars or the key starting canking path, dies.
Even better, is a remote start tool (push button), with key off , and there is no power /spark / fuel anywhere;
Factory SPECS: and Bench marks. (all hot, all with spark plugs out, all test with throttle blocked open)
All at SEALEVEL, at 4000 feet multiply spec by .888 to see what yours must be. The 16v would be 173 PSI.
Warm or hot motors produce the best pressure, Spec is HOT.
Cold block tests, only find dead cylinders,etc (very useful), and if like 80 PSI all 4 jugs , the timing belt did slip.
FSM SPEC. HERE: (not BS or rumor, SPEC) All numbers are sealevel, use the table below to correct spec to your altitude.
The 8v is 170 PSI. Factory spec. ALL HOT. (there is a cold spec. useless unless engine is DEAD. and is 150PSI min, cold) 1991 to 1995 FSM facts.
The 16v is 195 PSI. Seen in FSM chapter 6-6 (not 6A1) Facts.
The newer J18/20 engines can do 199 easy. (as can any V6)
The readings can be higher. with a milled/shaved head, due to Compression ratio no longer at spec. but is much higher now. (or a way too thin, non stock head gasket)
If all 4 cylinders below 150 is caused in almost all cases,by skipping the timing belt 60k service or doing it wrong ,timing the cam wrong using those silly suzuki false marks on the cam cog wheel..
For fun, the 2007 SX4, J20a (note the 'a') with huge 10.5CR can do 199 warm as stated in its FSM book. See here the math on how to get 360PSI for fun.
USA engine Bench Marks: (mine) (not spec. me doing this.) Altidude at 500ft.
( My 3 engines ) " SEA-LEVEL !" see Altitude chart below, for corrections.
My 1996 Geo Tracker 1.6Liter 16valve. , pulls 183-185 PSI on all 4 cylinders. (warm ) (I forgot full 180F hot reading...)
My 97' pulls 185 PSI min. dead cold. (a new head) later and hot it does 195 PSI. Old 100k mile engine, now with new oil rings, new crank and new head.
My 91' 8 valve, pulls 155 psi. (dead cold at 72F) Suzuki minimum spec for hot coolant is 170 PSI and does so exactly. This engine has a lower CR.
(keep in mind , I'm not saying the engine has no service life at 150 PSI, but you do what them all high and equal.
Really if they are all equal and over 150 PSI, there is life left. Mine does do 170F hot.
If the valves are burned, they will fail soon. but with leaky rings?, it can run mostly forever like that. Do the oil inserted test hot. (or at least very warm engine)
The rings don't seat cold, don't expect them to do that, I believe the cylinders where finish honed in a hot block, with torque plates in place.
The Cylinders do change shape, from cold to hot.
See my leak down test tricks, and you can actually HEAR which path, the compression air leaks to....
DO IT NOW:
The COMPRESSION test Procedure: The tool is cheap.
( Some cars need, to remove lateral induction air tube, [on 1.8L engines, remove all the C.O.P's Coil-OVER-PLUGs ]
Prelim:
Battery fully charged !
Mark all the spark wires with numbers on tape/pen before pulling them 1F,2,3,4R. ( the spark firing order is important , so don't mess this up)
I remove the Distributor side power plug/ data connector if paranoid [low voltage side conn 1.6L ]. (unplug 1.8L or larger engines, COP connectors )
This kills the spark and Tachometer and the ECU cuts fuel as a result, but I don't trust this method for fuel cut)
For sure the best ploy is killing the ECU an not killing the Key Crank signal. See fuse secrets above.
My car has solid lifters, have lash set right before all this is best, and for valves that will not burn up. The 60k service point, sets lash to spec.
HV= HighVoltage spark wire leads.
- Defeat the fuel pump and spark as stated above.
- A HOT motor (warm is
ok) is best, cold is great on a dead motor too.
- Hand brake is set, and tranny is in neutral or
park. ( chocking the wheels is
good shop practice)
- Pull the HV spark boots
or
the COPs, then blow out the spark wells with shop AIR. lots of
sand WILL come out. Tag all wires with tape and wire numbers.
- Pull all spark
plugs, all at once, with
5/8"
spark plug
socket. I use a 3/8" rubber
hose to
fish out the plugs that refuse to come out. This tool size fits only KICKs.
- I then insert the Pressure gage in to the spark hole.
(mine screws in to 14mm hole) starting from #1 . (yes, #1 is on front
of engine)
- Have paper and pen handy to log your results
- Set the throttle to W.O.T. (near
wide
open throttle) ( a
helpers? right foot? , even
better is propping the throttle open, with something) over 50%
open, is ok.
- Crank the engine about 6-8 revolutions. ( a helper can yell , it's topped
out and you stop) or use a remote starter
button. Let the needle PEAK!
- I take a reading and write it down and and then bleed off
the gauge pressure (reset valve on gauge) to zero PSI.
- I then repeat this process, for each cylinder. Starting from
step #6 above, for all 4 cylinders. (if any read low
, repeat 1 time only, with 1
teaspoon (5CC) of engine oil into spark hole, please do not use 50cc (10 teaspoons) of oil or
you will Hydrolock the piston and bend the rods or worse, only 1 teaspoon, please!) (oil nor water
compresses, and boom)
- I am done, so I put the ignition
system, to back, where you found it and the fuel pump power.
- Pull the Dome/Tail fuse for 1 minute , put it back , this erases the stored false DTC errors in the ECU. (if any) Or use SCAN tool 96+' and clear codes..
- Put back the fuses removed above. FI (or IG if older car) or the pulled PINK wire back aft.
- Undo step 8 , if using the jamming/block open, technique.
Bad Readings? [ too LOW] All low and near equal is slipped timing belt.
IF ALL CYLINDERS ARE LOW , below 120 PSI, then you SKIPPED step 8 ! (WOT) I just jam the trottle body open (near) with a screwdriver used as a wedge.
Not Pulling All spark plugs at once. Not doing so, overloads and slows the starter motor and can spoil the readings.
If all cylinders read low , you forgot to block open the throttle or the timing belt/chain has slipped.
If the Timing belt or chain on any OHC motor has slipped do NOT DRIVE CAR. The compression can be 50 to 120psi, is typical on all 4 at once.
If the crank cog key is wrecked , the timing marks are useless, not inspecting keys & key ways, is a huge time waster. Same with cam key but is rare.
See TSB on the crank key here.
Be sure to compensated for ALTITUDE:
To use this chart, multiply your readings by "Factor" say you read 145PSI at 8000 feet? that will be 185 PSI in the FSM book. See?
The air pressure at sea-level is 14.7 PSI, at 10,000 feet its only 10 PSI. (and less oxygen too) EFI adjusts for that, but can't correct compression or add oxygen at wide open throttle.
If you are at or near sea level, ignore this section.
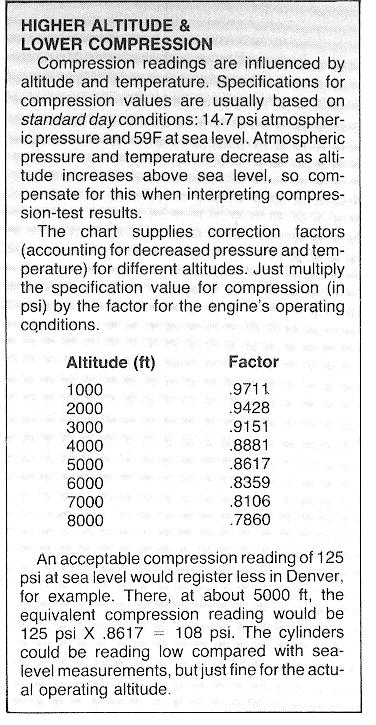
10,000 feet the factor is 0.68 ( a rule of thumb is a 3% loss per 1000 feet, so at 10k feet, is 10x3 or 30% loss or 150 x .7 = 105 PSI compression at 10,000 feet.
Lets do Denver CO. 1 mile high 5K feet so 150psi MIN. is now, 129 PSI compression min. (cold engine)
The J20a at 10k feet only does 140 psi , when at sea-level it does 199 PSI. That is why engine power is way low here. (thin air)
EXAMPLES:
If your engine matches bench marked data, you engine has a great future. (lash kept at spec, and fresh oil)
You discover , One or more cylinders are low.
Lets say, you read , #1 to 4 , 170,172,174, 21 psi. (HOT/warm). High spec. is 195 psi Hot.
What could cause this?, low #4?
Targets of Opportunity (Valve cover off or or Tbelt cover )
Bad valve? (but could be a head gasket side blow out, and not 2 adjacent cylinder blow outs.
First of all, the compression meets the "low" specifications for this engine (Sidekick) on the first 3 cylinders,
So, having a cam timing belt slip will not cause a loss in ONE cylinder. the belt would effect all of them.
If all the cylinders are Low, like all being 140 PSI.?
then:
Repeat the compression test with 1 oz. of engine oil in each cylinder. ( one teaspoon of engine oil )
if the compression rises , this indicates bad rings. (valves rarely seal better with oil, is the rational)
if no pressure rise then the valve(s) are bad. ( on the weak cylinders) There can be surprises to this rule. stuck rings being 1.
Next:
If you read 90,91,93,90 (or less) , your cam IS TIMED WRONG. ( based on common fail, the belt !!! doesn't any one ever change it? seems not.)
Belt bad,or crankshaft front cog , key is wrecked.
Any time you see 4 low cylinders, always first suspect you did not follow procedure, then if you did, suspect timing belt slip. ( CAM TIMING ! or crank cog key sheared)
More pattern failures: ( see the AA1 site but.. link 1 above !)
Cold: 1 to 4 cyl.
171,173, 170 , 90, ( bad #4 cylinder, with oil added it dont get better, so bad valve) or blown head gasket from #4 to out side. or broken head stud, stuck open valve)
171,90,90, 173 blown head gasket between #2 and 3.
60,61,70,80, you skipped step 6 above.
81, 85, 90 ,91, your cam has slipped time, for up to 4 reasons, timing belt/chain bad, crank key stripped or cam key stripped , or tbelt/chain, intall gone wrong.
182,180, 179, 185 : good to go.
Google for other pattern fails.
The gauge can only tell you its a bad cylinder , only YOU can find the why.
Do a leak down test.
Cam chain or belt timing inspection.
Valve lifter and cam inpection. LOOK.
Bore inspection test. fiber optic camera. (holed piston, pistion lands breaking up with chunks in side or sucked valve mushroom.)
Possible other causes of low compression:
- Valve adjusters at zero or negative clearance , causing
valve to be partially open. By excessive wear or some mechanic
not following procedures , correctly. Always check Valve LASH
ever 60k (at least). See Timing
belt
procedure, for LASH
- Bad Compression on all cylinders can and is common when the
timing belts slips some
teeth. 195 PSI is normal hot. Mine
is 155 cold. #1 Likely.
- A valve sticking open due to carbon in the valve guides. ( or bad valve seals causing carbon ,or loss of oil to rocker rails ).
- Valve burned, split cracked, worn out, warped. ( Oil added during compression tests fails to help, add 1 teaspoon to spark hole)
- Broken valve spring , broken cam ,broken bolts holding down
cam caps, broken cam cog wheel or stripped key way on cam.
- Bad Head gasket ( especially if two adjacent cylinders are
weak or you find exhaust in Radiator) #2
likely !
- Piston rings broken up or stuck INWARDS, in the
piston
lands. Or worn into to thin shells. 400,000 mile motor?
- A Holed / collapsed piston. ( caused by Pinging
Detonation)
- A Cracked Head. ( no Antifreeze huh?) or never
changing out the coolant hoses.
- A Cracked block. (ditto)
So do a leak down test, if this passes, then the cam is timed wrong ( see , no tearing down engine, just fix the belt or key way )
Some problems will require motor tear down. ( like stuck rings or bad head gasket or burned valves.). to deal with your bad motor.
Doing a Cylinder leak down test in conjunction with a compression test , will be far more revealing of the engine condition.
If I suspect a flat cylinder I always do compression first.
LEAK DOWN: Harbor Freight tool (or so call General tools )
The HF , PDF is Poor. I bought the tool, just to see if it worked, at all. << only my opinion !
In the PDF, edit step 5 to say 25 to 100 PSI , the tool will never work at 7 PSI, as stated .
add step 5a, disconnect tail hose from tool.
add, how to test the tool below.
Rules:
The O-rings on the hose end adaptors are no good, replace them. (China rings, are trash ) $35 you get what you pay for , no? ( I huge box of rings, no big deal)
Please do the 2 tool tests first, then test the motor at TDC firing.
The 100PSI is a the maxiumum allowed into the Tools onboard pressure regulator !, (do not exceed this , in fact. use way less, like 50).
The line pressure has NO BEARING ON THE TESTS , at all. (for 2 reasons)
You now have 2 regulators. one on tank and one on the tool. So, in fact the second regulator sets the TRUE pressure not the LINE (if in legal bounds)
The left guage is not LINE PRESSURE !!! Look at it ?
Reason 2:
The tool measures percentage of the leakage, and higher pressures, do not change percentages!.
Imagine a tank, with a 2 mm hole , if you raise pressure, the rate of leak increases, but never the percentage. The 2mm hole dictates the percentage of loss.
The tool has an orifice that sets max flow. when the engine leakage reaches tool orifice rate of flow, the percentage loss is 100%
The tool is very sensitive and works well. Practice with it. Cause a leak and learn how it really works.?
The only weakness in the tool, I see, is the regulator is touch vibration sensitive (so, keep it steady). $35 is cheap, be happy.
The below PRE TOOL tests, show how the tool really works, by doing 2 simple tests. ( shows tool works and teaches user what is going on) Double good , it seems.
All good tech's were taught in school , always test your intruments, before usage. (duh?)
The right hand gage , if you look carefully is just a revere reading 15pis guage, ( this guage at max is why the left guage only reads 15PSI when the right gage is 0.
See?
Question: if the line pressure is 7 PIS, like the book(& silly PDF) states there is no hope, see way?
No? then tell me, how are you going to get 15psi out of the regulator with 7 PSI inputted. (tooth fairy? or Dorthy's Tornado?)
As you can see with these facts, 25 PSI line pressure is plenty. (10 PSI over reg output is a good margin )
So, putting on a huge 100 PSI gage on the right defeats the whole purpose ! (desensitizing the tool by 6.7 times !) crazy.
First off ,the left gage is NOT compressor tank pressure, that left gauge is after the TOOL regulator!! Look, see that? Look 1 more time... there....
To begin , do not attach the tail hose until I say to do so. (the fatal flaw, in the instructions)
- Set the Supply TANK pressure to 50 PSI, even 25 PSI works perfectly !
- Again, the tail hose is NOT CONNECTED. (this blocks the end of the hose automatcially via the fast coupling, as always)
- The Regulator on the tool has a locking REG adjuster, unlock it and CCW the knob. both gauges drop to left side of scale, or they are busted. ( or reg is bad, leaks)
- Then rotate the regulator knob CW until the right guage, reads 0 (set) dont pay any attention to the left guage , (unless it sticks to zero, or to LINE pressure,bad)
- IF at this point (tool test #1) the Right guage is not going to 0 yellow (set) then the fast connecter on the output line, is stuck open , hear the leak, that is a failure . Fix it.
- Plug in the tail hose, (no engine connected) note 80 % leakage or more, (the end adapter limits the leak rate on mine) This proves the guage is working. Test 1 done !
- If the tail hose fails to leak (it must) in step 6, that is again, a hose fast coupling failure, replace the hose and or coupling now.
- Begin Tool test #2 !
- Put finger onto the end of leaking tail hose, gage reads zero 0 leakage ! That is a pass condition, tool is ready for service.
- IF Finger test fails test 2, that is because the the hose is leaking. bad hose. Find the leak and fix it now.
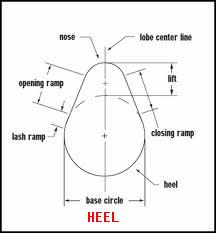
- Screw in the tail hose in to the cylinder under test and at ENGINE TDC. all valves closed (cams lobes are on the heels of cam) (the firing point )
- The right hand guage is your leakage. (if it swings hard left and the left gage goes to zero , there is a catastrophic air leaks.
- If the right hand gage goes to left side red zone, say 80%/, then engine valves or rings are bad. Gross leakage or you don't understand TDC firing ?
- If the gage shows 15% it's a very tight motor. GOOD. Less is perfect (right sweep is LESS) No motor made is 0 leakage,.
If in step 12 , the left gauge went to 0 or to 50psi (or to LINE input) that is regulator, on tool, failure.
There can be 4 tool fails. Reg, Gage 1 , Gage 2, or the end fast coupling auto valve failure (stuck open or closed. ( a fifth fail, is tool leaks (bad hoses leaking)
ALL IS GOOD, PROCEED !
To do the full tests on the engine, you need to know the firing order of your engine (1,3,4,2 is the sidekick/tracker)
and then rotate the crank in the proper order. CW , 180deg per cylinder. (I-4 engine only) Read your FSM on YOUR your engines firing order.
FYI:
If needles stick, tap them gently. Cheap gages do that, pro $400 gages don't , sigh.
Now to the cool stuff.
You find gross leakage? discovered in test 13
Listen for air leaks all places below (rubber hose to ear) (yes, a free tool to make ) You got hose?
The leakage tool is supplying the air. you can hear the leakage through the hose. easy. if not, you failed to do the 2 tests above !!! steps 1-10
- At exhaust pipe exit ( I read this junk everywhere, but tell me how to hear a hiss that far and past baffles?)
- THIS Exh test WORKS better at the 0² sensor bung hole, Remove sensor with sensor tool, and listen with a hose.
- Throttle body blocked open , at butterfly
- At crankcase , dip stick hole and OIL FILLER CAP (removed) RINGS leaking.
- and Radiator filler next for air hissing. (not all that effective but you can get lucky ) Use a Rad leak down gage for that test..
Most the posts on the Utube are junk (all top 10) , so much disinformation , gee.
Any student of Physics can do this tests. It is not rocket science.
Advanced, users can lower the piston on the power stroke and measure leakage to almost BTDC, just before the exh valve starts to open.
These advanced test shows the lower cylinders wall are not warpped or out of round. A Fancy tool this is, in good hands.
Upgrades? buy good O-rings and one 15 PSI American made gage and repaint the dial (right gage) , backwards)
I'm just a retired wrench. But these are my experiences.
Best of the best Utube is here. Most others?. NOT SO.
Vacuum testing.
If the motor is bad, like a stuck open valve. or worse, it is folly to go into EFI, fuel, spark, etc, when 5min later a $10 tool , THE ANWER IS BEFORE YOU EYES.
I recommend this tool. The OTC 5613 and not a cheap weak and inaccurate gauge.
Youtube example 1:
Better vacuum tests:
Duane the ASE Master Mech. video:
See the great example at 3:12 minute mark ! Classic failures.
Hints:
Every time you pull the valve cover on any engine (not HLA 1.8L) always check the lash. (solid lifters) HLA= Hydraulic Lash Adjustor's.
Never miss a free opportunity to check solid lifter LASH for abnormal wear. This can save you lots of grief later. (burned valves).
Please:
Do not pull down any engine , unless you have checked the T-BELT for proper timing , the crank pulley for a damaged key way and the ignition timing being way off , indicating something serious is wrong.
If IGNITION (distributor) timing is off , ALWAYS suspect a bad timing belt. ALWAYS! Ignition timing, don't just drife off like in 1960s (points).
W.O.T. Wide open throttle.(all meanings) In most cases the ECU sees WOT as fact over 75% throttle
and if not fully WOT, the engine will starve for air running, when needing full power (throttle cable set wrong)
but in the context of compression testing, we only need the throttle blocked open a BIT or TAD or anything, but not ever CLOSED. (or hold foot on gas pedal cranking, and win)
The compression test is best done warm or hot engine, (150F is warm) and at 150F the thermal air valve (IAC) is closed. (by design)
The ISC valve (electric) can be closed too cranking (it loves to stick closed). (or sure using remote start cable)
The ISC will be closed 100 % if using the starter remote jumper cable, (with key in pocket there is no air supply to the engine.
On a cold engine the IAC valve (thermal will supply air for idle cold starts only) adds air, but why trust this old dog valve on such and old engine. I'd not. but is closed on warm to hot engine.
Warm (to hot) compression is better due to cylinders being fully round warm-hot , when cold they are not round. (study how cylinders are honed to be round)
This test is a bench mark and if done wrong your readings are worth less.
Compression is a function of 2 things, the compression ratio and Altitude.
If you crank WOT, the needle peaks 10x faster. and saves the battery from excess discharge. (never good that)
Use a remote start cable , keys in pocket ,WOT and there is no injection or spark now. (safer)
Spark plugs must be removed. (or CRANKING RPM can be too low) and wrecking this bench mark.
It is true a normal good engine has plenty of startup air, but gee, I bet your engine is not so normal , if doing a compression test... (cranking cold, normally)
Recap, best done warm, throttle held or blocked open , spark plugs removed, watch the needle peak. 170PSI (warm/hot) is facory stated minimum. (warm engine, at sea level)
The 8v can be as low as 150PSI dead cold. (cold means 68F not -40F.)
Raw math calculations. (for Cylinder pressures)
Using Boyles laws (now Ideal gas laws)
The cam shaft timing is what lowers compression on all production engines. (compared to say a shop compressor)
CR means compression ratio.
The J20a engine has CR of 10.5:1 and if you remove the cam and use my 180 Degree intake open profiles (mythical). (not more or less ,it's ok for the intake to open a tad early , it's that closing time....)
Then the pressure can get at near 25 bar, (or 360 PSI (in a lab.) Huge. ! VE = 100% near. Theoretical max. ( suck in a FULL 500cc of air and compress it 10.5:1)
But with our stock cam, with production engine intake timing (see below) the pressure will be 199 PSI hot. (FACTORY spec, at sealevel)
What won't you see readings like this relic. from 1929 with a CR of 4.22:1
The math is here, (adiabatic Isentropic compression gas laws....)
Algebraic
p = Po x CR (power of spec.heat or 1.4) (p = pressure, Po is pressure at BTC , that being 1 atmosphere)
I plug in the numbers and get....
Ptdc = (1bar) x 10.5 to the power of 1.4 = 25.1bar. (tdc means from BTC to TDC) ( a rule of thumb is, pressure is like 20 x CR)
The 1 bar means at STP standard temperatures and pressure or seal level is at near 15 psi Absolute. (readings drop about 3% per 1000 feet altidude)
The 1.4 is the Sp. heat constant for AIR. we are pumping only AIR.
The cam is designed to make max engine power. (not spray paint or fill tires fast)
At cranking speeds VE 's is poor... about 70% caused by cam , mostly . The engine is great, but makes poor shop air pump at 70% VE
Culprit 1:
My G16 intake valve closes way too early at 54º deg, before BDC. (cam degree's x2 for crank) this lower compression readings big time. Closes before its finished sucking air in totally.
Make no mistake here , you can in fact line up 10 engines here, all same, and get the near same compression on a hot engine. (199 PSI)
When cold, the cylinders are out of round and leak (rings to walls) and compression can drop 10 psi. easy.
The CR and cam profiles dictate the pressure (at sea-level) if the machanic does every step correctly.
Engine size is not a factor, here, 1 Liter or 2, whatever.
If you mill the head, pressure rises , and if you let it rise too much it will act diesel like and detonate. (or need high octane fuel every day, at the least)
VVT: variable valve timing as seen on J20b
Most VVT devices default to " no valve overlap". (low RPM setting) and cranking, pumping MAX air. This engine pumps are much better.
"Advancing the intake camshaft’s timing produces better power at higher RPM. "
This means it makes better compression, cranking, if the VVT defaults to retarded as most do, in this cranking mode, then this makes for more easy starting.
If you have VVT ? , check it carefully reading the correct FSM for your engine. (some VVT have manual bypass device to check that it's retarding, keys on pocket)
The VVT makes more power at idle and uses less fuel idling, due to this very good VE. (volumetric efficiency)
What does all this mean, it means the FSM book stated compression are dead accurate as stated, it is a "benchmark".
At sea-level, warm/hot engine, and stock cam and stock head with un altered CR .
If you see gross variances from this benchmark, that means there is troubles inside the engine and the whole purpose of this test.
Jargon:
HLA, hydraulic Lash Adjusters.
60K mile service points. STOP FORGETTING THEM !
Many people skip all 15k maintenance steps , but missing the 60k, is folly, as are the Lash checks.
FYI:
The firing order is 1,3,4,2.
The front cylinder is #1 the rear cylinder is #4 Do not mix up the spark leads. !!! Mark them with tape, 1,2,3,4, front to rear.
Do not get shocked, and those COPS are one nasty high powered shock too, OUCH ! Shut em' DOWN.
rev.13 , 9/2010 added leak down. and vacuum tests. (10-10-2013 small edits, for safety) added J20a engine and the math.