
I bought a dead 97 Geo tracker , it has the G16B (or KV) 16valve motor, DOA dirt cheap and blown motor. (owner didn't believe in antifreeze) 4 Door , 5speed, 2WD.
My wife, calls it a Geo Cracker. (LOL)
I have done this before, so I just dove in.
My Log: (see here, for why, this is tricky)
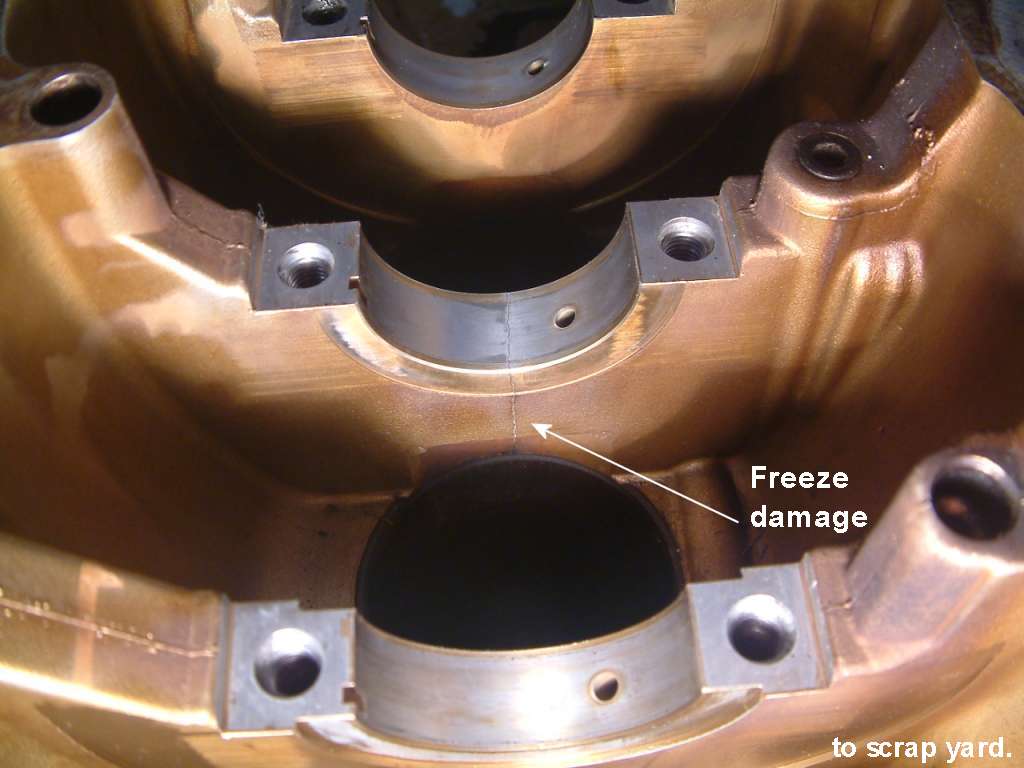
My Block is cracked in half from ice damage ( at #3 main). ( kicked block to the curb)
Finding good running (or even serviceable) engine blocks are hard to find after 20 years. G16A or B. (and less each year)
So, I found one on "Craigslist", with 96k on block. now, I have one good block and 2 bad cranks ,both are bad rod bearings.(spun) but cost me $100 to get an un-cracked block.
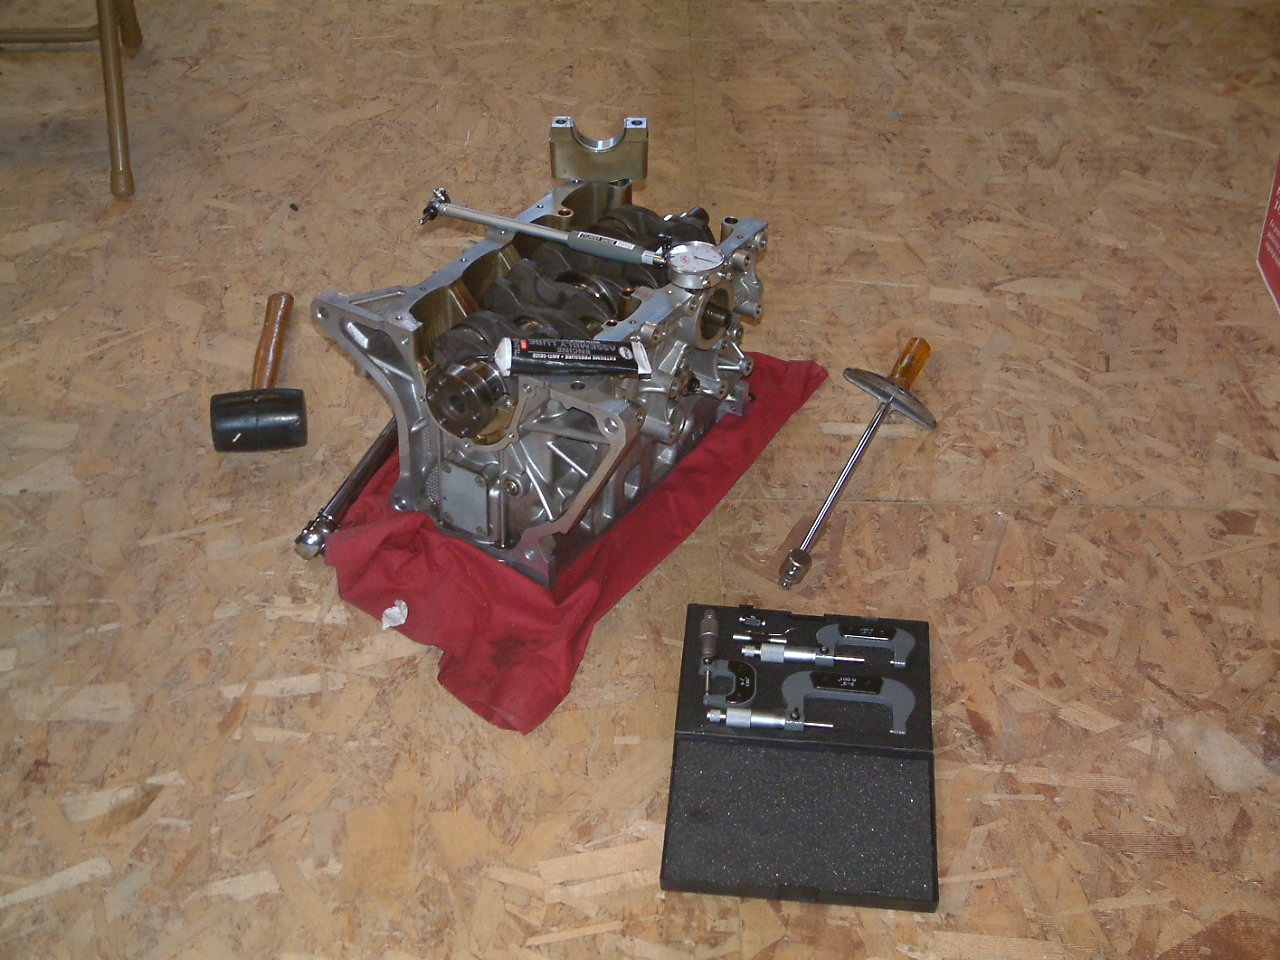
I installed my rebuilt crank in my new naked block with new bearings. end to end. (and measured with TLC)
Rebuilt blocks are over $1000 HERE IS MY MOTOR PULL SLIDE SHOW.
There are only 2 paths to rebuilding yours, DIY or take it to a machine shop and say, rebuild this sucker. Here is my engine, pull page.
DIY: (skipping no steps, cross fingers?)
BTW the 8v and 16v have same block, same crankshaft, same rods but different pistons and different front crank cam COG. (by same, that means the Suzuki official part numbers are the SAME) (some early 89 cranks can vary, I just don't run 89 early cranks)
I discovered my cylinder bores to be near perfect on the Craigs block, he said it had 97k, it seems so.. top to bottom, no wear and no out of round, near perfect. (I can see hone marks top to bottom, nice block)
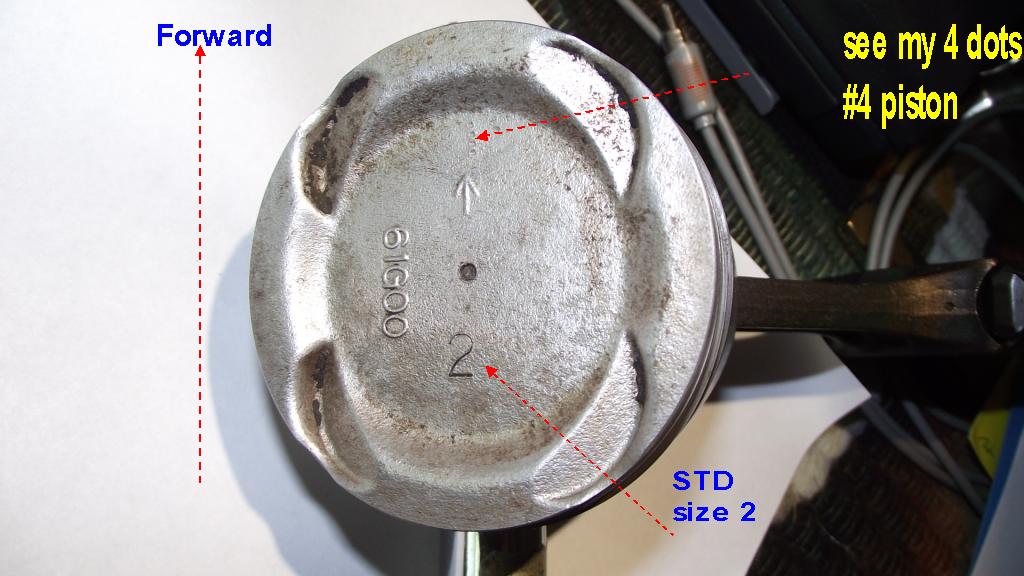
Step one, head off, is to mark each piston 1,2,3,4 on the top , I use a emboss stamp or center punched dots (count).
SUB GRADES (all bearings , pistons and cylinder walls have sub grades Piston grade 2 is the smaller piston, and same with cylinder walls. (all this is covered in chapter 6 of FSM ,it's no secret)
That means if you attempt to put a #1 (larger) piston into any #2 (smaller) hole bore, you will fail. The clearance doing, that illegal act, can cause piston to cylinder clearance to be 0.0004" (.0008" is lower limit) FAIL YOU WILL (Yoda's voice) "facts" shown in the FSM.
I look on top deck of block and see "1221" stamps, this means cylinder 2 and 3 use piston grade 2 size. (mix no parts, be it pistons, pins, rods, rod caps, bearing caps, none !)
The engine was gang bored, and this machine is very crude. (same with crank shaft)
So, day 1 in the factory floor the line operator , hand graded parts, he measured the bores then reached for the #1 or #2 sub sized pistons. (the block maker , did the 1221 stamp)
What you have now, I could never guess, that it the job for MIKE's (micrometer tools)
Right?, means the right hand of car, drivers seated in car seat perspective.
I never say passenger side due to goofy conflicts, with Right Hand Drive and LHD, cars. (the word Right word works on all cars, seated, in USA or in UK.)
The Rules: Do's and Do not's:
- Do not fail to read at least one motor builders book, before starting. and the FSM.
- The first check is to see
if engine has been, rebuilt before (MIKE IT and look at piston top
marks) and if it was SHADE TREE built.)
- Best is to have the
block pressure tested to find hidden cracks, or be sad after spending
big machinist cash, on a cracked block (like this POS here)
- NEVER START A NEW ENGINE , unless you prime the oil pump first. (and filter)
- Do not mix
parts. ( bag them and tag them Cylinder 1 ?
etc) Do not rotate or mix bearing caps on rods
or mains. (they were machined as ONE PART) the block was line bored
(crank mains), as one.
- Never mix #1 and #2 piston sizes , each size is clearly marked on the top right corner of the block deck and on the top of the pistons.
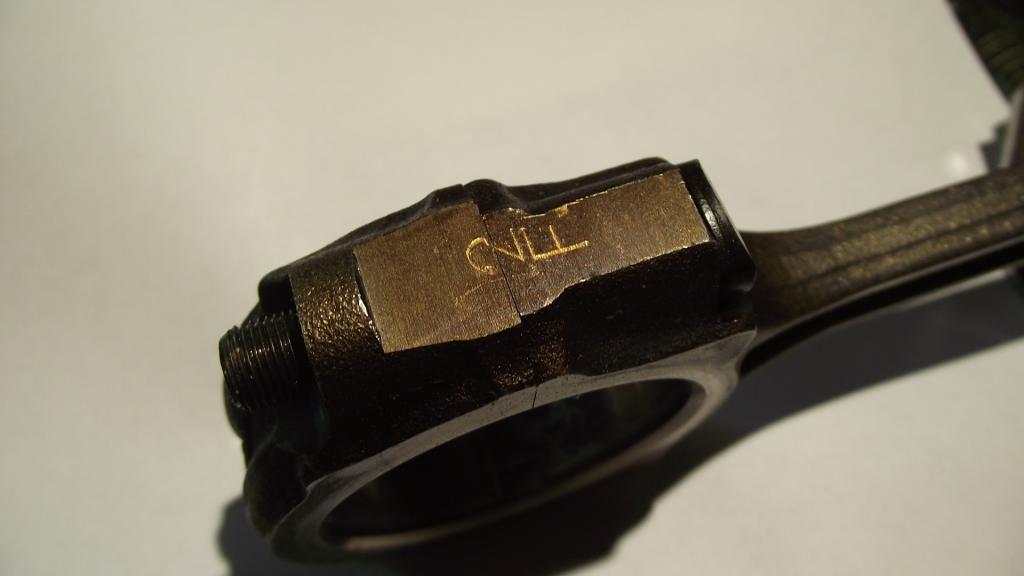
- Do not mix rod caps. or rotate them, see arrow on the cap ( arrow goes forward) (do not rotate or Deity forbid put that cap on another rod)
- Do not rotate the rod , it must have the oil Squirter facing the INTAKE (right = you sitting in drivers seat) side of the block. The rod caps are marked Front. It has a mark for that. So if cap is wrong, so now is the mark....oops.
- Do not mix bearing shells
up. There are 10 grades and sub grades of bearings, due to
crankshaft gang grinding factory DAY 1. The can not be mixed and
thrown in to the engine willy-nilly.
- Do hone the cylinders with new rings.. the cylinders lightly
- The rings have tops and
bottoms, do not forget to look, (marks vary be maker, ask them what
that means) New rings will not seat and break in , on an non honed
cylinder.
- Do not skip new ring gap
checks. (per FSM all this) (do so in the lower bore diameter point
(almost all worn engines is bottom of cylinder, best is in the non
swept area bottom (tightest point)
- Do not fail to clean the
block after honing the block , using a non caustic jet washer. The grit
is everywhere. (skipping this step, is the all time #1 reason for
overhauls fail early (data proof)
- Do
mike all bores and journals & do not use, out of TOLERANCE, parts.
("mike" means, using a micrometer to take real measurements
, ID an OD) Do the differential measurements and the math. now.
- Never fail to use
Plastigauge(tm) (at the least) at final assembly, to be 100% sure the
clearances are IN SPEC. (most pro's only use Plastigauge as a backstop,
only ,as a way to show above MIKE steps are good.)
- I use Plastigage only as a crosscheck of my accurate MIKE sessions. Each block takes me 5 hours to MIKE IT. (not using MIKES is a SHADE-TREE build , junk motor.... )
- Do not fail to do my , oil pressure test and my top end oiling tests. or FAIL ! BEFORE FIRST START !
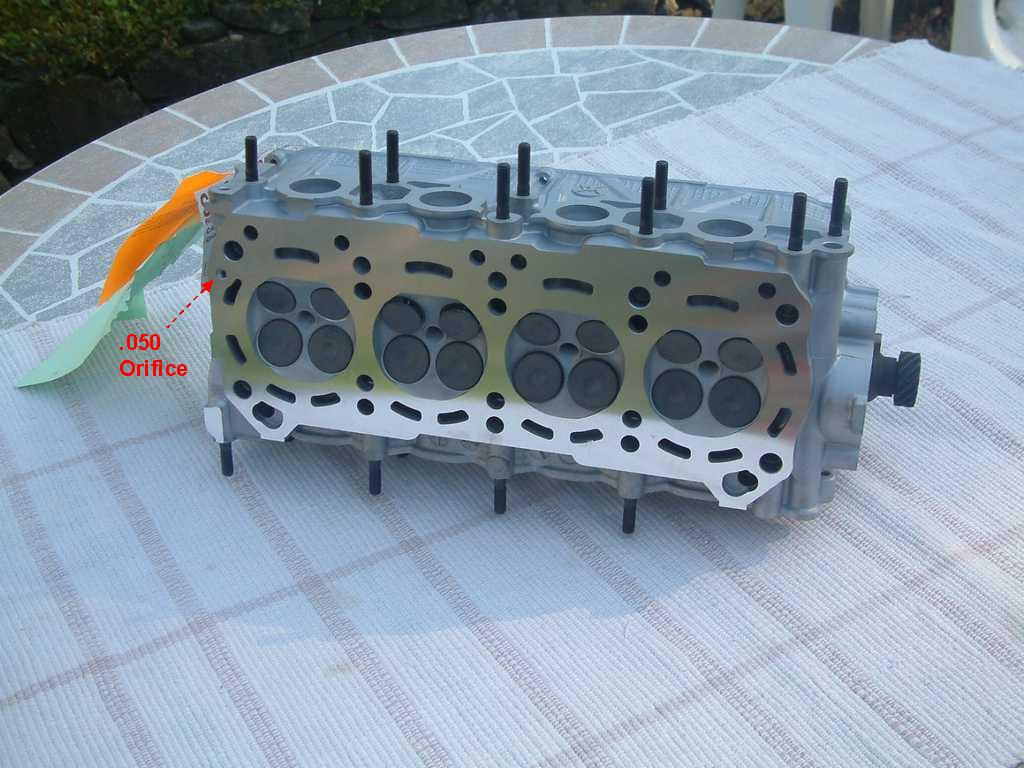
- Do not fail to check the
.050 head orifice
(oil gallery feed) for blockage. (bottom front
left corner of head, it is 50 thou, size and this Orifice will clog
easy using any RTV in the engine, (not pan, not rear cam cap) RTV
loves to burn up the head or bearing shells.
- Do
not fail to put the head gasket on , such that above oil feed is NOT
BLOCKED , my FELPRO gasket is stamped," this side up." or just "UP" the above ORIFICE lines up to gallery hole to same.
- Do use moly assembly lube on all parts. for sure the CAM lobes.
- Do put oil (engine ) on to the bolt threads (and under washers) of all block bolts; do not torque them dry, and do use the torque sequence tables.
- Do check all torque
settings , 2 times. ( or 3 times, if distracted with CELL phones.) No television in the
shop , no Cell phones, it's serious cash work here.
- Do not forget Mr. Murphy hiding in every corner.
- Do
not attempt to hone a
block, while engines is in the car or with crankshaft
installed. (more
SHADE-tree builds (means building blind with no proper tools or checks
, guess and by gosh.) << for sure fun to watch !
- Don't forgot to Keep parts covered at all times, so dirt does not land on any disassembled engine parts.
- More. sure there are lots more, do not ignore rods or rod caps or any bearing caps that turned black (won't lean off) or Blue colors, this is a part the glowed red hot and is now JUNK (turned to softer metal, annealed now)
- Do not fail to clean all
galleries, spotless, that means the small brushes to the crank gallery
too. (sand and grit will be found there) this list is not
complete, read any re builders book and Barnes and Nobel , and win.
One needs and FSM manual Full Factory Service manual chapter 6 and the specific actions, are all in the book. $20 on Ebay.
All measurements are easy and the only hard thing, is checking main bearing alignment of the bores. (more later)
I exchanged my bad crank for a new crank $200 and got .25mm undersized crank and matching bearings. (Marshall's crank via Rockauto) Some times its missing this item at Rock)
My local machine shop charges only $35 per 4 banger crank grind. (they do 100s a day there, even up to Mack truck engines) I paid $10 extra for the polish step, (I'm a big spender?)
I then bore checked my main bearing bores and they were in spec. (using a bore gage ( .0001 accuracy)
Below are all the steps I took , in order.
In each case, I used Assembly lube on all bearings and all bolt threads and all bolt washers on top. Special lube, not just motor oil. (Assembly lube is best if engine , will set for a while)
I never chase threads with a tap as this damages them (only if damaged already, I do ) I use a roll edge chase tap ( Google that) and darn hard to find for Metric here...in USA land.
Clean the thread holes with brushes and blow them out with shop air and then lube them with assembly lube.
I always chase the water pump threads.
The #1 reason for rebuild failures, is dirt. #2 is not priming the oil pump and not checking top end oiling, 1,2,3 , causes.
All the steps I took:
- Block and galleries , jet wasted like new. Block is naked
and clean and ready . (this repeats if , block is machined in any way)
- I checked the block for damage ,every inch, and all main bores and used a machinist straight edge rule and checked the main bores for alignment issues. I did the same for deck flatness, to FSM spec.
- At this point we say thumbs up on the block. ( a pro
will run metal check tests , and pressure tests, I can not do this, just visuals.)
- I measured all the pistons for spec. clearance ( mine had #2 stamped on top ,so I used the #2 table in the FSM)
- I then measured each cylinder bore hole top and bottom (FSM
WAY) at 90 degree points, and I found the bores to be near
perfect. (luck happens)
- I measured the piston to bore play with feeler gauge and
it too was in spec range. (near perfect in fact)
- I decided that since there is no ridge and there is no out of round and it is in spec and the rings are broken IN, why fix good.? ( if you are going to drive it 100k in 5 years, use your own judgment here, I'm not going over 1000 miles a year)
- If you want to bore , be sure to match the bores to the exact new piston sizes, they vary, so ask you machinist to do that, do not buy pistons before , you ask him for the correct over size , which only he can decide.
- He (the machinist) tells you to buy xxx over sized pitons, you get them, hand them to him and he bore each hole to fit each piston perfectly, this is 10x better than any factory method, (gang bored sloppy work). This is RACERS way. (#1)
- If you bore and are done , you need to set the ring gaps. next. (FSM read the FSM steps. and clearance)
- I measured each main bearing by inserting them and torquing
them to spec. and measuring the bore to see if they are in spec. and I
wrote down this number.
- I then measured all the new crankshaft journals, I wrote down each size 4 rods + 5 mains. I then subtracted this number from the number above for the mains.
- I now had the running clearance for the mains. ( no guessing, no skips)
- My next step was to use Plastigauge to make sure I'm not fooling my self. ( this is redundant to above, but necessary) , I did this to all mains and rods. 1 at a time. and wrote down the readings.
- Above step, require, torquing each main and doing the
Plastigauge test.
- I now took a big step and installed the crank, in to the new main shells and torqued it to spec, and while doing so ( I did this in staged pulls with my torque wrench,, 20 lbs then 41 ft/lbs.) I kept spinning the crank as I go, by hand, checking for, NO BINDING.
- Next ,I checked the block crank main bearing end play ( crank has new thrust washers , do not forget them)
- My crank spins with baby finger now. nice and smooth as glass.
- I measured each rod with the new bearings installed with my bore gage and wrote this data down next to the crank data in step 11. and did the subtraction step to see if bores are in spec.
- I then set each piston ring position as per FSM (my pistons look like new due to soaking 24hrs in Berrymens Chem dip, then flushed with water and soap then baked dry and the flushed with paint thinner) and now all 4 pistons are ready to put in.
- I next put a rubber gas tube 5/16"on each rot bolt of #1 piston (protection), and insert the piston into the block (ring compressor installed) with the piston arrow forward and the rod cap arrow > forward ( if they don't agree , you have them backwards)
- I push them on with the new bearing shells and then check them with , Plastigauge and check side play for spec bounds. If all is good, it torque it to spec 2 times to be sure. assembly lube as always.
- I repeat 20 and 21 until all 4 piston rod assemblies are installed.
- Pat self on back , the hard days are over.
- These 23 steps are the bare minimum , many will choose to
re bore the motor at great expense and time ,but if you find a low
mileage motor and 96k surely can be ... then 23 little steps.
- There are lots of inspection steps and Murphy's law says then one inspection you skip, will be the one that kills the motor. How true this is.
- The pan were RTV glued on all years, you can use orange or black RTV both are silicon free and high temp.(the gasket is ok on pre 1996 USA engines). NO gaskets allowed on USA 1996 and newer oil pans, or the CKP sensor will FAIL.
- I hate RTV period, (ask air craft engine builders why) and
would use the comes with Felpro overhaul with pan gasket, if there was a way, 89-95
use the gasket !! Suzuki did very careful pressure checking to get RTV to work after cure.
- I uses a Felpro overhaul gasket kit, the China one from flee bay I sent back , it was 100% crap, ( I bought both , just to see what comes out of China for $15 bucks, you get pure CRAP)
- New head installed, I exchanged my head for $375 , so I don't have to guess on its condition. ( local shop wanted $600 [Napa])
- Cam timed. with new belt and new water pump (Gates belts and Japan make pump, not China)
- My
new Engine, sitting on the floor, full of oil with starter
attached,, with battery and jumper cables, to crank the engine over.
(checked oiling and compression , engine on the floor) No need to put
it in car, then take it out when it fails, not at all.
- I have Vaseline in my new oil pump. already, I then
back
fill the 2 holes it the filter mount with engine oil. (hose and funnel
trick) the filter is full off oil as I spin it on fast. Bam , I'm
pre-primed. (there is this cool pro tool that is a gallery primer that
works great, I later made my own , DIY)
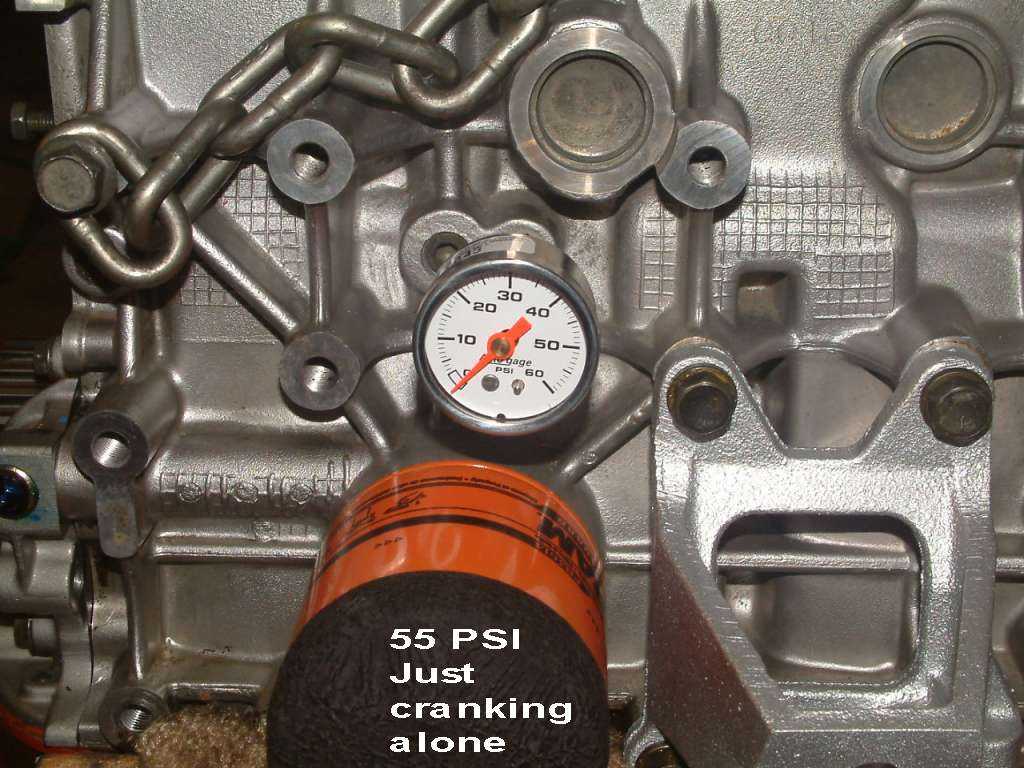
- I cranked the motor with no spark plugs, until my oil pressure gauge hit 55PSI. 10W-30 oil See photos here. It's just a pressure gauge, inserted in to the oil sender removed. Nothing magic here, Any pressure gauge works
- I LAST made sure the
cam was running large volumes of oil, as I cranked.(called the top end
oiling check , never skip this check, or you will be sorry) THE CAM
must drip oil or do not ever run this engine ,ever. (cam will seize)
the head has a 0.050" orifice here.
- I got 55 PSI, and top end oiling on the cam.
- I
can check compression engine parked on floor too or in car,
180PSI I got. sparks back in, there holes. (8v can be 150PSI ) if way
low the cam is timed wrong, or valve lash not set correctly.
- Put new engine in car. Put in distributor and time it, I leave it out , so it don't get crushed at engine drop time.
Do not put the head gasket on upside down, see the word "UP" (Felpro has it)
Never install any motor and just start it up, never ! Do the prime oil gallery steps and top end oiling checks and the no spark 55psi checks.
Do not start the motor with the oil pump not primed.
Do not start the motor with the oil filter not primed.
Do not crank motor with Ignition enabled. (for the pressure check and top end oiling checks.) ( I unplugged the Distributor primary cable plug and pull the fuel pump relay) Fire Safety
Do not crank motor with fuel pump enabled. (for the pressure check and top end oiling checks.) Fire Safety
Do check compression NOW. ( if bad , find what you did wrong) (doing this with engine parked on floor is 10x easier) Cam timed wrong? Lash not set?
Do not just start a motor WILLY NILLY, or FAIL.
Everyone , it seems, wants simple solutions. ( engines are not simple to build, and last)
You want simple?:
There is only 1 way to do that, and that is to take the car to the top rated machine shop in town , "specializing in Japan motors".
I hope my log, helps you fix your motor or at least get you on a proper path. One best for you and your family and pocket book.
My 2 cents. FWIW:
The Never do list: (common errors)
Never sand blast or bead blast any internal part of the engine. ( impossible it is to get it all out ) (use chem clean or walnut shell blasting or plastic media last)
Run a rod, that has spun a bearing , see the black/blued end caps, this is proof that the metal is HAS annealed ( softened) making it worthless.
Put the rods on backwards, see end cap arrow (forward)and oil squirter pointing to the Intake side of block?
Put the piston on backwards , see arrow on top of piston (forward)?
Swap rod caps,or use them backwards,or install bearing shells backwards, blocking oil holes.
Run a new head with out setting the lash or the valves will burn to a crisp. (check compression, or better do a leak down test using tool with same name.)
Fail to tension the Timing belt correctly, follow the manual precisely , it is not installed like 100 lb Accessory serpentine belt. Not at all . (doing this wrong, will destroy the front cam bearing, and oil pressure will be lost, and ...)
Forget to stamp a number on all pistons on top with a mark( punch or stamp) so you can put them back. as you found them. 1,2,3,4 (1 is front) (except new pistons, of course)
Put the motor back together, unless you at least use plasigauge on all bearings. 90 degree's from the SHELL splits.
Never just replace damaged bearing shells, on damaged crank journals, the journal must be ground and MIKED and checked for wear, out of round (very strict) and diameter. Most spun bearing need a new crank (regrind).
Never skip checking all running clearances, on bearings. Using math, "ID shell minus OD journal = clearance", (miked then calculated , then checking your MATH with PlastiGauge(tm) last as a backstop (sanity checks)
Never forget to set (file) ring gaps on all new pistons and or rings.
Never forget assembly lube. (real, not motor oil) "Race engine builders use just engine oil, but they are running it in 1 hour later, you are not him, so use real assembly lube.)
Never put huge money into a bad block , get another block. Inspect every detail of the block, before committing machine shop dollars to the old block, except cleaning and pressure checking it, for leaks. and any micro cracks.
Never mix parts or there locations inside the motor. Mark all parts ! if not already marked.
Never run parts that show signs of overheating, bluing, blackening, funny colored parts. Normal parts are tan. (natural oil varnish color).
I never ever touch any mechanical cleaning tool, to any piston, I use Berrymens chem dip and the parts come out like the day they were made like new... with no reduction in size of piston or LANDS ! nor any damage.
Never use piston land groove cleaner tools, ever (pre 1960s old school BS).
If you can't get Piston clean, find a pro who can. Use chem clean, Chem clean does not remove metal. The lands are precision ground, do not damage them in any way shape or form and WIN.!
Critical Dimension tables for clearances:
For my 96-98 1.6L 16v, See your FSM for exact spec. (the below is just a min. list of check points to give you an idea)
All in inches.
| Location |
Minimum |
maximum |
Limit |
| Rod bearings clearance |
.0008 |
.0019 (#1) |
.0031 |
| Main bearings clearance |
.0008 |
.0016 |
.0023 (std) [#2] |
| Rod side gap end play |
.0039 |
.0078 |
.0137 |
| Main thrust end play |
.0044 |
.0122 |
.0149 |
| Cam bearing clearance |
.0016 |
.0032 |
.0047 |
| Piston to cylinder clear... |
.0008 |
.0015 |
none. do not mix piston sub grades |
| Cylinder bore taper/out-of-round |
na |
na |
.0039 |
| Head warp (end to end) |
0 |
.002" |
Cylinder bores are checked 2 inches from the top and 3-3/4" from the top deck and in the thrust side and 90 deg. away.
There are 3 factory piston sizes and the code is stamped on the the top of the piston and on top of block deck.
2111 Means cyl 1 is size 2 , cyl 2 is size 1 and so on.... to measure pistons and bores one must look in the FSM table.
#1 errata: the Geo FSM has an error , that deletes a zero in the rod max play! above correct !
#2 this is standard bearing clearance, there are 8 other bearing color sizes in the FSM.
OEM Manufacturing of engines: (took me forever to understand this)
Let me explain the reason for the extreme complexity of the FSM chapter 6, on the engine bearings and pistons.
HISTORY MATTERS:
The block was manufactured on a Gang inline engine machining system "CNC" like !
Although it is fast and efficient , it is however very crude, ( engine to engine , bore to bore ,variances huge).
The same is true for the crank. (the crank has special marks showing the sub size variances (the crude results of gang grinding) (they do the measuring after the gang grinding then mark the errors with codes)
The Suzuki bearing shells are all sub graded for the above codes.
The Bores in the rod big ends and all Block main bores are precision made. (or all this magic would collapse)
The mfg. then measures all parts and assigns a color code to each journal and bore. ( if out of range the part is melted down,destroyed or sold to GM ,LOL)
Then the engine is assembled with color coded parts for the crank , rods and pistons. (pistons are numbered not color coded)
When you rebuild the motor , your machinist will attempt .0001" accuracy and get real close, Something that was impossible in the factory (gang jobs). ( a whole new world now, exists for precision)
DO SO and win. (the factory gang machine tools were crude, so had sub sizes on parts, like pistons and bearing shells)
You can buy new parts, mike them, as to true sizes , and bore to get a fit YOU WANT.
If your crank shaft shells (new) fit bad, have your machinist grind your crank to match your shells !! After market shells may not fit, and finding factory shells, that fit can be a horror,(delays) with 10 or more days awaiting for deep SUZUKI stock on old parts.
This means you can grind (or buy) a ground crank that is exactly (for all intents and purposes) exactly .25mm undersized and the new after market bearing shells, will fit perfect and are supplied with the crank.( pro cranks do)
The best way to bore the cylinder bores, is to measure the bores, in 4 places each pre FSM, then using this data decide what over bore size to select ( ask your machinist for help deciding , please) then buy these correct sized pistons, that he recommends.
Next, take these new pistons to your machinist and he will then measure them for there true size ( it varies) and then machine each cylinder to match the exact size of your new pistons.(marked 1,2,3,4 clearly , I use emboss stamps)
Some pistons are precision too. but I'd never ASSUME THAT. MIKE IT first.
That is the correct way to bore a block , there is no other good ways.
The day 1, bore codes are stamped on the top front right side of the block deck, and at the bottom pan flange for the block bearings and on the center 2 fly weight the crank (outer edges, show the crank errors).
These codes tell you exactly what you got or had.(stock , day 1) What you have now , is only found with a Micrometer.(miked)
If the block is warped or the crank shaft bores, are not in line, get another block.
Do not spend $200 machining a block that can be bought used for $100 and is not in need of such machining. ( line boring mains comes to mind)
People with classic cars do that ,we do not need to., yet.
my 2 cents..... (in Canada , 5 cents )
rev 43 ++++ 4-25-2010 , 4-14-14 , video added. and more do not do.... and endless topic that.