 See
Video 89-91' axle pull (poor , fails to replace outboard seal, w/ bearing off).
See
Video 89-91' axle pull (poor , fails to replace outboard seal, w/ bearing off).Sidekick's/Vitara's and Trackers. (all years, nearly the same)
Parts and materials:
See parts here.
New axle bearing and seal, some newer car has seal in the bearing, like below has. Early Seal and Early bearings (rear)
RTV sealant
Bearing grease (for seal lips and for bearing if its NOT sealed.)
Seal hook tool
Slam hammer
Basic mechanics tools. (wrenches, spanners,etc...)
Brake fluid. (if needed)
GL5 Gear lube Grade 5. (it's due anyway, so change it out, but will leak out bad as axle is pulled, so drain it first)
New brake shoes if the seals leaked GL5 all over shoes.
Procedures:
(key hints first:)
- Use your camera on the brake shoes, so you have a record, of how those tiny bits go back , don't do both sides at once) 2004 Tracker below, 99-2005 same and more early, very similar.)
- There are no inboard axle locks, Hint3, there are 2 seals here, one in the axle housing and one behind the bearing, the bearing must not be loose, if it feels loose, it is bad (radial or axle play = bad). (it must spin ONLY) If it feels notchy or rough spun it's bad.
- The seals fail usually because the bearing is no good (it's
loose)and beats both seals to death (think of a hammer pounding the
seal to death, bingo)
- All this is covered in the FSM, and is free to read at any time the 1996 Tracker book is free. 24/7. Chapter 4B covers all this step by step. (figure 12 is the show stopper in most DIY shops)
- The bearing can be pregreased do not use that grease its packing grease, use the best quality grease you can buy here, in the bearing balls, the outer seal keeps grease off the brake shoes, the inboard seal keeps GL5 from washing the bearing dry of real grease.
- Some new bearings have side seals on the bearing both sides, with life time grease inside, (unseen) this is common now. If the bearing is open type (balls in plain view), use the best grease you can find here.
- This FSM above is GM bad translation, it fails to tell you to put RTV on both sides of the brake backing plate, I have a real Vitara FSM book that gets this right. I paint RTV on end of axle housing then on the 4 studded bearing carrier face.
- Park car , on flat, chock front wheels. 5speed in reverse, A/T in park gear.
- Hand brake set.
- Drain axle lube. (yes, you can raise an axle with a jack and pull it leak free, but oil oil is full of metal filings. look at drain plug magnet see chips?)
- Jack up bad side of axle only. (use stands too)
- Remove wheel. (lug bolts)
- Release hand brake, releasing drum.
- Pull drum outward by hand. using two 8mm bolts to pop it. see
photo (early cars than 1992, the drum has 4 bolts ,like in video above)
- Release auto adjuster CW , flipping upward.
- Move hand brake cable above retainer, to allow axle pull. I looped bailing wire under cable and tied it up high to Slave cylinder. That feed it all up. See photo 2.
- Remove the 12mm nuts seen in photo 3
- Pull
axle with Slam hammer. photo 4. (or if redneck (it's
ok) use a brick tied to chain and chain to one lug bolted down, or be
inventive) the Axle is now REMOVED.
- Pull inside housing seal with a standard store bought seal hook. Then out comes the plastic
seal protector easy. (unlike the video screw driver seal attack above)
- Put in new inner seal, over the protector ,with seal installer shown, grease the rear of seal first, on the back spring side.
- Replace the bearing on the axle, with new bearing, OUTER seal and
collar retainer. needs a 30" or more press. Few DYI
have this press, (this step is done at the machine shop, they know what to do, even buy the bearing /seal for you)
- Put fresh RTV on both sides of backing plate. at the sandwich points of back plate and bearing carrier face.
- Put back in the newly rebuilt
axle bearing /seal assembly. (twist it at the last 4 inches or so, to DOG in the splines, bam it's installed.
- Tighten the four 12mm nuts, pulled in step 10
- All brake parts back and adjusted per FSM link above. (new
shoes after GL5 soaking?) I do both sides with new shoes, if even
one shoe soaks.
- Put back the brake drum.
- Install wheel-tire assembly, Check pressure?
- Drop the jack , car back on ground. Set hand brake.
- Add GL5 till it drips out the rear fill hole. (raise frame on both sides, but not axle housing, so body rises and not axle (a trick here) and lube can be squirted in directly super easy)
- Remove jack under frame lower body and chocks off.
- adj, auto brake adjuster , by backing and playing with
the hand brake,per FSM. (link above)
- Test drive. Make sure brakes or OK, first. then stop and look for leaks.
I showed my axle (in hand) to 3 machine shops, 2 of the 3 declined to touch it. Said needed magic. (truth is, they have no PRESS shim blocks to fit my Suzuki bearing carrier and would bend it , if they tried. or are just lazy ,whateva)
The 3rd guy removed the bearing 1 atom at a time (LOL) for $25 (I had parts in hand ) ( The shop was over 50 years old and very skilled old guy there did this... my age)
In effect, the bearing was removed (it had overheated) just like the retainer collar is removed, Grind the slot, and cold chistle it to crack it just like the above FSM pages show. exactly. What damage you find is by FATE.
If confused? ask your machine shop what they think, and how to correct damage.
At step 14 is the best time for new studs if yours are missing or broken as many are.
The new bearing has it's seal on outboard side. (some
See Red comments on this PAGE. (PDF)
ABS?
Great way to remove Tone ring! FSM says cut it off. No, see video , press it off.
The bearing must be greased with top quality grease. The top bearings come greased with special grease that don't sag out or puddle.
LG5 never ever lubes this bearing so be careful in any grease selections.
Photo 1: The drum pull trick. and 2 spare screws here , turn them CW evenly and the drum pops off alxe flange. (pre 92 drums there are 4 fange bolts to remove here.) 2004 car. next 7 photos, others are 1996
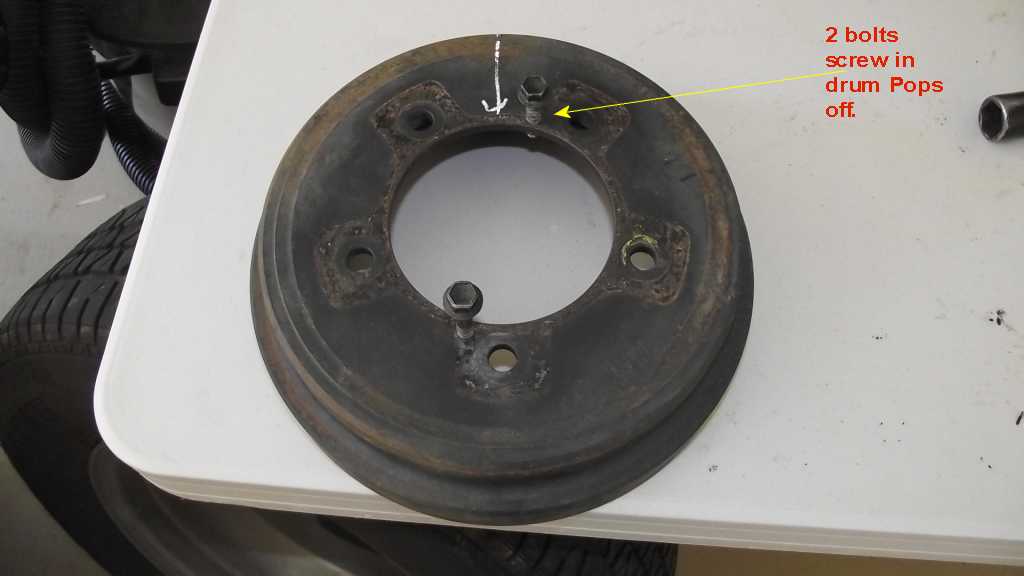
Photo 2: You can see the side gears inside, amazing , no? The below photo is axle out, and shows brake parts clearly, for later.

Photo 3: 12mm spanner. below.
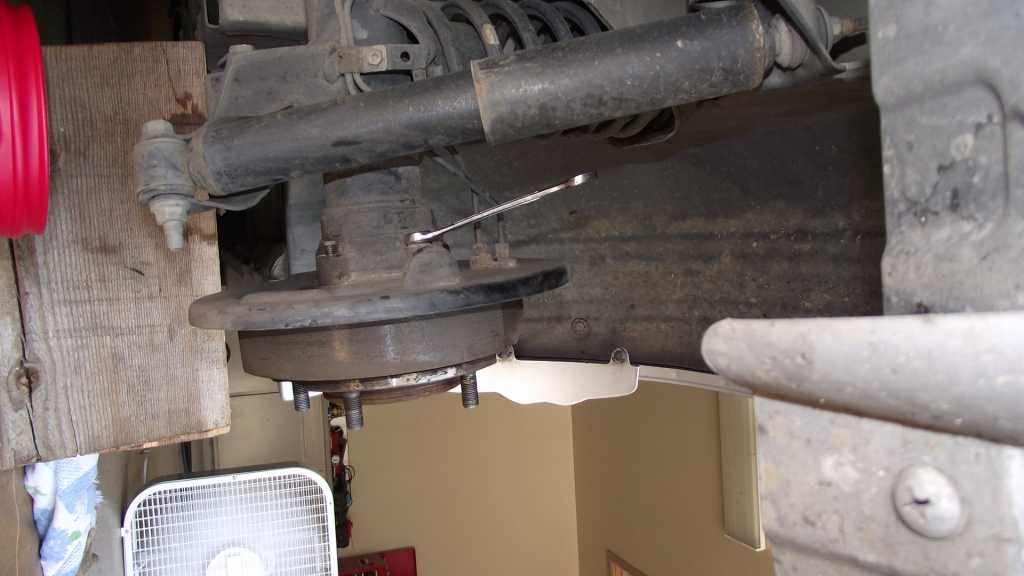
Photo 4 USE the Slide or Slam hammer. (is next after the 4 NUTs above are removed)
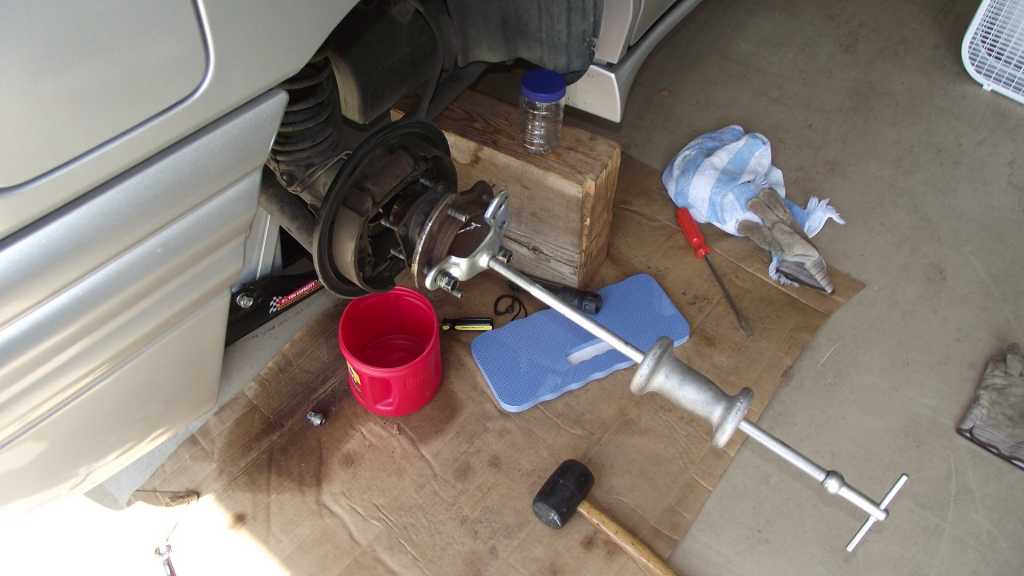
Photo 5: I Slam the hammer gently, as to not hurt studs or brake parts.. Note triple jack protection. ! (safe around kids and pets)
Some folks tie chains to the studs, and yank them (snow chains) Finding a slam hammer that fits is PITA. (had to grind my slam hammer flange to fit) Only the 4 nuts/studs seen, hold this axle on car.

Photo 6: This bearing is WRECKED. (loose, rattly and rough spun ,fails all checks) And Naturally since the bearing is bad so is the seal (beat to death it was)

Photo 7: I put 2 spare bolts added below, so my backing plate don't float around. (just a precaution, not necessary) But will allow you to keep the brake cylinder in place and lines not removed, or leaking.

The seal ready to go in with tool., note spring side if seal goes INBOARD ! grease it ! ON inside and lip.
My 1996 Sidekick has an internal housing seal, and one on the outer brearing seal.
The machine shop, cut the axle bearing collar , then pressed off the bearing , and replace my seal there and put back a new bearing with seal and new collar. (this cant be done at home, unless extreme rednecks comes in play (hammers /grinders etc)
Photo's , red arrows are seal, 1992 to 1998 car. and all are similar...
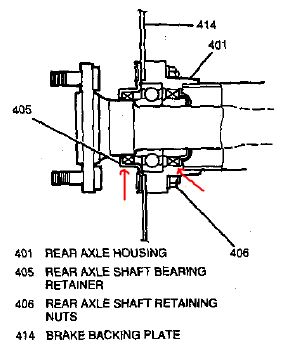

Finding an outer seal takes a silly trip to the OEM Suzuki or GM. Dang! But found one after long hours searching. (Look on Rockauto.com first to see who makes them and p/n , then use this info, to find them locally... ) < 2004 example. (rock had no outer seal for my 04)
The odd thing was the newer the car, the harder it was to find a seal... very odd.
rev2 ++++ 4-09-2011