All Torque's here, are for 96 , 1.6L SOHC 16valve motor;
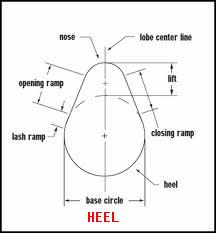
See Cam below?, set the lash on the heels , never on the lobe sides. (the rockers are missing for clarity!)
The heel is perfect simi circle and lash does not vary here. (cam not wrecked, sure)

Assumptions:
You already know how to use a feeler gage.
The distributor "disty" is timing correctly (rotor at 1pm per FSM at TDC)
The cam key is not sheared or some previous owner(evil) didn't time the cam using the "I" slot. DO NOT USE "I" marks or SLOTS ! Timing the CAM.
The crank key is not sheared. (hidden under the crank cog is damage?, LOOK !) No body reads 1996 published TSB's , seems so.
The Timing belt is timed exactly , not slipped.
If any of the above are wrong, stop and correct that now.
Rules: CW = Clock wise, CCW = Counter clockwise (facing rear of car)
- Never turn the engine over with wrench using just the cam bolt.
- Number 1 cylinder is the front cylinder.
- Always spin crank cog , CW, less you risk getting
the crank 17mm bolt loose.
- If you find the lash changing during a validation of
lash , you have set the valves , not on the heels or, a serious
mechanical failure is here.
- In each step you must tighten the cam rocker set screw jam nuts, to factory spec. "Cam valve lash lock nuts..... 11 to 13.5 ft/lbs or 132 inch/lbs"
- You dont need special tools, all tools mentioned here are to explain the tools shown in the FSM, I ignore them.
- Do not rely on the Disty rotor location or HV wire rounting, for this procedure.
(or risk FAILURE
and burned valves)
- The FSM uses the assumption, that all things are perfect, sure in a factory , perfect happens, but in a real world, NO!
The Lash can be set using 4 different procedures, called ways, and way4 works even if the cam is timed wrong !
The Best WAY is that way that never burns up the valves. The be, the lobes way.
Way1: The 2 stops way. The FACTORY FSM way. (cam not timed right is failure here) This is the fastest way , per FSM.
The Suzuki factory FSM way with just 2 crank turns ( fails if cam is not timed correctly) See full Factory way 1, here
Way 2: The 4 stops way( the crank fires every 180 degrees of rotation, 1,3,4,2 )
(cam not timed right is failure here, same for crank key, same with the infamous crank pulley internal rubber has failed and is loose)
Cam Cog not exposed. (cover on Tbelt not removed) I'm trusting all keyways in the engine, here.
The 4 stop way, I first put a chock mark on #1 crank pulley edge "V" mark, then put 1 more mark at 180 Degrees (1/2 turn around) on the same pulley crank. (about)
The #1 mark is for #1 firing and #2, the rockers are on the cam heels if #4 is on heels, now, I then t rotate the crank 360degrees and now #1 is firing. (#1 rockers on cam heels)
We set lash for Each cyclinder in this order, 1, 3, 4 ,2 (ignoring the distributor , totally)
Turn the crank only Clockwise.
#1 crank 'v' mark at TDC 0, cams on heels #1 , set lash on #1
Rotate crank 180 degrees CW set #3 lash.
Rotate crank 180 degrees CW set #4 lash.
Rotate crank 180 degrees CW set #2 lash.
your are done.
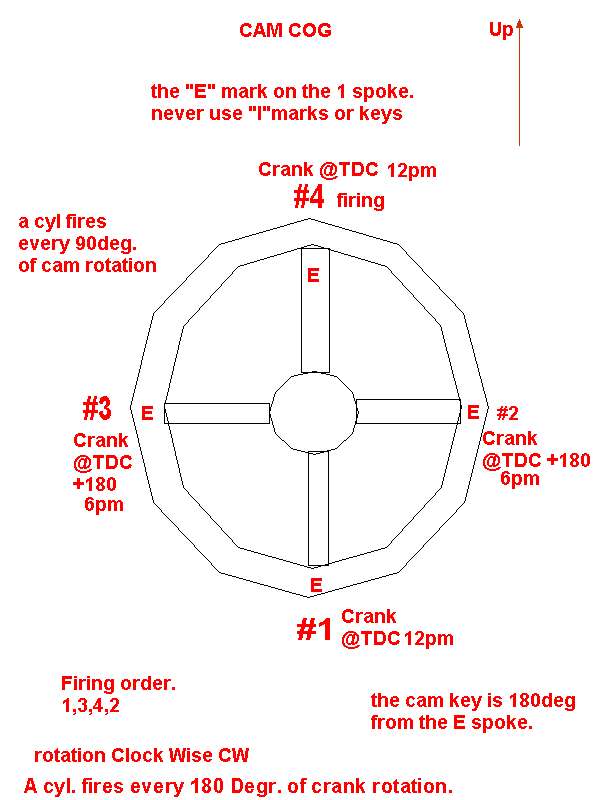
Way 3: (if the cam key (slot E) is sheared, this fails too. but the crank key can be sheared and lash will be good ! and the crank pulley rubber bad)
The CAM COG wheel must be exposed, if not skip this way3.
The cam fires every 90 degree's.
This way 3 is the same as #2 , but this time all we do is Gander at the "E" SPOKE MARK, on the front of the CAM COG wheel.
This can be done in Any order at any time, any valve, suspected.
- Set #1 rocker valve lash with E Mark at 6pm (I
look at the cam lobes and see they are on the heels, if not , the cam
key is sheared or indexed wrong)
- Set #3 rocker valve lash with E Mark at 9PM
- Set #4 rocker valve lash witih E Amark at 12pm.
- and last set #2 rocker valve lash with the E mark at 3PM
Set the lash on the cam heels and never ever be wrong.
Click photo to ZOOM.
Way 4 , (LOBE HEELS WAY ONLY) This is the only way that is 100 % failure free, for LASH ONLY.
This way is , just rolling the crank CW , and you, watching the lobes and when the lobes are on the heels? , then set the lash,
This is the no books, no tricks, no cheating way, it is taught in all ASE classes, for checking cam timing or lash on any 4cycle otto cycle engine.
All you need is a feeler guage, and eyeballs on the cam lobes, to do the job.
Why do this?, if you have issues with the motor, doing this way, prevents valve burn up, no matter what is wrong with keys and rubber crank vulcanization. You can do this , then conscentrate on timing, bad keys and what not and get compression over 170psi.
Suzuki WAY 1 Assumptions:
You read the instructions on how to use a feeler gage.
and:
You know how to set lash with a feeler gauge and can remove and replace the valve cover gasket ( with a new gasket)
You checked the crank bolt , for 94 ft/lbs of torque (CW facing pulley) because they all seem to be falling off. (TSB) Horror
If you've never set the valve lash before, then Google " setting valve lash", this is common information. The below is unique to this motor.
The FSM shows using a special feeler gauge, to set lash , no you don't need that, just use the cam to rocker juncture to set lash. and avoid this tight valve tip , area totally.
Do not try to put a feeler in lifter gap just below. See the 2 red arrows in the below head photo? see lash THERE. x16
 Hard
to set gap. click to zoom.
Hard
to set gap. click to zoom.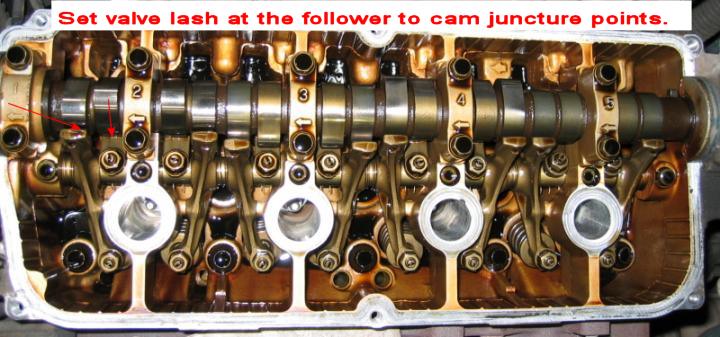
See Targets of Opportunity.
Pre-staging:
Pull off the main induction tube, 4 hose clamps and 3x , 12mm headed bolts. and the Induction tube mount bracket.(3 more bolts)
After pulling (twist first) the spark wire boots out of the wells , I always blow out the pits (wells) with shop air, I just hate sand in side a motor.
If the wells are full of water , then consider stopping the use of the pressure washer. If full of oil the gasket is no good. You have a new one.
Remove the 2 water tubes to the induction heater pipe (plug them) and remove PCV and 1 breather hose from the same pipe, tie them back.
I leave the throttle cable attached, but that is your call.
Pull the Valve cover , there is pry point at the top right corner of the cover (below, at the gasket juncture)
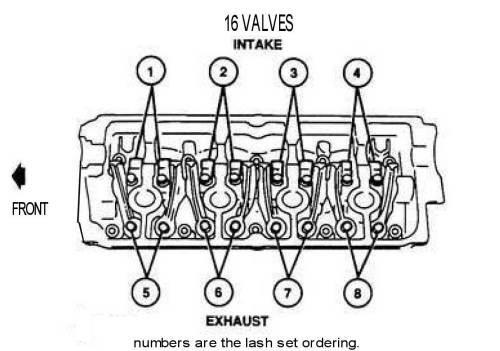
Key points are, that you set the lash in groups. 1,2,5,7 is the first group (Drawing #1 below) , be sure you are at TDC 0 degr. and that valves at Intake group 1 are loose.
In fact all valves at #1 cylinder (front) are loose now. And must be so.
If valve group 1 is not loose, rotate the crank CW , 360 degress and it will now be loose.
If not loose now ( the lash) then something bad is wrong. ( Timing belt slipped. Cam wheel cog key sheared? , etc?)
The Procedure: WAY 1, the factory way. Most Torque spec.'s are here.
- Gain access to viewing and touching, the distributor and
valves. ( I recommend
timing the distributor now, if this has not been done yet)
- Find your crank shaft timing marks and mark them with white
paint,on front cover on
newer cars.
- Get a new valve cover gasket , because we never reuse
gaskets, (FelPro has a nice set) The old ones will be hard and
cracked, I bet.
- Remove the spark plug wires from the spark plug tips, mark
them so you know where they go back. (can't be mixed) Twist
them first do not just yank them.
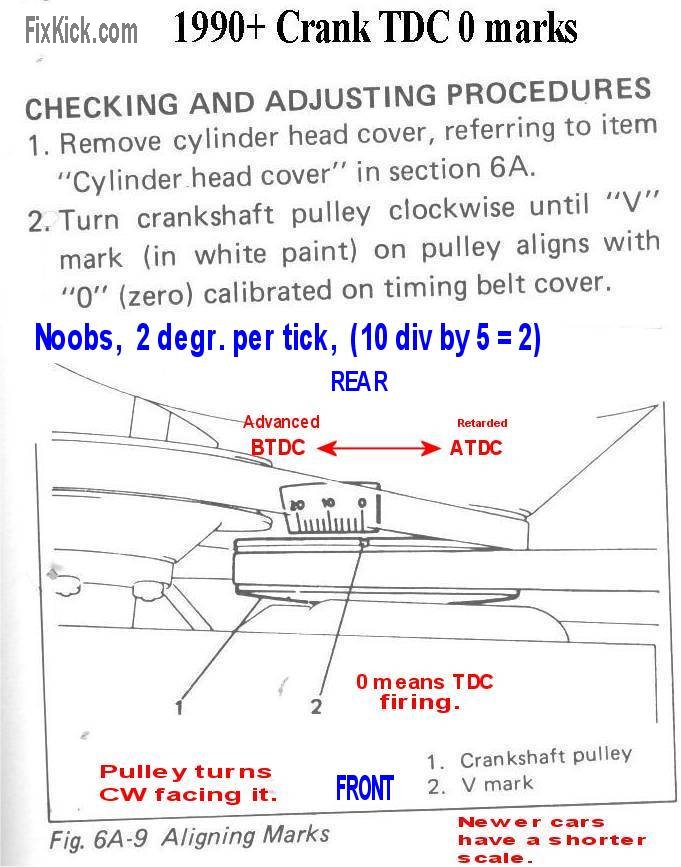
- With 17mm wrench turn the crank shaft big end (front) bolt
Clock wise , until the Timing mark on the pulley (notch) aligns
perfectly with the timing scale molded into the front timing belt
cover. 10 |||||5 |||| 0
<<< something
like this. set it to 0 degrees.Align it to 0 DEGREES
- Remove distributor cap , mine has 2 screws. Mark #1 spark plug wire on cap with white paint or tape. Also mark the Distributor base for #1.
- I never look at the Disty, when doing lash, I only look at Crank TDC , Cam marks and the cam lobe positions, with a careful eye. I find #1 firing and jump to step 13
- FSM states, Look at the rotor, is the rotor at 1 pm ? (I
never do this) , see note 1 for
corrections)
- If the distributor was timed wrong or to different posts,
then either correct that, or see my alternate settings Note 1, and jump to step 12 when ready.
- If not at 1pm (or not at TDC 0 #1 firing) then rotate crankshaft CW ! 360 degrees ( 1 full turn on crank) and aligned again to 0 degrees.
- Is the Distributor rotor at 1 pm. NO? then someone set it
wrong. You have 2 choices now ,
time it correctly or just mark the rotor to the body with paint.
- Alternately to steps 6-10 above ,just find the loose valves
, on #1 cylinder or #4 , if #4 is loose then turn crank 360deg
more CW. (1 more turn). Now #1 is loose.
- You now think you are at TDC 0 #1 firing , you now need to
check that the valves are
both closed at the front #1 cylinder pair. Intake and exhausts
valves #1 must be on the back side of the cam lobes and lash must
be loose. If this isWRONG, then the cam timing is
wrong. You may need to loosen the valve adjusters on #1 if they
were too tight,
- We are now sure that
all
#1 valves are
closed fully on top of compression stroke ? firing ?, then
proceed. Just look at the cam or watch its action.
- Note the Distributor can be timed in 4 positions, and
doing so,
is really bad practice , even though it runs, just feel sorry for the
next poor guy, trying to sort this, deviance. If you find any issues
here , then re-time the cam and then re- time the Distributor, then
last
set
the lash.
- The cam must be timed correctly before doing the Valve Lash. ( timing the Distributor can be done later if you follow note 1 rules)
Drawing #1:
(this way is the Suzuki FSM 2 crank position way) you don't need to do it this way , you can just walk the crank and cam 1,3,4,2 and set valves "old school")
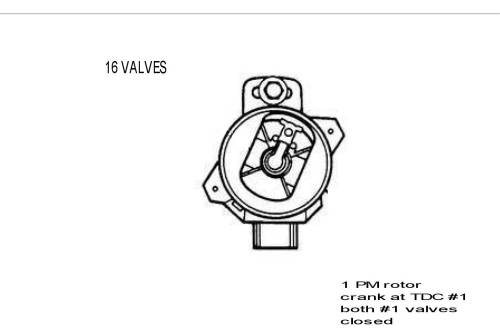 Rotor
at 1PM !
Rotor
at 1PM !- Next, adjust all valves marked, valves with a feeler gauge.
(doing the first 4 groups, see them?) I use the "Go , NO
method", .008 don't fit and if .005 don't it needs
adjusting, and only checking on the back sides of the rockers at the
cam lob junctures, only !
- Adjust valves groups (sets) 1, 2, 5, 7 (not cylinder numbers,but group numbers) See lash tables at end of document.
- Set the lash on each set 1 at time and do not touch the
others
yet, just set only 1, 2, 5, 7 (this are set numbers , NOT
cylinders)
- We are done with those 4 sets , now rotate the Crankshaft
360
degrees CW and stop at TDC 0 again. (CW = Clock Wise) #4 is
firing and loose.
- Adjust the valve lashes for 3, 4, 6, 8 and tighten all lash nuts, to 133 to 168 inch /lbs. ( each valve lock nuts is tightened as you finish each)
- Do not go back and re-touch the other valves , unless you
rotate the crank , 360 degrees again. (avoid CCW rotations)
- This process is just 2 steps, at two TDC 0 deg. locations
on the crank. #1 firing and loose valves then #4 firing and loose
valves.
- The first step is really TDC #1 firing (set 1, 2, 5, 7) and the second is TDC #4. firing (set 3, 4, 6, 8) FYI !
- You are done, all rocker jam nuts are at 13 FT/lbs (
or 155 inch/lbs, max) be sure lash didn't change after Jamming the
nuts.! < experience talking......
- Reverse the procedures above , gaining access to the
valves. Cover , brackets, Induction tubes.
On my 96 Kick, I set the lash to .006 on all valves. (middle of spec. range) ( if checking, last I use Go, NOGO method)
The last bit of information needed , is the lash spec.s and the valve cover torque , below for your year.
Valve Cover bolt torque is low as, 36 inch/lbs or 3 foot/lbs ( on some years)
My 96 FSM shows contradictory data, 89 in/lbs on one page and 44lb/inches on page 6a1-61.
( My 95 FSMTracker) show as high as 89 inch/lbs , on page 6a2-77)
I use 44 inch lbs max. for my 96, as stated in my 96 FSM.
Careful here, on VC bolts (8mm head) times 6, use as little toque as possible and make it firm. Never use a Ft/Lb torque wrench at 3 Ft/lbs , use an inch/pound wrench!
The VC bottoms out in the 4 corners and so over tightening will never stop any leak. Forget that idea, please look at the corners, and see the stops?
Go easy with these tiny screws on the VC.
The LASH data: Just set the cold lash and be happy.
1992-95 16v: data; (Source 1995 ,Tracker 16v FSM pg. 6A2-12)
------------------------------------
When cold - Coolant 59-77 degrees F.:
Intake: .005 to .007
Exhaust: (same as intake above)
When hot - Coolant 140-154 degrees F.:
Intake: , .007 to .008)
Exhaust: (same as intake above)
------------------------------------
1996 to 1998: 16v (source, 1996 Tracker FSM)
same temp as above.
cold
intake .005-.007
exhaust.005-.007
hot
intake .007 -.008
exhaust .007 to .008
1.8L Suzuki Sidekick SPORT DOHC engine, cars have hydraulic valve lifters, and this page does not apply.
TDC ? what is TDC Top Dead Center firing?; ( How to get to TDC 0 deg. #1 cylinder firing )
How to find TDC if lost, here are all the ways.
rev. 5 , more simple but still 4 ways. 6-1-2013