
For CV service the below inside out way, for outside to inside way of CV service see here.
Below the guy had bad pan gasket and some folks needed to replace main PIG seals (3rd member) so did all that and new CVs and or boots.
Parts: 1 Felpro pan gasket 89-95 , or RTV for 96 and newer ( the gasket will cause any 96+ to fail the CKP sensor , use RTV only on these cars)
1. Jack up front of vehicle and place on jack stands. Set parking brake, block rear wheels. Remove front wheels for better access.
2. Drain the engine oil. You'll be removing the oil pan, so this fundamental.
3. Drain the oil from the front differential - will prevent huge smelly spills later.
4. Remove drivers side stub axle by removing 3 bolts. (Index the axle stub so that it can be replaced in proper location).
5. Drop front drive-shaft by removing the four bolts that attach the shaft to the front diff. (Index the drive shaft so it can be replaced in the same locaton). (Do not pull front prop shaft or transfer case lube, will empty to floor)
6. Remove the center diff mount by removing the two bolts holding the mount to the center cross brace.
7. Place a floor jack under the front diff and lift it just enough to take the stress off the mounts.
8. Remove 4 bolts that serve as mounts for drivers side of diff.
9. Remove 3 bolts that serve as mounts for passenger side of diff.
10. Lower floor jack and slide diff forward and towards drivers side, sliding passenger side axle stub out of the diff.
11. Remove the vent tube front the top of the diff.
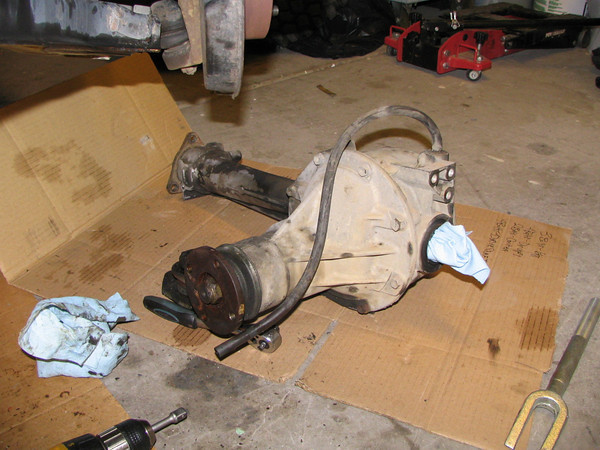
12. Remove the diff and set aside. Stuff clean rags into open end of diff to prevent dirt or debris from entering hole for stub axle.
13. Remove the trans cover plate, held on with two 6mm bolts, one on either side (10mm socket fits nicely).
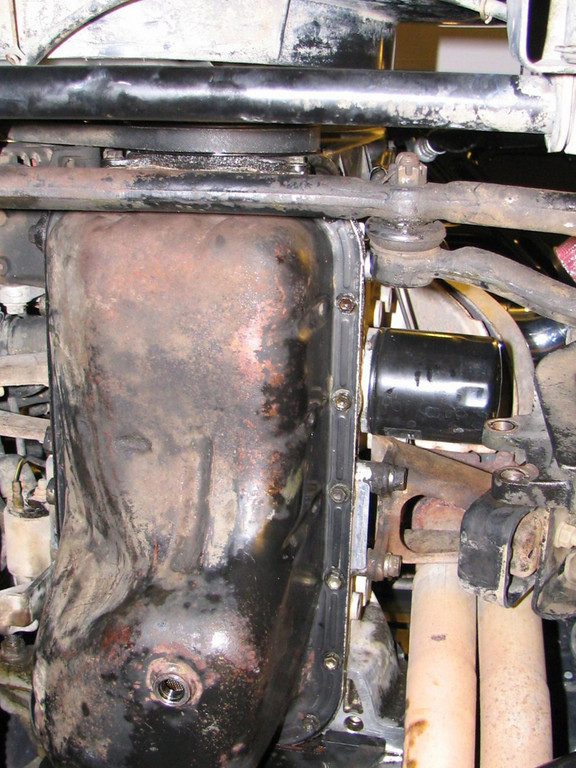
14. Remove the bolts the hold the oil pan to the cylinder block. There are also two nuts on the front corners of the oil pan, remove these as well. (6mm bolts with 10mm heads)
15. The oil pan can be removed with oil pickup tube still in place, or you can remove the two bolts that hold the pickup tube to the block.
16. Clean the gasket surface on the oil pan and cylinder block. I used a single edge razor and scraped both surfaces until very clean. Be careful not to get any dirt, or contamination into the bottom of engine -that could lead to failure of the crank or rod bearings.
17. Install the new pan gasket. (I used a Felpro OS30594C and Permatex #2 non hardening gasket compound.)
18. Refit the oil pan onto the cylinder block. I slid the oil pan up over the cross brace and then bolted the oil pickup tube onto the cylinder block, then aligned the pan and bolted it back onto the block. A bit tedious but not terribly difficult.
19. Refill the engine with oil and check for leaks.
20. Reinstall the front diff. I had to remove the center diff mount for clearance, then I was able to muscle it up and in, single handed using the floor jack. Inserted the passenger side stub axle. Then aligned the center mount (2 bolts), then the passenger side bolts (3 bolts), and the drivers side bolts (4 bolts).
21. Reinstall the drive shaft (4 bolts) and then the drivers side stub axle (3 bolts).
22. Refit the vent tube onto the top of the diff. Upper end of vent hose is held by clip next to intake/throttle body.
23. Refill the front diff. I used Mobil 1, synthetic gear oil.
24. Check all torque specs on diff mounts, drive shaft, and stub axle.
25. Reinstall the front wheels/tires and then lower the truck off the jack stands.
26. Take for test drive, and recheck for leaks, loose fasteners, missing tools.


The goal below has been reached.

PS:
there are rumors of dropping only left side of axle and fiddling pan out ( been done but is very hard and my be a zero sum gain)
and the jacking up of motor, , mounts removed, and distributor removed. HERE is my rumor source.
But the above 26 steps is the factory way.
By: MARK B. NV , and HTML creation by me.
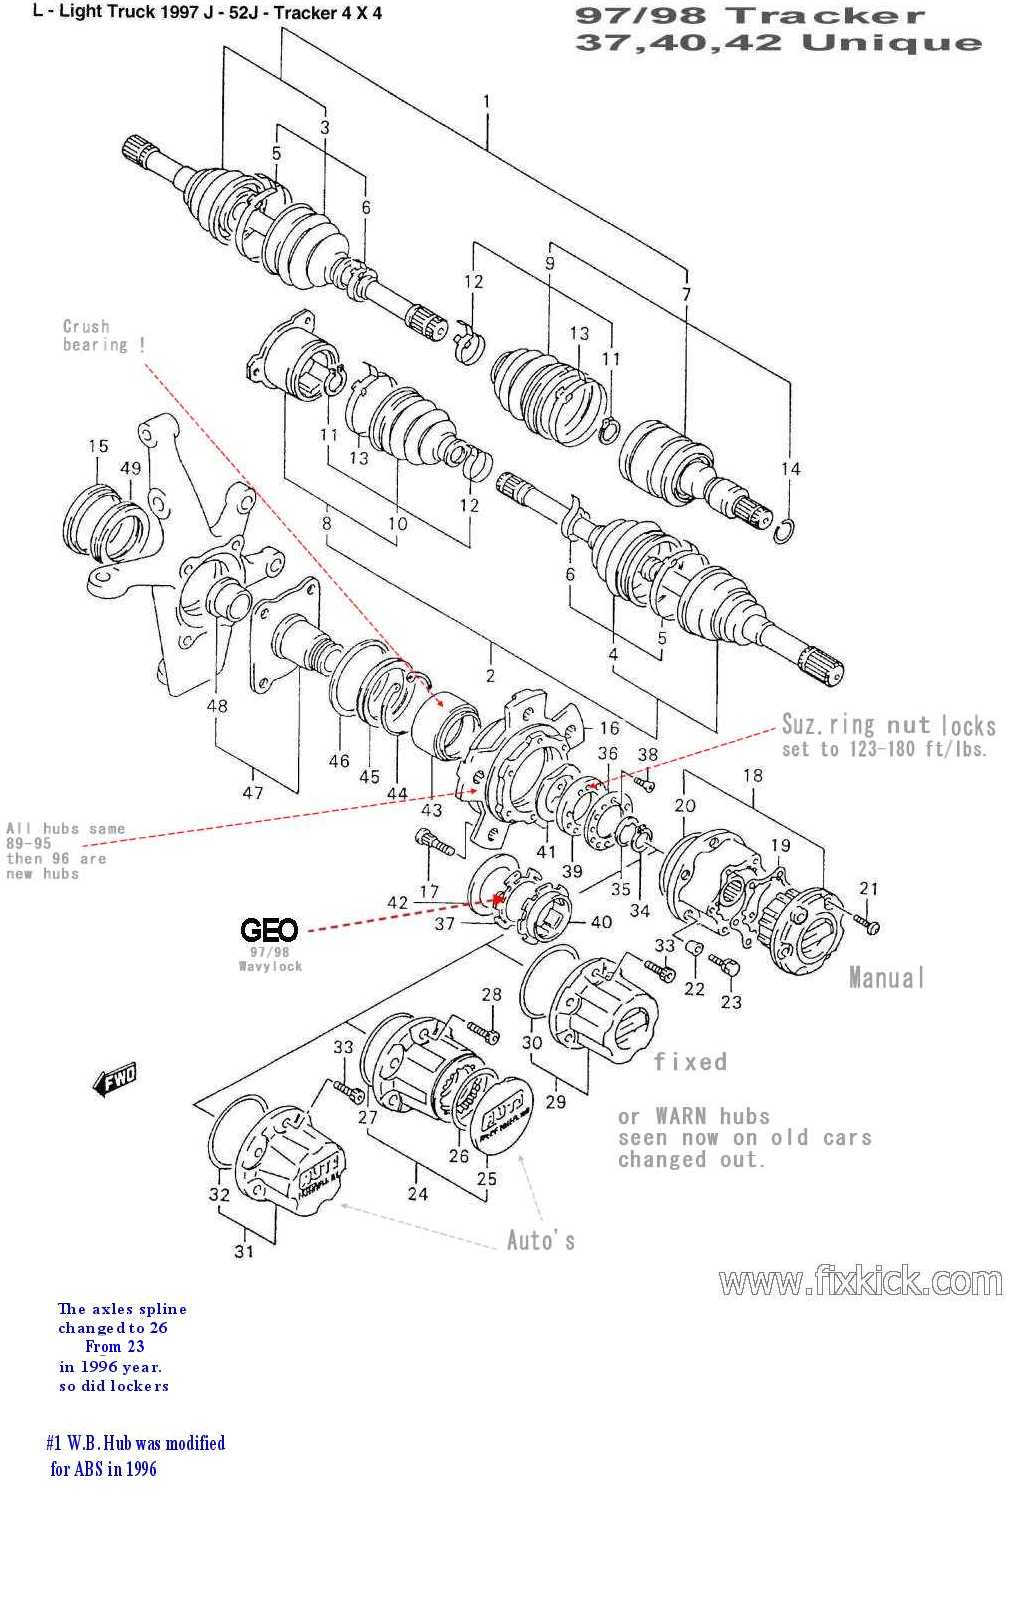
CV service from Outside to inside. CV is short for , Constant Velocity joints, on the 2 front axles. They don't jerk , like univeral joints do , in motion, see wiki for nice video on that topic.
1989-98 , not for newer.
Here is one way to get to them. from inside out, unlike the above.
See above frame.
Which way depends on goals and tools.?
Doing a CV page from scratch, is not easy, all the steps, and full inpections.
The section in the fsm cover this. section 4c , pdf page 14 step 1. Do not skip the warnings here , are unique and not related to other cars,,,,,
http://www.acksfaq.com/96-FSM-v1-4c-pdf.htm
There are better pages... (I dont cover this because I'd never beat the best)
Best cv forum. vast content here, near endless.....
http://bbs.zuwharrie.com/content/topic,1...msg1156298
Best for CV out of car.
http://www.acksfaq.com/cvhalfshaft.htm
This graphic show that illusive outboard snap, id 34, and some Geo deviants. Ive see many kicks missing snap ring 34.
rev 3 ++++ 8-23-2010 , and 9-11-2013